Timer Operation Of Blinds - Part 2: Controls & LCD Display

PLEASE NOTE: These instructions are for our G series motor timers, part number MCGT-1W-RF (1 ch) and MCGT-5W-RF (5 ch).
In part 1 of the blind motor timer instructions we discussed how the MCGT-1W-RF wireless wall mounted timer can be used to activate our radio equipped blind and shade motors using RF (Radio Frequency).
In part 2, we will become familiar with the layout of the controls and features of the display.
At this point the battery should have been inserted into the battery compartment, which will power up the timer unit.
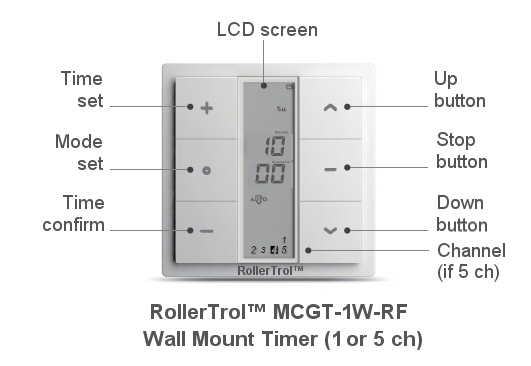
You should see some characters on the LCD display, as shown in the picture on the right (the actual characters may be slightly different).
1. Blind Motor Timer: Details of the LCD Display
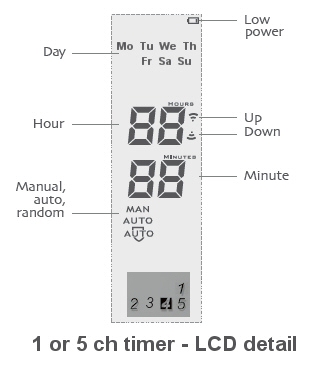
The close-up of the timer LCD display is shown at left. Starting at the top, these are the features:
- low battery warning indicator only appears if the internal button battery is getting low. The event memory settings will be retained when you change the battery, if you change the battery within 1 minute and do not touch the metal clip on the battery holder.
- The day of the week is shown in 1 of the 7 blocks allocated for this purpose.
- The label HOURS (and MINUTES) flash once per second in normal operating mode.
- The hours character display reads from 00 to 23 (24 hr clock).
- The minutes character display reads from 00 to 59.
- The Up and DOWN symbols show motor direction (both visible if stopped).
- The operational mode display reads Manual, Auto, or Auto (random), depending on selection.
- The channel display only appears on 5 channel timers.

2. Blind Motor Timer: Setting the Mode of Operation
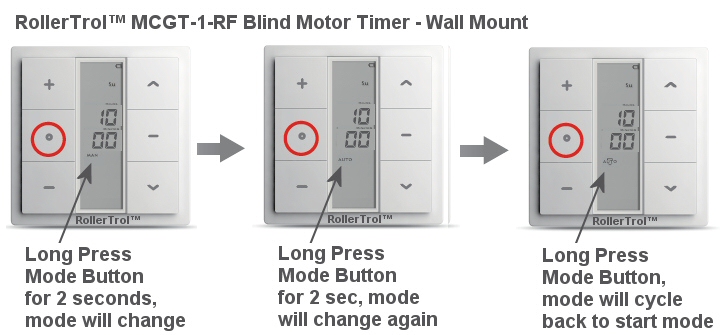
The timer has 3 modes of operation, adjusted by a 'long press' (longer than 2 seconds) of the mode button (circled in red):

- Manual (MAN on display). This mode acts like a regular wall switch.
- Automatic (AUTO on display). This mode will activate shade motors according to programmed times.
- Automatic Random (AUTO with graphic on display). This mode activates blind motors according to programmed time events, adjusting the time by a random amount.
In the Automatic Random mode it will activate blind motors according to the programmed time events, but it will adjust the activation time by somewhere between 15 minutes before or after the actual programmed time.
3. Blind Motor Timer: Setting the Clock
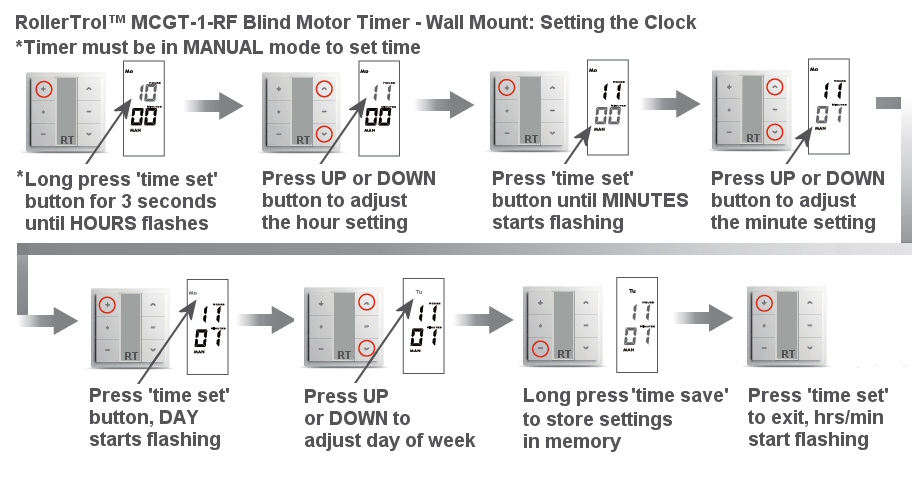
Please place the timer in MANUAL mode before attempting to set the time with the following instructions; in the picture below, the red circle on the button indicates which one is used in each step:

Here are the detailed instructions:
- The first step for setting the clock is to make sure it is in MANUAL mode, as per the settings in step 2 above.
- To enter the clock setting mode, hold the setting button down for 3 seconds (aka long press), until the HOURS display starts flashing, then adjust it to the current time.
- Press the 'time set' button to cause the MINUTES to flash, then adjust to current time.
- Press the 'time set' button again to cause the DAY of week display to flash, then adjust to the day.
- Long Press the 'time save' button to store the time setting in memory. It will flash the entire display 3 times, then stop.
- Press the 'time set' button to exit the setting mode. The small HOURS and MINUTES labels will flash once per second, indicating normal operation mode.
This completes the time setting procedure; the next article (part 3) will discuss assigning a motor to the timer.
PART 1: Timer for blinds - Removing the Cover, Inserting Battery
PART 2: Timer for blinds - Controls and Layout (YOU ARE HERE)
PART 3: Timer for blinds - Linking to a Radio Motor
PART 4: Timer for blinds - Creating Timer Events
We sincerely hope you enjoy using these advanced motors; if you have any questions, please feel free to contact us at any time!

 Shopping Cart Home - Start Here
 Remote Controls for Radio Equipped Motors
 DIY Starter Kits for Window Shades
 DIY Starter Kits for Window Openers
 ZWAVE Blind & Shade Controllers
 How To Choose the Right Blind & Shade Motor
 Select tubular Motor (Comparison table)
 Choose RollerTrol Battery & Solar Motors
 DIY Roller Blind Motors - FAQ
 How To Insert Blind Motors & Attach Brackets
 Calculate your Blind or Shade fabric Weight
 Select Tube Size for Blind Motor
 How to Insert Blind Motors Into Tube
 How to Insert Blind Motors Into Tube with Adapters
 Attach Mounting Brackets - Standard + Mini Series
 Attach Mounting Brackets - MAXI Blind Series
 How To Set Up Radio Equipped Blind & Shade Motors
 Series P Radio Remote Control Motors
 Series G Radio Remote Control Motors
 Series R Radio Remote Control Motors
 BroadLink RF/IR Hub System for Motors
 How To Set Up Window/Skylight Openers
 Introduction: Window & Skylight (K Series)
 BroadLink RF/IR Hub System for Motors
 Z-Wave Interfacing for Shade & Opener Motors
 Wired Wall Switch Control of Window Openers
 How To Use Alexa With Our Motors & Window Openers
 How To Use BroadLink Phone App Hub With Our Motors
 How To Set Up ShadeSlider Skylight or Bottom-Up Blind
 How To Retrofit RV, Boat and Motorhome Blinds
 How To Set Up Non-Radio Motors
 Operation & Travel Limits of Non-Radio Motors
 Make a Simple DC Motor Reversing Switch
 How To Set Up ZWAVE Control
 ZWAVE Controller for G Series Radio motors
 ZWAVE Door/Window Opening Detection
 ZWAVE Motion Detector with Temperature Sensing
 Motorized Window Blinds & Shades
 Motorized Dual Window Shade
 Make Motorized Blackout Blinds
 Phone-Tablet-PC Control for Motorized Blinds
 Mini Motor for Existing Shade Retrofit
 Roman Shade Retrofit
 Make a Motorized Window Opener
 Blind & Shade Motors for RV & Boats
 Make Your Own Projector Screen
 Curtain Closer: Ultimate Home Theater
 Wireless Battery Operated Drapery Motor Kit
 Make a Motorized Bottom-Up Shade
 Make a Motorized Skylight Opener
 BroadLink RF/IR Hub System for Motors
 Why Buy From US?
 Background & Mission Statement
 Customer DIY Testimonials
 Site Map - Search All Pages
 Why Buy From US?
 RollerTrol Users Forum
 Contact Page