FAQ: Can you show me how to install mounting brackets for my roller blinds?
Our standard series motors are designed to fit industry standard Rollease® style 1.5" tubing. In this article, we'll show you how to install the mounting brackets for the motors. You will need to allow 3/4" on each side of the tube for mounting bracket clearance.
If you are doing a retrofit, you would remove the clutch mechanism from one end, where you are going to insert the motor. You may also be able to use the existing idler mounting at the other end of the tube, or you may prefer to use the one supplied with the motor, as discussed below.
Note that the motors can be permanently programmed (with the remote) to operate normally in either direction, so you can choose whichever end you prefer (see blind and shade motor programming instructions).
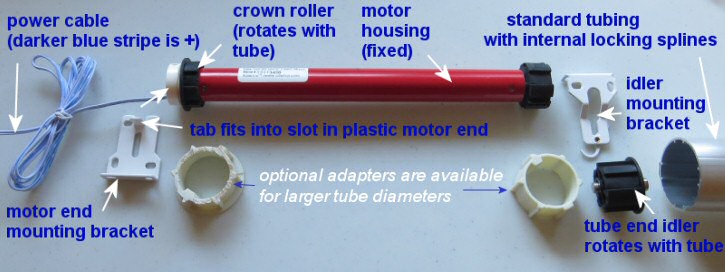
1. Overview of the parts:
Please Note: When you are setting up the positions for your mounting brackets, please consider what the full roll width will be, to ensure that your fabric does not scrape any window handles or other protrusions that could damage the fabric finish. When testing, please unroll the shade in incremental steps, checking carefully for any interaction between the fabric and the wall or window handles.
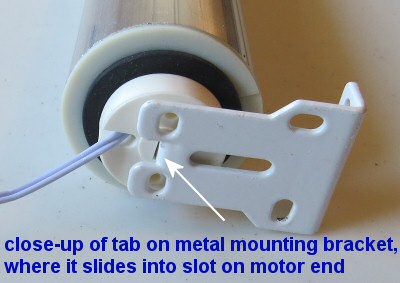
The motors just slide into the standard Rollease® style tubing, locked into place by the internal splines extruded into the tube. The cylindrical motor housing of the tubular motor remains stationary and is locked to the mounting bracket with a tab. Please notr that our battery and low-standby models have a star shaped hole, instead of a slot, and the tab on the bracket is larger.
If you are using your own tubes with a smooth inside surface (no locking splines), you can still lock the drive wheel adapter to the tube with a setscrew. This is not necessary if you have purchased our custom shades because the tubing does have the internal locking splines.
If you are interested in a custom shade package, please see our dedicated custom shade website here:
http://AutomaticBlindsAndShades.com
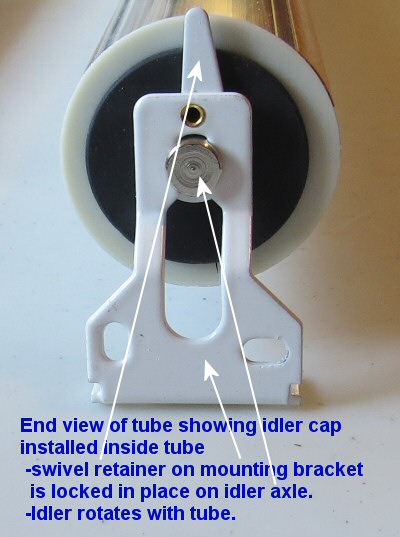
At the other end of the tube, a rubber idler wheel cap is inserted into the mounting bracket and held in place by a hinged locking clasp, then the assembled idler cap with bracket attached is inserted into the tube; the idler rotates freely with the tube (see pictures in sections 2 and 3 below).
The idler shaft has a cut-out channel machined into it that allows the idler wheel to slide into place on the bracket, and the mounting bracket for that end has a swivel clip that locks the axle for the idler into a slot on the bracket.

2. Tube end view showing tab detail where it locks into motor slot:

3. Tube end view showing idler locked into mounting bracket:

more information about DIY tubing and pipe for roller shades
Our "Mini" series fits existing retail blinds that have an inside roller diameter of around 3/4" (20mm) or more. Here is an article about retrofitting roller blinds from Home Depot with our Mini motors:
retrofit existing roller shades from Home Depot
We sincerely hope you enjoy using these advanced motors; if you have any questions, please feel free to contact us at any time!

 Shopping Cart Home - Start Here
 Remote Controls for Radio Equipped Motors
 DIY Starter Kits for Window Shades
 DIY Starter Kits for Window Openers
 ZWAVE Blind & Shade Controllers
 How To Choose the Right Blind & Shade Motor
 Select tubular Motor (Comparison table)
 Choose RollerTrol Battery & Solar Motors
 DIY Roller Blind Motors - FAQ
 How To Insert Blind Motors & Attach Brackets
 Calculate your Blind or Shade fabric Weight
 Select Tube Size for Blind Motor
 How to Insert Blind Motors Into Tube
 How to Insert Blind Motors Into Tube with Adapters
 Attach Mounting Brackets - Standard + Mini Series
 Attach Mounting Brackets - MAXI Blind Series
 How To Set Up Radio Equipped Blind & Shade Motors
 Series P Radio Remote Control Motors
 Series G Radio Remote Control Motors
 Series R Radio Remote Control Motors
 BroadLink RF/IR Hub System for Motors
 How To Set Up Window/Skylight Openers
 Introduction: Window & Skylight (K Series)
 BroadLink RF/IR Hub System for Motors
 Z-Wave Interfacing for Shade & Opener Motors
 Wired Wall Switch Control of Window Openers
 How To Use Alexa With Our Motors & Window Openers
 How To Use BroadLink Phone App Hub With Our Motors
 How To Set Up ShadeSlider Skylight or Bottom-Up Blind
 How To Retrofit RV, Boat and Motorhome Blinds
 How To Set Up Non-Radio Motors
 Operation & Travel Limits of Non-Radio Motors
 Make a Simple DC Motor Reversing Switch
 How To Set Up ZWAVE Control
 ZWAVE Controller for G Series Radio motors
 ZWAVE Door/Window Opening Detection
 ZWAVE Motion Detector with Temperature Sensing
 Motorized Window Blinds & Shades
 Motorized Dual Window Shade
 Make Motorized Blackout Blinds
 Phone-Tablet-PC Control for Motorized Blinds
 Mini Motor for Existing Shade Retrofit
 Roman Shade Retrofit
 Make a Motorized Window Opener
 Blind & Shade Motors for RV & Boats
 Make Your Own Projector Screen
 Curtain Closer: Ultimate Home Theater
 Wireless Battery Operated Drapery Motor Kit
 Make a Motorized Bottom-Up Shade
 Make a Motorized Skylight Opener
 BroadLink RF/IR Hub System for Motors
 Why Buy From US?
 Background & Mission Statement
 Customer DIY Testimonials
 Site Map - Search All Pages
 Why Buy From US?
 RollerTrol Users Forum
 Contact Page