 Here's a happy duo that will make your day!
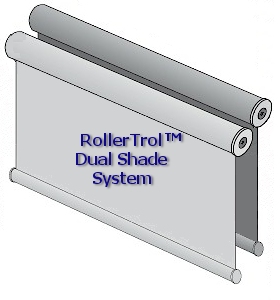
If you have enough room behind your window valance or fascia, you can mount 2 of our radio controlled motors and choose the type of shade to suit the time of day.
You can order our standard starter kits in our online store and add a second motor:
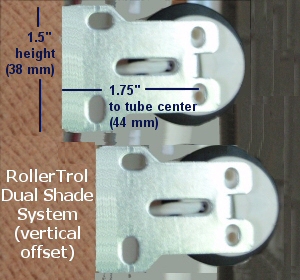
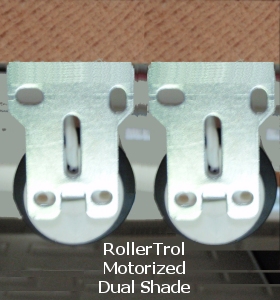
Our standard remote control motors require about 1.75" (44 mm) of horizontal space (1.5" OD tubing + 1/4" roll wrap), so you need less than 4 inches (100 mm) of frame depth to accommodate a dual roller system side by side. If you use the vertical offset roller arrangement, you can do it with a frame depth of less than 2.5" (64 mm)
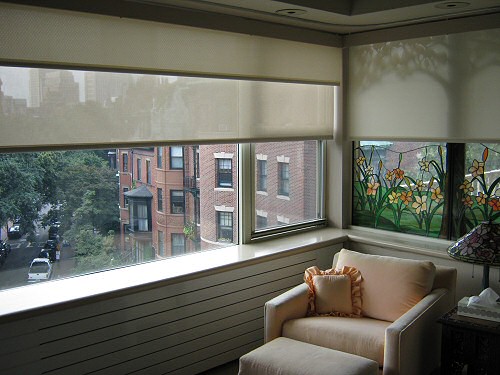
The picture at right is a very nice installation one of our customers did. Note how the first shade has a see-through quality, while the second shade makes it opaque. In this case, he used our standard (large) series because the tubing was big enough to accommodate the larger motors with a higher lift capacity.
The 18 mm mini motors require about 1.25" (32 mm) of horizontal space (1" OD tubing + 1/4" roll wrap space), so you need less than 3 inches (76 mm) of frame depth to accommodate a dual roller system side by side. If you use the vertical offset roller arrangement, you can do it with a frame depth of approximately 2" (50 mm).
This system makes it possible to deploy two different shade types, depending on conditions. If it's bright outside and you still want to see out, you could use some tinted solar film on one of the rollers.
If you have a home theater system and want blackout conditions, you could deploy opaque shade material.
If blackout blinds aren't to your liking, but you like privacy, you could use some translucent shade material, or semi-silvered solar film.
Our remote controlled tubular motors can be set for reverse operation so that you can organize the motorized shade roller positions however you like. The motors can be installed in either the left or the right side of the roller tube and each one can be programmed to go in the opposite direction when you hit the 'up' or 'down' switch on the remote.
You could easily set up a multiple window configuration where all the shades of one kind would retract simultaneously (going up), and all the shades of another kind could be deployed simultaneously (going down).
You would not have to wait until one type finished before you activate the other type; just a quick channel change on the multi-channel remote will do it.


Some typical dual shade arrangements are shown above (left to right): dual shades side by side, dual shades with vertical offset, dual shades with vertical opposed rollers, triple horizontal (go crazy with three shades!), 14 channel remote.

 Each blind can be assigned to a different channel, and you can 'group' the shade operation - if you have, say, 3 different windows, the first blind in each window can be assigned to one group, and the second shade of each window can be assigned to a different group.
So if you had, for instance, some tinted solar film material on your roller in each of 3 adjacent windows, you could make all three shades of that type deploy at once, on a single channel. So channel 1 might be solar film, channel 2 might be a blackout shade, and chanel 3 might be a translucent shade (on 3 different windows).
We have 1, 2, 5 and 15 channel remotes, so you can start small and expand your system later.
You can change the material to suit your needs, and you can use double sided tape or duct tape with a few wraps on it to fasten new material to the roller.
Buy our starter kits here:
Please note that we also have very affordable wireless sun sensor (or day/night) triggers, and wireless programmable timers.
We sincerely hope you enjoy using these advanced motors; if you have any questions, please feel free to contact us at any time!

 Shopping Cart Home - Start Here
 Remote Controls for Radio Equipped Motors
 DIY Starter Kits for Window Shades
 DIY Starter Kits for Window Openers
 ZWAVE Blind & Shade Controllers
 How To Choose the Right Blind & Shade Motor
 Select tubular Motor (Comparison table)
 Choose RollerTrol Battery & Solar Motors
 DIY Roller Blind Motors - FAQ
 How To Insert Blind Motors & Attach Brackets
 Calculate your Blind or Shade fabric Weight
 Select Tube Size for Blind Motor
 How to Insert Blind Motors Into Tube
 How to Insert Blind Motors Into Tube with Adapters
 Attach Mounting Brackets - Standard + Mini Series
 Attach Mounting Brackets - MAXI Blind Series
 How To Set Up Radio Equipped Blind & Shade Motors
 Series P Radio Remote Control Motors
 Series G Radio Remote Control Motors
 Series R Radio Remote Control Motors
 BroadLink RF/IR Hub System for Motors
 How To Set Up Window/Skylight Openers
 Introduction: Window & Skylight (K Series)
 BroadLink RF/IR Hub System for Motors
 Z-Wave Interfacing for Shade & Opener Motors
 Wired Wall Switch Control of Window Openers
 How To Use Alexa With Our Motors & Window Openers
 How To Use BroadLink Phone App Hub With Our Motors
 How To Set Up ShadeSlider Skylight or Bottom-Up Blind
 How To Retrofit RV, Boat and Motorhome Blinds
 How To Set Up Non-Radio Motors
 Operation & Travel Limits of Non-Radio Motors
 Make a Simple DC Motor Reversing Switch
 How To Set Up ZWAVE Control
 ZWAVE Controller for G Series Radio motors
 ZWAVE Door/Window Opening Detection
 ZWAVE Motion Detector with Temperature Sensing
 Motorized Window Blinds & Shades
 Motorized Dual Window Shade
 Make Motorized Blackout Blinds
 Phone-Tablet-PC Control for Motorized Blinds
 Mini Motor for Existing Shade Retrofit
 Roman Shade Retrofit
 Make a Motorized Window Opener
 Blind & Shade Motors for RV & Boats
 Make Your Own Projector Screen
 Curtain Closer: Ultimate Home Theater
 Wireless Battery Operated Drapery Motor Kit
 Make a Motorized Bottom-Up Shade
 Make a Motorized Skylight Opener
 BroadLink RF/IR Hub System for Motors
 Why Buy From US?
 Background & Mission Statement
 Customer DIY Testimonials
 Site Map - Search All Pages
 Why Buy From US?
 RollerTrol Users Forum
 Contact Page