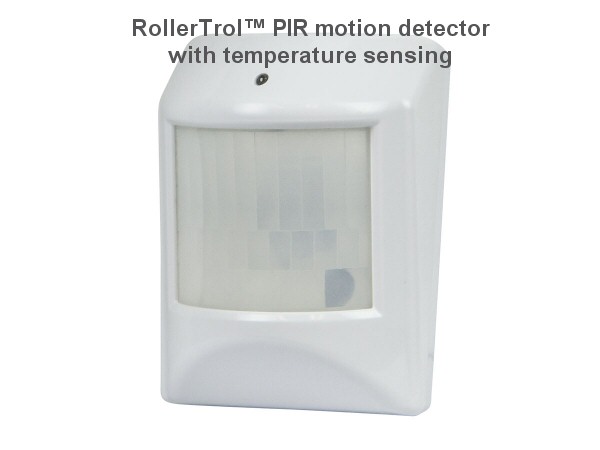
Z-Wave Motion Detector with Temperature Sensing
 The RollerTrol PIR-ZWAVE-MT motion detector senses movement using a passive infra-red (PIR) system and sends a Z-Wave signal when motion is detected within its sensitivity range.
It also has a separate temperature sensor that can be used with a ZIC to open/close windows or vents, and turn on heaters or fans.
This unit is a Z-Wave enabled device (interoperable, two-way RF mesh networking technology) and is fully compatible with any Z-Wave Interface Controller (ZIC), such as Vera®, Wink®, Homeseer®, SmartThings®, etc.
Every mains powered Z-Wave enabled device acts as a signal repeater. The use of multiple devices result in more possible transmission routes, which helps eliminate RF coverage dead areas.
Z-Wave enabled devices displaying the Z-Wave logo can be used together, regardless of the manufacturer.
OPERATION
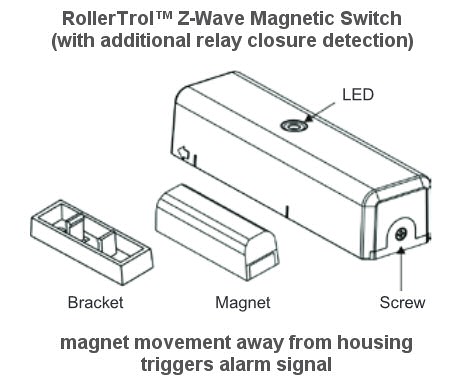
- Opening the door or window separates the magnet from the sensor body, which sends an "ON" status signal (Basic Set, Value OxFF) to any associated nodes. The LED flashes once when this occurs.
- Closing the door or window aligns the magnet and sensor, which sends an "OFF" status signal (Basic Set, Value OxOO) to any associated nodes. The LED flashes once when this occurs.
- The LED is off during normal operation.
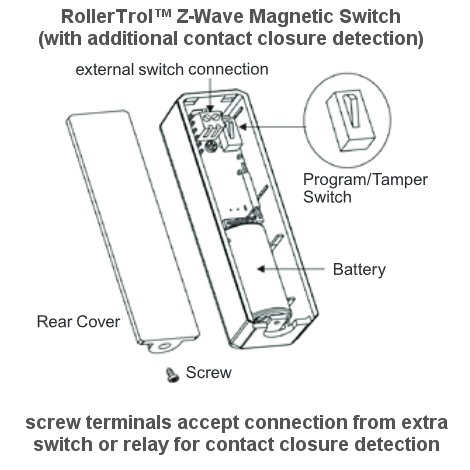
- The sensor is equipped with a tamper switch. When the rear cover is removed, the sensor sends an alarm status signal (type 01, level 11) to the ZIC. The LED will steadily glow and the sensor will be in "awake" mode until the cover is replaced.

SPECIFICATIONS
- PROTOCOL: Z-Wave (ZM31O2N)
- FREQUENCY: 908.42 MHz
- OPERATING RANGE: Up to 100 feet line of sight
- OPERATING TEMPERATURE: +5 - 14O°F (-15 - +60°C)
- BATTERY TYPE: Ix CR123A
PACKAGE CONTENTS
- Ix Door/window sensor
- Ix Magnet bracket
- Ix Magnet
- 2x Adhesive tape pads
- Ix CR123A battery
- 4x Mounting screws
This unit can be purchased in the Z-Wave SENSOR section of our online store.
INSTALLATION
Notice: If you are installing an entire Z-Wave system for the first time, please refer to the installation guide for the Z-Wave Interface Controller before installing this sensor.
- Remove the screw that holds the rear cover of the sensor in place.
- Slide the rear cover down and remove it from the sensor body.
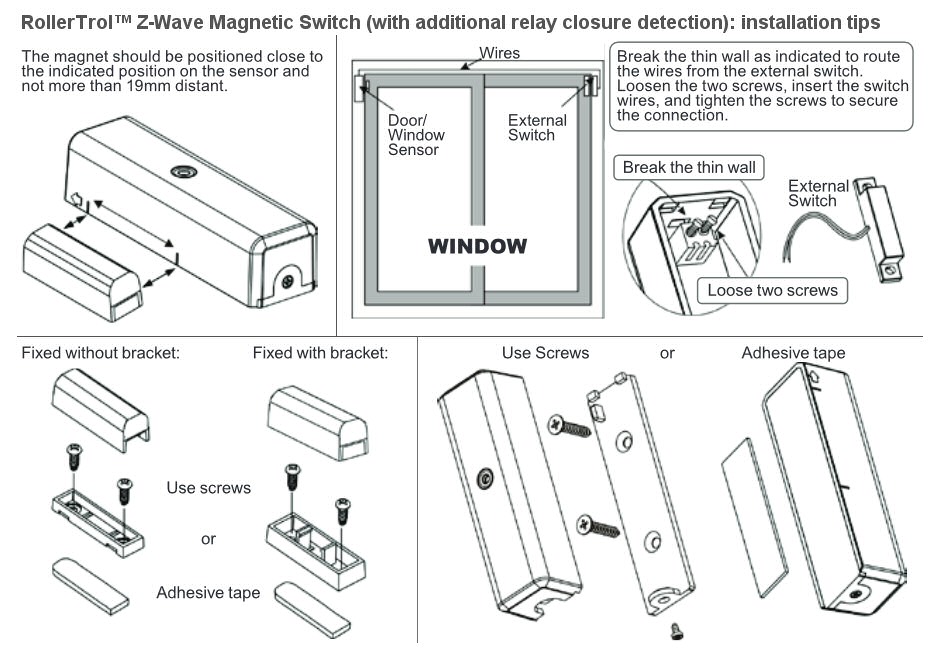
- Using either the provided screws or adhesive pad, attach the sensor's rear cover to the frame of a door or window.
- Insert a CR123A battery into the battery compartment. The LED will start to flash slowly, which means that the sensor has not yet been "included" in your local Z-Wave network.
- Depending on your specific application, setup the sensor as follows:

INCLUSION:
Add the sensor to an existing Z-Wave network by first putting your main Z-Wave Interface Controller (ZIC) into "inclusion" mode. Follow the instructions that came with your ZIC to pair the sensor with the controller. Place the sensor within 1 meter of the ZIC, then press and hold the program switch for about 1 second. The LED will stop flashing and will glow steadily when pairing is complete.
EXCLUSION:
To remove the sensor from an existing Z-Wave network, first put the ZIC into "exclusion" mode and follow its instructions for removing a device. With the sensor within 1 meter of the ZIC, press and hold the program switch for about 1 second to exclude the sensor from the network.
ASSOCIATION:
You can assign the sensor to be associated with another device. This allows the two devices to communicate directly, without direct control by the ZIC. To associate the sensor, first remove the rear cover from the sensor to put it into "awake" mode. Then put your ZIC into "association" mode and follow the instructions included with your ZIC. When association is completed, close the rear cover of the sensor, which will automatically go into "sleep" mode to save power. The sensor supports one association group of five nodes.
AWAKE:
Put the sensor into "awake" mode by removing the rear cover. When in "awake" mode it can receive inclusion, exclusion, and association commands from the ZIC.
Once pairing is completed, slide the sensor back onto the mounted rear cover and fix it in place with the screw.
Use either the included screws or adhesive pad to secure the magnet in place. The magnet should be positioned to that it is adjacent to the area indicated on the sensor body (see illustration below). Additionally, the magnet should be positioned no further than 19 mm from the sensor body.
If your door or window can be opened from either side, you will need an external switch to monitor that side. Follow the instructions in the illustrations below to install an external switch. The switch will send an alarm signal (type 01, level 11) when the door or window is opened.
You can also use this to detect the operation of other devices, such as rain sensors with contact closure or relays.

FCC COMPLIANCE STATEMENT
This equipment has been tested and found to comply with the limits for a Class B digital device, pursuant to Part 15 of the FCC Rules. These limits are designed to provide reasonable protection against harmful interference in a residential installation.
This equipment generates, uses and can radiate radio frequency energy and, if not installed and used in accordance with the instruction, may cause harmful interference to radio communications. However, there is no guarantee that interference will not occur In a particular installation.
If this equipment does cause harmful interference to radio or television reception, which can be determined by turning the equipment off and on, the user is encouraged to try and correct the interferene by one of the following measures:
- Reorient or relocate the receiving antenna.
- Increase the separation between the equipment and receiver.
- Connect the equipment into and outlet on a circuit different from that to which the receiver is connected.
- Consult the dealer or an experienced radio/TV technician for help.
This device complies with Part 15 of the FCC Rules. Operation is subject to the following two conditions:
1. This device may not cause harmful interference
2. This device must accept any interference received, including interference that may cause undesired operation.
FCC Caution: Any changes or modifications not expressly approved by the party responsible for compliance could void the user's authority to operate this equipment.
This unit can be purchased in the Z-Wave SENSOR section of our online store.
We sincerely hope you enjoy using these advanced devices; if you have any questions, please feel free to contact us at any time!

 Shopping Cart Home - Start Here
 Remote Controls for Radio Equipped Motors
 DIY Starter Kits for Window Shades
 DIY Starter Kits for Window Openers
 ZWAVE Blind & Shade Controllers
 How To Choose the Right Blind & Shade Motor
 Select tubular Motor (Comparison table)
 Choose RollerTrol Battery & Solar Motors
 DIY Roller Blind Motors - FAQ
 How To Insert Blind Motors & Attach Brackets
 Calculate your Blind or Shade fabric Weight
 Select Tube Size for Blind Motor
 How to Insert Blind Motors Into Tube
 How to Insert Blind Motors Into Tube with Adapters
 Attach Mounting Brackets - Standard + Mini Series
 Attach Mounting Brackets - MAXI Blind Series
 How To Set Up Radio Equipped Blind & Shade Motors
 Series P Radio Remote Control Motors
 Series G Radio Remote Control Motors
 Series R Radio Remote Control Motors
 BroadLink RF/IR Hub System for Motors
 How To Set Up Window/Skylight Openers
 Introduction: Window & Skylight (K Series)
 BroadLink RF/IR Hub System for Motors
 Z-Wave Interfacing for Shade & Opener Motors
 Wired Wall Switch Control of Window Openers
 How To Use Alexa With Our Motors & Window Openers
 How To Use BroadLink Phone App Hub With Our Motors
 How To Set Up ShadeSlider Skylight or Bottom-Up Blind
 How To Retrofit RV, Boat and Motorhome Blinds
 How To Set Up Non-Radio Motors
 Operation & Travel Limits of Non-Radio Motors
 Make a Simple DC Motor Reversing Switch
 How To Set Up ZWAVE Control
 ZWAVE Controller for G Series Radio motors
 ZWAVE Door/Window Opening Detection
 ZWAVE Motion Detector with Temperature Sensing
 Motorized Window Blinds & Shades
 Motorized Dual Window Shade
 Make Motorized Blackout Blinds
 Phone-Tablet-PC Control for Motorized Blinds
 Mini Motor for Existing Shade Retrofit
 Roman Shade Retrofit
 Make a Motorized Window Opener
 Blind & Shade Motors for RV & Boats
 Make Your Own Projector Screen
 Curtain Closer: Ultimate Home Theater
 Wireless Battery Operated Drapery Motor Kit
 Make a Motorized Bottom-Up Shade
 Make a Motorized Skylight Opener
 BroadLink RF/IR Hub System for Motors
 Why Buy From US?
 Background & Mission Statement
 Customer DIY Testimonials
 Site Map - Search All Pages
 Why Buy From US?
 RollerTrol Users Forum
 Contact Page