FAQ: How do you make motorized blackout blinds?
We have had so many people ask about blackout blinds (with side channels), we decided it was time to explain how we make them. This will be another short article because it is really very easy, no rocket science here.
You may also be interested to see how one of our customers implemented a DIY blackout blind project, with the added bonus of how he interfaced his Insteon automation system with our motors:
Diy Project:
How to set up blackout blinds with RollerTrol™ motors - by Tim Page
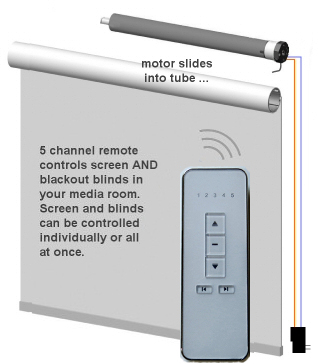
Off-the-shelf blackout blinds and night shades can be retrofitted by sliding our tubular motors into the existing tubing, or you can make new ones by attaching some opaque vinyl material or other suitable fabric to a tube and inserting our motors in the end to drive them.
Our 'mini' motor fits tubes with an inside diameter as small as 3/4" (18mm), and you can also replace the tube with a bigger size that can use our larger heavy duty 12v motors. 1.25" ABS or PVC pipe in the plumbing department, or 1.25" EMT steel conduit pipe in the electrical deparment works well for the larger motors.
Our 12v motors are safe for children, pets, and adults; there is no shock danger with our low voltage motors, making it a perfect DIY project.
Our radio motors use RF (Radio Frequency) signals from our multi-channel remotes; a small antenna in the motor receives the control signal and activates the motor. You can have multiple night shades in a room and control them individually, or simultaneously. Our multi-channel remotes can be programmed to control blackout blinds and night shade motors in various different rooms and hallways throughout the house.
With our zwave interface and Vera, or other home automation software like Raspberry Pi, Homeseer, or Event Ghost, you can control your Rollertrol™ motors and other devices with your phone, tablet or PC, while at home or away!
 So what is the difference between ordinary roller shades and blackout blinds?
The answer is 'edge guides'. If you have seen how regular vinyl roller blinds curl at the edges over time, you know how much light that can admit into the room. Even if you use blackout material that doesn't curl, there is still usually some light leakage at the edges.
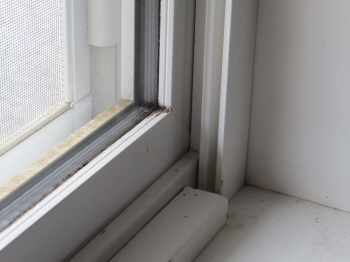
Our senior design engineer solved that problem with a very elegant, inexpensive solution, simply by purchasing a few lengths of u channel at the local building supply store. The u-channel is so effective, we could not take a picture from the inside when it was closed because there was no light!
In his case, the window frames were white and he found some vinyl u-channel that blended in perfectly with the window frame (you can also get it in aluminum in different colors with anodizing).
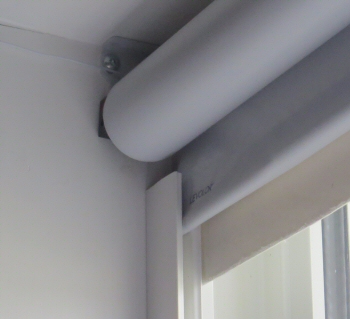
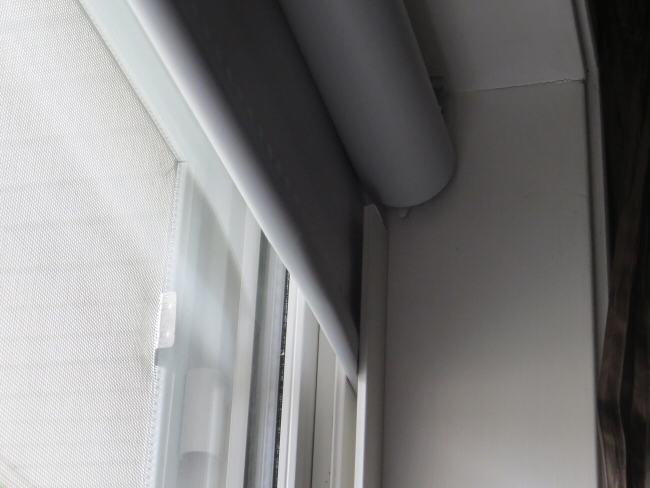
However, we later found that U channel does not work so well with longer shades as it is hard to get it to feed properly at the top, due to the changing radius of the roller. We later tried some L channel right-angle molding and it worked just as well, without the feed problem.
 If you make the tension bar at the bottom of the blind slightly less than the width between the u-channel, it causes the blind material to slide perfectly inside the channel, sealing out the light in a very effective manner.
The blackout blinds you see in these pictures were used to block the daylight coming into his home theater. If you're interested, you can read the article about his ultimate home theater.
The light coming through these windows is sealed out even further by dark side curtains, but you don't need to go that far, just the roller blind by itself works very well. It really doesn't matter what your application may be, it works well for all situations.
You can drill some holes and screw it into the frame, or just use double sided tape like he did. Either way, it works like a charm - enough said!
See our blackout blind motor kits in our online store. Here's a nice big picture of the u-channel, close-up:

We sincerely hope you enjoy using these advanced motors; if you have any questions, please feel free to contact us at any time!

 Shopping Cart Home - Start Here
 Remote Controls for Radio Equipped Motors
 DIY Starter Kits for Window Shades
 DIY Starter Kits for Window Openers
 ZWAVE Blind & Shade Controllers
 How To Choose the Right Blind & Shade Motor
 Select tubular Motor (Comparison table)
 Choose RollerTrol Battery & Solar Motors
 DIY Roller Blind Motors - FAQ
 How To Insert Blind Motors & Attach Brackets
 Calculate your Blind or Shade fabric Weight
 Select Tube Size for Blind Motor
 How to Insert Blind Motors Into Tube
 How to Insert Blind Motors Into Tube with Adapters
 Attach Mounting Brackets - Standard + Mini Series
 Attach Mounting Brackets - MAXI Blind Series
 How To Set Up Radio Equipped Blind & Shade Motors
 Series P Radio Remote Control Motors
 Series G Radio Remote Control Motors
 Series R Radio Remote Control Motors
 BroadLink RF/IR Hub System for Motors
 How To Set Up Window/Skylight Openers
 Introduction: Window & Skylight (K Series)
 BroadLink RF/IR Hub System for Motors
 Z-Wave Interfacing for Shade & Opener Motors
 Wired Wall Switch Control of Window Openers
 How To Use Alexa With Our Motors & Window Openers
 How To Use BroadLink Phone App Hub With Our Motors
 How To Set Up ShadeSlider Skylight or Bottom-Up Blind
 How To Retrofit RV, Boat and Motorhome Blinds
 How To Set Up Non-Radio Motors
 Operation & Travel Limits of Non-Radio Motors
 Make a Simple DC Motor Reversing Switch
 How To Set Up ZWAVE Control
 ZWAVE Controller for G Series Radio motors
 ZWAVE Door/Window Opening Detection
 ZWAVE Motion Detector with Temperature Sensing
 Motorized Window Blinds & Shades
 Motorized Dual Window Shade
 Make Motorized Blackout Blinds
 Phone-Tablet-PC Control for Motorized Blinds
 Mini Motor for Existing Shade Retrofit
 Roman Shade Retrofit
 Make a Motorized Window Opener
 Blind & Shade Motors for RV & Boats
 Make Your Own Projector Screen
 Curtain Closer: Ultimate Home Theater
 Wireless Battery Operated Drapery Motor Kit
 Make a Motorized Bottom-Up Shade
 Make a Motorized Skylight Opener
 BroadLink RF/IR Hub System for Motors
 Why Buy From US?
 Background & Mission Statement
 Customer DIY Testimonials
 Site Map - Search All Pages
 Why Buy From US?
 RollerTrol Users Forum
 Contact Page