Timer Operation Of Blinds - Part 1: Removing Cover, Inserting Battery

PLEASE NOTE: These instructions are for our G series motor timers, part number MCGT-1W-RF (1 ch) and MCGT-5W-RF (5 ch).
Introduction
We have stand-alone timers can be used to activate our radio equipped blind and shade motors using RF (Radio Frequency) for transmission of a remote control signal.
You can assign as many motors as you like to a single timer, and you can have multiple timers in your home. This is a four part article series on how to set up the timers.
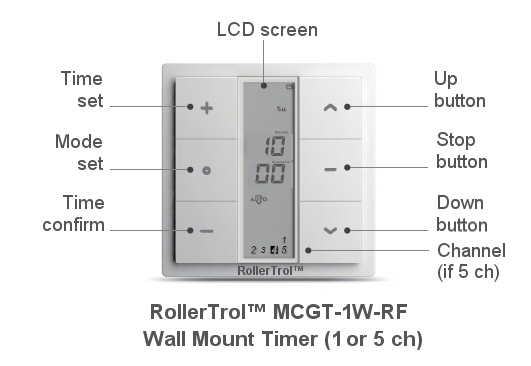
The MCGT-1W-RF wireless wall mounted timer transmits the radio signal to a small antenna in the motor; a microprocessor then decodes the signals to activate the motor. The timer is able to memorize different timing event triggers for each day of the week, organized in a sequential fashion from Monday to Sunday.
The RF signal is also capable of passing through walls and in most cases can reach anywhere inside a typical home.
1. Removing the Back Cover
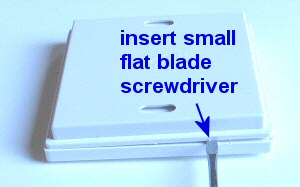
 The surface mount wall remotes and timers all use the same type of 'press fit' housing.You will need a small flat blade screwdriver to pry the back cover off, exposing the battery compartment and programming button (if it has one).
Insert the blade near a corner, to start separating the back cover from the main housing (see pictures at right).
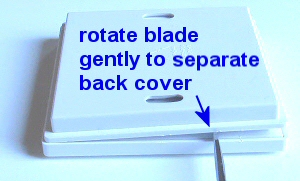
Rotate the blade gently (picture 2) to continue the process of separation, but don't try to do it all at once. Move the blade along the edge and rotate it gently as you move around the 4 sides and you will find that it comes off quite easily, even though it is fastened tightly when snapped in place.
Note the two mounting holes in the back cover that can be used for attaching the switch to the wall. These switches are attractive, bone white, low profile units that do not require an embedded box.
They operate on button batteries for many years, and the radio control signal has the ability to reach anywhere in a typical home, passing easily through walls (but more signal loss if walls are concrete or brick).
Our multi-channel hand held remotes have up to 15 channels (plus ALL channel) that can be programmed to control blind motors in various different rooms and hallways throughout the house. These remotes transmit the same signal as the timers and can be used in conjunction with them.
2. Locating the Programming Switch and Battery Compartment
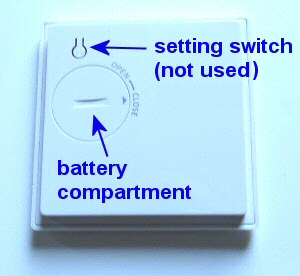
 Once the cover is removed, you will see the button battery compartment and the programming switch (P2).
You can remove the button battery cover by inserting a coin in the slot provided. Insert the CR-2430 button battery into the battery receptacle (make sure the stamped + symbol is facing up).
If you have to replace the battery, the event memory settings will be retained when you change the battery, if you change the battery within 1 minute and do not touch the metal clip on the battery holder.
You should be able to see the P2 programming button beside the battery compartment (see picture). The single channel wall switch uses this button for programming the motor functions, but the timer unit does not use this (even though the plastic button appears to be there).
PART 1: Timer for blinds - Removing the Cover, Inserting Battery (YOU ARE HERE)
PART 2: Timer for blinds - Controls and Layout
PART 3: Timer for blinds - Linking to a Radio Motor
PART 4: Timer for blinds - Creating Timer Events
We sincerely hope you enjoy using these advanced motors; if you have any questions, please feel free to contact us at any time!

 Shopping Cart Home - Start Here
 Remote Controls for Radio Equipped Motors
 DIY Starter Kits for Window Shades
 DIY Starter Kits for Window Openers
 ZWAVE Blind & Shade Controllers
 How To Choose the Right Blind & Shade Motor
 Select tubular Motor (Comparison table)
 Choose RollerTrol Battery & Solar Motors
 DIY Roller Blind Motors - FAQ
 How To Insert Blind Motors & Attach Brackets
 Calculate your Blind or Shade fabric Weight
 Select Tube Size for Blind Motor
 How to Insert Blind Motors Into Tube
 How to Insert Blind Motors Into Tube with Adapters
 Attach Mounting Brackets - Standard + Mini Series
 Attach Mounting Brackets - MAXI Blind Series
 How To Set Up Radio Equipped Blind & Shade Motors
 Series P Radio Remote Control Motors
 Series G Radio Remote Control Motors
 Series R Radio Remote Control Motors
 BroadLink RF/IR Hub System for Motors
 How To Set Up Window/Skylight Openers
 Introduction: Window & Skylight (K Series)
 BroadLink RF/IR Hub System for Motors
 Z-Wave Interfacing for Shade & Opener Motors
 Wired Wall Switch Control of Window Openers
 How To Use Alexa With Our Motors & Window Openers
 How To Use BroadLink Phone App Hub With Our Motors
 How To Set Up ShadeSlider Skylight or Bottom-Up Blind
 How To Retrofit RV, Boat and Motorhome Blinds
 How To Set Up Non-Radio Motors
 Operation & Travel Limits of Non-Radio Motors
 Make a Simple DC Motor Reversing Switch
 How To Set Up ZWAVE Control
 ZWAVE Controller for G Series Radio motors
 ZWAVE Door/Window Opening Detection
 ZWAVE Motion Detector with Temperature Sensing
 Motorized Window Blinds & Shades
 Motorized Dual Window Shade
 Make Motorized Blackout Blinds
 Phone-Tablet-PC Control for Motorized Blinds
 Mini Motor for Existing Shade Retrofit
 Roman Shade Retrofit
 Make a Motorized Window Opener
 Blind & Shade Motors for RV & Boats
 Make Your Own Projector Screen
 Curtain Closer: Ultimate Home Theater
 Wireless Battery Operated Drapery Motor Kit
 Make a Motorized Bottom-Up Shade
 Make a Motorized Skylight Opener
 BroadLink RF/IR Hub System for Motors
 Why Buy From US?
 Background & Mission Statement
 Customer DIY Testimonials
 Site Map - Search All Pages
 Why Buy From US?
 RollerTrol Users Forum
 Contact Page