DC Tubular Motors: Motor Programming for Motors Without Built-in Radio
Applies to these motors: TMDC-12-25-15-28-NR, TMDC-12-25-07-34-NR, TMDC-12-18-03-25-NR
1. Preparing the RollerTrol™ motor:

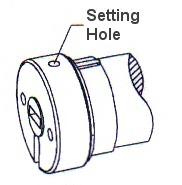
Figure 1: Programming Hole
Each RollerTrol™ motor has a a small hole on the outside edge of the cap at the wired end of the tubular motor. At the bottom of the hole is a small switch for activating the 'programming' mode of the motor.
You can feel a pronounced click when this switch is activated, when inserting a small screwdriver or similar item into the hole. You do not need to apply much pressure for this to be activated. Your motor should be mounted in a position that allows access to this hole.
2. Check Wiring Polarity:

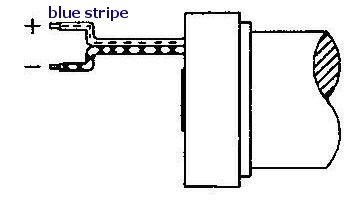
Figure 2: Wiring
A DC motor of this type reverses direction when the polarity is reversed. Connect your rocker switch or controller to the motor and activate the 'UP' mode of motor operation. If the motor rotates in the wrong direction, reverse the wiring to correct this. If you do not have a switch for operating the motor, please see this article:
how to wire a DPDT DC motor reversing switch
3. Setting the UPPER and LOWER Travel Limits:
The travel limits of these RollerTrol™ motors can be set and changed at any time . The sequence is as follows:
Activating the Programming Mode:
- Activate the motor in either direction with the UP or DOWN button of a switch or controller; we'll assume for these instructions that you will start with the UP button.
- While power is applied (the motor may not be running, if it has reached a travel limit), insert a screwdriver in the programming hole described in step 1 and hold the setting button down within six seconds of the power application start time. If you don't do it within 6 seconds, remove power, then re-apply power again (you'll have another 6 seconds to do it). Continue holding the setting button down until you hear a quick sequence of short beeps, then release the button. If the motor is running, it will stop, even though you are still applying power. REMOVE POWER FROM MOTOR.
- At this point, the motor has entered into its limit programming mode. Even though you have removed power, it will remember that it is in programming mode. You must complete the programming sequence or it will be permanently in programming mode.
- Apply power again for the UP direction, and it will continue running in that direction. Let it run until you are close to the desired UP position, then STOP it (do not let it go past the desired UPPER limit).
Setting the UPPER Limit:
- At this point of the programming mode, and you have moved the motor so that it is close to the UPPER position limit (but not past). When you stopped it, you removed power from the motor, but it has an internal memory that 'remembers' that it is in settings mode. Activate the UP direction of the motor; the motor now enters the 'JOG' mode. You'll see the motor move in very short steps that are a small fraction of a full rotation. Alternate between UP and STOP modes until your motor is at the exact UPPER limit you desire.
- The UPPER limit has been reached at this point, and the motor is still in 'programming mode', even though it is stopped without any power applied. The next step will be to press the DOWN button, which will set the UPPER limit into memory (you'll hear a confirming beep sequence), and it will also start the shade moving in the opposite direction. Do not press STOP until it gets close (but not past) the LOWER travel limit.
Setting the LOWER Limit:
- At this point you have stopped the motor, ready to enter JOG mode. Press the DOWN button and you will see it move slightly; you are now in JOG mode.
- Alternate between DOWN and STOP modes until your motor is at the exact LOWER limit you desire. Make sure it is stopped, with no power applied when you reach the desired LOWER limit.
- To confirm the LOWER setting and exit the programming mode, press the UP button; you will hear a beep sequence. At this point, the travel limits for the motor have been set and the motor is now back in normal running mode and you should be able to test the full excursion. Repeat the above steps if you need to reset the travel limits.
We sincerely hope you enjoy using these advanced motors; if you have any questions, please feel free to contact us at any time!

 Shopping Cart Home - Start Here
 Remote Controls for Radio Equipped Motors
 DIY Starter Kits for Window Shades
 DIY Starter Kits for Window Openers
 ZWAVE Blind & Shade Controllers
 How To Choose the Right Blind & Shade Motor
 Select tubular Motor (Comparison table)
 Choose RollerTrol Battery & Solar Motors
 DIY Roller Blind Motors - FAQ
 How To Insert Blind Motors & Attach Brackets
 Calculate your Blind or Shade fabric Weight
 Select Tube Size for Blind Motor
 How to Insert Blind Motors Into Tube
 How to Insert Blind Motors Into Tube with Adapters
 Attach Mounting Brackets - Standard + Mini Series
 Attach Mounting Brackets - MAXI Blind Series
 How To Set Up Radio Equipped Blind & Shade Motors
 Series P Radio Remote Control Motors
 Series G Radio Remote Control Motors
 Series R Radio Remote Control Motors
 BroadLink RF/IR Hub System for Motors
 How To Set Up Window/Skylight Openers
 Introduction: Window & Skylight (K Series)
 BroadLink RF/IR Hub System for Motors
 Z-Wave Interfacing for Shade & Opener Motors
 Wired Wall Switch Control of Window Openers
 How To Use Alexa With Our Motors & Window Openers
 How To Use BroadLink Phone App Hub With Our Motors
 How To Set Up ShadeSlider Skylight or Bottom-Up Blind
 How To Retrofit RV, Boat and Motorhome Blinds
 How To Set Up Non-Radio Motors
 Operation & Travel Limits of Non-Radio Motors
 Make a Simple DC Motor Reversing Switch
 How To Set Up ZWAVE Control
 ZWAVE Controller for G Series Radio motors
 ZWAVE Door/Window Opening Detection
 ZWAVE Motion Detector with Temperature Sensing
 Motorized Window Blinds & Shades
 Motorized Dual Window Shade
 Make Motorized Blackout Blinds
 Phone-Tablet-PC Control for Motorized Blinds
 Mini Motor for Existing Shade Retrofit
 Roman Shade Retrofit
 Make a Motorized Window Opener
 Blind & Shade Motors for RV & Boats
 Make Your Own Projector Screen
 Curtain Closer: Ultimate Home Theater
 Wireless Battery Operated Drapery Motor Kit
 Make a Motorized Bottom-Up Shade
 Make a Motorized Skylight Opener
 BroadLink RF/IR Hub System for Motors
 Why Buy From US?
 Background & Mission Statement
 Customer DIY Testimonials
 Site Map - Search All Pages
 Why Buy From US?
 RollerTrol Users Forum
 Contact Page