Creating a Control Screen for Blackout Blinds, Lights, Projector & Netflix

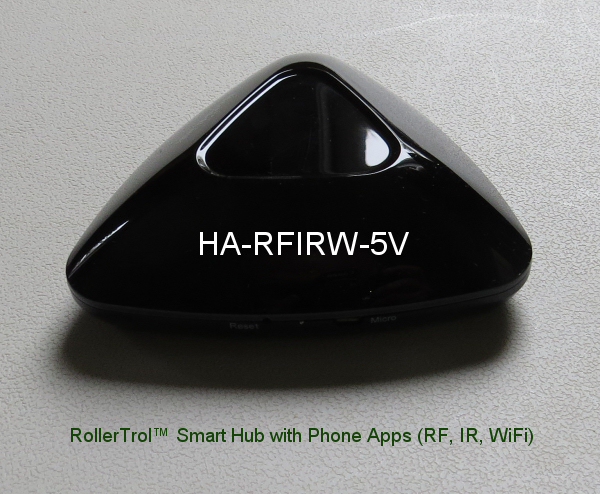
This is the fifth article in this series about creating a control screen for the phone app that controls our blind motors, smart film, skylight/window openers, drapery motors, and many other devices, such as fans & LED lighting, using the BroadLink® smart WiFi hub.
In this article we will be discussing the home theater system we used as an example for configuring the hub control system. This scenario involves many of the components you might want to control in a media room or home theater:
- blackout blind control
- lighting control
- projector control
- audio/video switching
If you didn't see the previous article about methods of adding remote control commands to the phone app, please take a moment to review those important steps.
Please Note: It is important to follow these instructions sequentially to avoid any confusion.
Buy These Products In Our Online Store
If you are interested, you can purchase these products in our DIY online automation store.
Creating a User Defined Remote Control Template on Your Phone
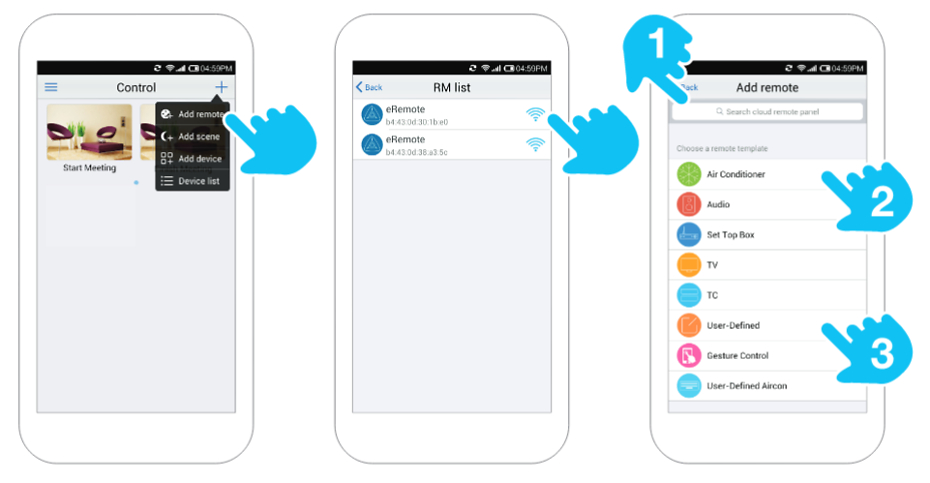
As discussed in the previous article, there are 3 different ways to create control buttons on your phone with the BroadLink® app, and the process starts with the Add Remote menu link that is accessed by pressing the large 'plus' sign (+) in the upper right hand corner of the Control home screen (pictured at left below).
When you press the + sign it will display the list of RM hubs on your WiFi system (you can have more than one), so the next step is to select the hub where you want to create the remote control, as seen in the center of the picture below.
Please Note: If you only have one RM hub, the program will go directly to the 3rd screen you see below; you will not see the middle screen.
We will use method #3, as shown in the picture below, which is the User-Defined choice, and the next step will be to press the User Defined button. After you have pressed this button, shown in the picture directly below, please advance to the next picture that follows for a sequence of screen captures you will see on your phone.

Creating a Phone App to Control Home Theater
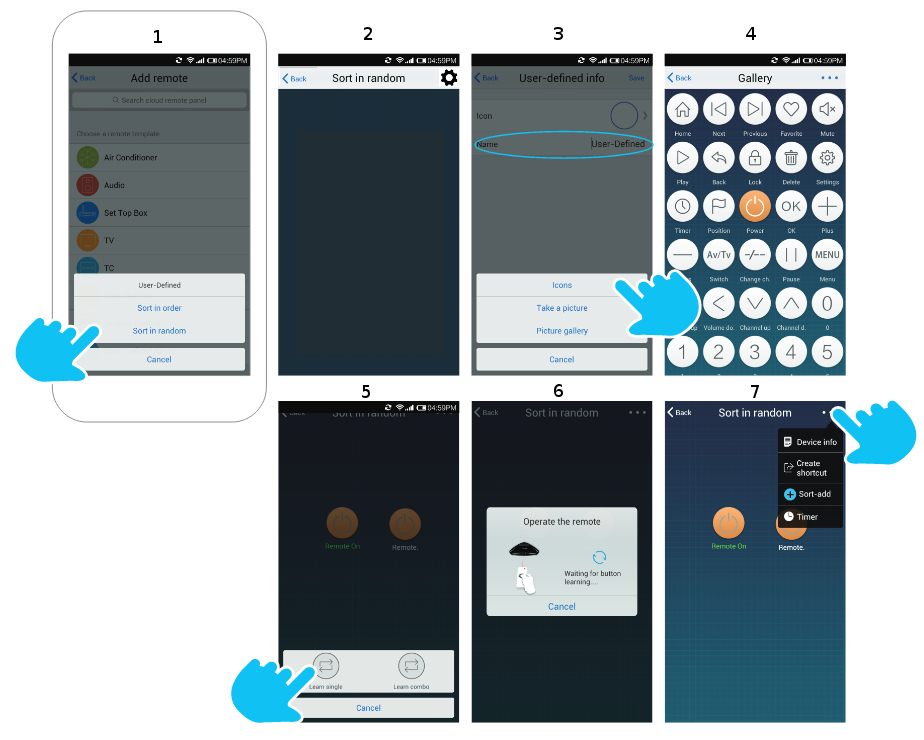
The following screens summarize the steps involved in creating a User-Defined template of button controls. Please note the following descriptions; the pictures are numbered 1 to 7 above the screen captures (below).
Please Note: The screens may vary slightly as newer versions become available.
- When you press the User-Defined button, you are presented with a choice: Sort in order (fixed position by order of creation), and Sort in random order (it means you can move buttons around). Press Sort in random and you will see the screen change to something very similar to screen #2, with + sign in the main screen area, with a message about moving buttons around.
At this point, the new control screen has been created and saved. Press the Back text button (top left) twice to return to the Control screen; you will see the new User-Defined button. You can long press it to change the name and/or the icon (you can also choose a picture); we changed the name on ours to Theater. - A short press on your new Control item will take you back to a screen similar to #7, where you will start adding control buttons. The name you assigned will be at the top, instead of "Sort in random". Press the tools icon (gear) at top right, and a drop-down menu will appear. Choose Sort-add, and the screen header will change, showing a large + icon at top left, with a Save text button at top right. Press the large + icon at top left to start the process of adding a button.
- At this point, screen #3 will appear, where you have a choice of using icons or pictures; we'll stick to icons for this example. Press to select the icon choice.
- Screen #4 will now appear, with a nice selection of suitable icons; tap one to select it. The icon and the associated name will be transferred back to a screen similar to #3, where you can change the associated name by tapping it. There will be a Save text button at top right - press that and you'll see the button appear at the top right of your new control screen (similar to screen #2). At this point, you can press-and-hold to drag the button wherever you want it positioned. Press the Save text button at top right again, when you are finished setting the screen position. You can edit or delete it with a long press; a secondary menu will appear.
- Now we start the process of "learning" the associated remote control command. Tap the newly created icon button; you'll see a screen like #5 where you are given a choice of Learn single or Learn combo. The Learn single command is useful for single action buttons, such as a power on/power off button. The Learn combo button is useful for chaining commands, such as when you need to select a TV channel like 220.
Please Note: Pressing the Learn single button produces a sub-menu (not shown) with a choice of Learn or Sweep frequency. This is the difference between IR (Infra-Red) and RF (Radio Frequency) commands, and you need to know which type of remote you are currently holding. Generally speaking, a TV remote will be IR and our shade/blind motors or skylight/window openers will be RF. -
Pressing the Learn button or Sweep frequency button produces screen #6, with a message that it is time to press the button you want to learn, and at this point the yellow light on the hub will turn on to indicate learning mode is active.
Please Note: The process of learning the IR type of command is slightly different from learning the RF type of command:- If it is IR, just press the desired remote button as you would normally do; the program will respond with a 'saved' message.
- In the case of RF, you must hold the button on until the program indicates it has captured the RF frequency. You also need to hold the remote very close to the hub (we found 4 to 6 inches worked well). The program will notify you once it has captured the RF protocol, then it will ask you to press the same button one more time (this can be a brief button press).
- Once the learning process is complete, the new remote screen will appear, as per screen #7. You can repeat the process to create all the buttons you need.

This ends this article series; later we will discuss scene composition and IFTTT (if-this-then-that) configuration, using the rain detectors for our skylight openers as an example.
Buy These Products In Our Online Store
If you are interested, you can purchase these products in our DIY online automation store.
Articles in this series:
Part 1-Smart hub for blind motors: Introduction
Part 2-Smart hub WiFi router connection: Activate Hub
Part 3-Smart hub program installation: Download Software
Part 4-Smart hub methods: Creating Control Screens
Part 5-Smart hub example: Home Theater Control Screen (you are here)
Also, see the follow-on series about our other devices:

 Shopping Cart Home - Start Here
 Remote Controls for Radio Equipped Motors
 DIY Starter Kits for Window Shades
 DIY Starter Kits for Window Openers
 ZWAVE Blind & Shade Controllers
 How To Choose the Right Blind & Shade Motor
 Select tubular Motor (Comparison table)
 Choose RollerTrol Battery & Solar Motors
 DIY Roller Blind Motors - FAQ
 How To Insert Blind Motors & Attach Brackets
 Calculate your Blind or Shade fabric Weight
 Select Tube Size for Blind Motor
 How to Insert Blind Motors Into Tube
 How to Insert Blind Motors Into Tube with Adapters
 Attach Mounting Brackets - Standard + Mini Series
 Attach Mounting Brackets - MAXI Blind Series
 How To Set Up Radio Equipped Blind & Shade Motors
 Series P Radio Remote Control Motors
 Series G Radio Remote Control Motors
 Series R Radio Remote Control Motors
 BroadLink RF/IR Hub System for Motors
 How To Set Up Window/Skylight Openers
 Introduction: Window & Skylight (K Series)
 BroadLink RF/IR Hub System for Motors
 Z-Wave Interfacing for Shade & Opener Motors
 Wired Wall Switch Control of Window Openers
 How To Use Alexa With Our Motors & Window Openers
 How To Use BroadLink Phone App Hub With Our Motors
 How To Set Up ShadeSlider Skylight or Bottom-Up Blind
 How To Retrofit RV, Boat and Motorhome Blinds
 How To Set Up Non-Radio Motors
 Operation & Travel Limits of Non-Radio Motors
 Make a Simple DC Motor Reversing Switch
 How To Set Up ZWAVE Control
 ZWAVE Controller for G Series Radio motors
 ZWAVE Door/Window Opening Detection
 ZWAVE Motion Detector with Temperature Sensing
 Motorized Window Blinds & Shades
 Motorized Dual Window Shade
 Make Motorized Blackout Blinds
 Phone-Tablet-PC Control for Motorized Blinds
 Mini Motor for Existing Shade Retrofit
 Roman Shade Retrofit
 Make a Motorized Window Opener
 Blind & Shade Motors for RV & Boats
 Make Your Own Projector Screen
 Curtain Closer: Ultimate Home Theater
 Wireless Battery Operated Drapery Motor Kit
 Make a Motorized Bottom-Up Shade
 Make a Motorized Skylight Opener
 BroadLink RF/IR Hub System for Motors
 Why Buy From US?
 Background & Mission Statement
 Customer DIY Testimonials
 Site Map - Search All Pages
 Why Buy From US?
 RollerTrol Users Forum
 Contact Page