Background: Veralite™ automation
Please Note: This article series was written in 2012 and is here for legacy purposes only; our current focus is on the very affordable BroadLink® hub that can learn RF and IR codes, giving direct control over each blind motor, skylight/window opener, and other devices. It does not require any external interfaces.
 Our radio equipped motors use RF (Radio Frequency) for transmission of the remote control signal from a hand-held or wall mounted remote control. These very affordable stand-alone multi-channel systems are extremely easy to install and operate. Our built-in rechargeable battery motors require no wires at all!
If you later want to expand your system, you can extend control of your window blind radio motors to your web enabled devices (PC, phone, tablet, etc) with the RFXCOM™ plug-in for Vera™. With Vera or Veralite, you can easily monitor and control your home whether you are on the premises or away.
The Vera system is also about CHOICES. You can control many other devices aside from our Rollertrol™ blind motors, using many different home automation protocols: Z-Wave, x10, Insteon, Zigbee, etc.
Another important resource that has a lot of information is the Vera forum website. There are two thread topics in particular that have a lot of discussion about RollerTrol™ blind motors and the Vera plugin:
RollerTrol DC Tubular Motors - RF Control
RFXCOM USB transceiver plugin for Vera
Getting Started With the Vera Plugin for RollerTrol™ Motors
The images above and in this article series are screen captures of what you will see in the browser viewport of your PC, tablet, phone or other web enabled device. The instructions that follow explain how to set up and configure the RFXCOM™ plug-in for Vera that will give you control over our RollerTrol™ shade and blind motors.
Setting up the Veralite™ Plug-in for RollerTrol Blinds & Shades
These instructions assume that you have assigned at least one of our RollerTrol™ motors to the remote control. The instructions for assigning motors to the remotes will not be discussed here; the instructions in this article cover the installation of Veralite™ and the linking of our motors to Veralite™ via the RFXCOM™ USB transceiver. We are also assuming you have connected and activated your Vera or Veralite to your router or Internet feed (as in the previous Part 2 of this series).
This procedure is relatively simple; the following is a condensed version of the steps we will take:
- Download the xml config file for the USB transceiver
- Upload this file to your Vera or Veralite unit
- Configure settings for transceiver using the Vera browser interface
- Assign a motor to the system by pressing a button on remote control
- Assign that motor to a room, create events and scenes to suit your needs
(see a detailed explanation of each step below the following picture)
The following is a screen capture of the upload area for the Luup files required to set up the Veralite web server unit. You get to this screen through the menu system of the Vera user interface in your browser (see part 2 re address):
Apps -> Develop Apps -> Luup Files
Luup is the special device/event oriented scripting language used by the Vera MIOS operating system. It is an extension of the Lua scripting language. The screen capture below has been condensed slightly to fit all the important parts on the picture:
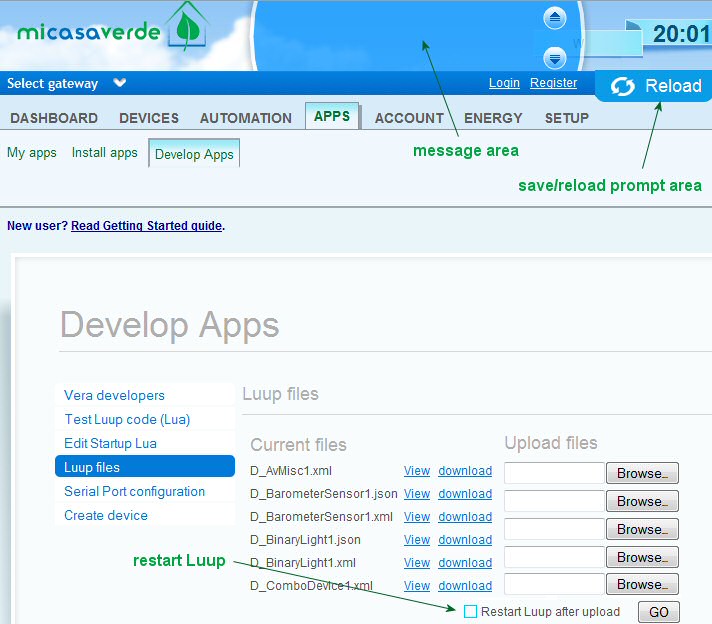
In the above picture we have annotated 3 important parts of this screen (in green) that you need to know about for a smooth, trouble free installation:
- The message area: even on a fast connection, it can take a few seconds for files to upload or data to be saved. When this happens a message will appear here, indicating that a process is underway. If you have scrolled down the page, you may not be able to see this area, so be sure to scroll back up and make sure a process has completed before moving on to the next step. Sometimes the text on the screen below may indicate that an upload is complete before the message area indicates that it is finished; it is good practice to always wait for the message area to indicate that it is finished.
- The save/upload prompt: if you have made changes, the Vera system will often prompt you (red 'Save' button appears) to save your changes. When you save your changes, watch the message area to see that it has completed.
- The restart button: when you see the 'Restart Luup' directive in these instructions, this is where you do it. It does not matter if you are not uploading files, you still use this area to restart Luup.
Step 1: Download the config files for the USB transceiver plug-in to your local machine
The RFXCOM transceiver config files can be found on this page at the MIOS code repository. You would normally click on the latest file release towards the bottom of the page. This will display a list of files that support various devices, but if you are only going to use the transceiver for our blinds and shade motors, you only need to download files containing RFXtrx in the file name:
Please Note: the following is an example set of files - the names do change slightly from one version to another, so it depends which version you decide to download. The file set may be slightly different, but the naming rule still applies (you only need the files with RFXtrx in the file name):
- D_RFXtrx.json
- D_RFXtrx.xml
- I_RFXtrx.xml
- J_RFXtrx.js (not in all versions)
- L_RFXtrx.lua
- S_RFXtrx.xml
Once you have downloaded the config files, make note of your download location on your local machine, ready for upload into Vera memory.
Step 2: Upload the config files to your Vera or Veralite unit
Use the 'Browse' button on the Vera interface screen (shown in picture above) to upload the RFXCOM transceiver config files to your Vera or Veralite unit. BE SURE TO CHECK THE 'Restart Luup' CHECKBOX WHENEVER YOU DO THIS.
Step 3: Configure settings for plug-in using the Vera browser interface
A. Create the master device:
- Load the screen below using Apps -> Develop Apps -> Create Device
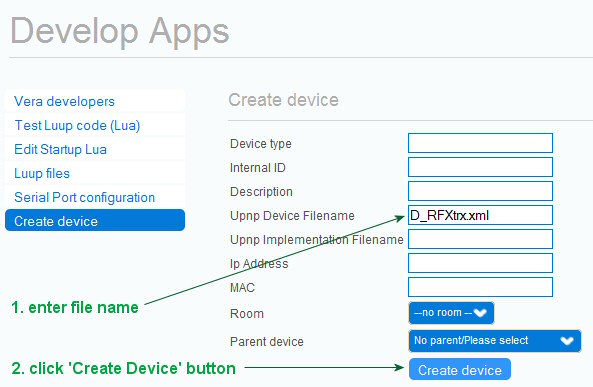
- Enter this file name in the "Upnp Device Filename" field: D_RFXtrx.xml then click "Create Device" button. A device named "RFXtrx controller device" will be created, with a confirming message on the screen. You do not need to enter anything else in other fields.
- RESTART LUUP as per previous instructions above
B. Configure the serial port:
- Load the screen below using Apps -> Develop Apps -> Serial Port configuration
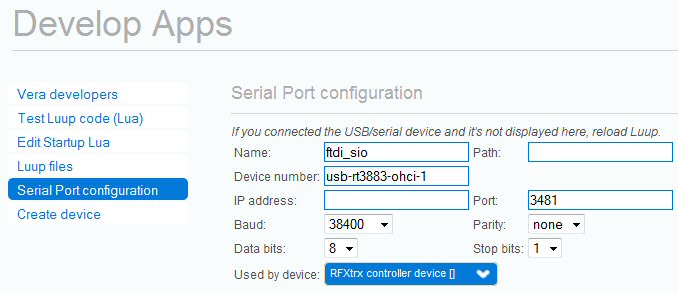
- Set speed to 38400 baud and select the device named "RFXtrx controller device" in the field "Used by Device"
- RESTART LUUP as per previous instructions above
C. Activate the RollerTrol protocols:
- Load the RFXCOM icon screen below using Devices -> All
Please Note: the first image shows it using the Alpha 4 version of the RFXCOM plugin, but yours may say something different, depending on the version you select from the download page in Step 1 (eg. Beta 2)
![]()
![]()
- When you move your mouse over the title bar, you will see the 'wrench' icon appear, which is the pathway to the setup screen for the USB transceiver. Click on it to expose the settings dialog screen, as below ... then click the RollerTrol Enable button to activate the Rollertrol device control system. SETUP IS COMPLETE!
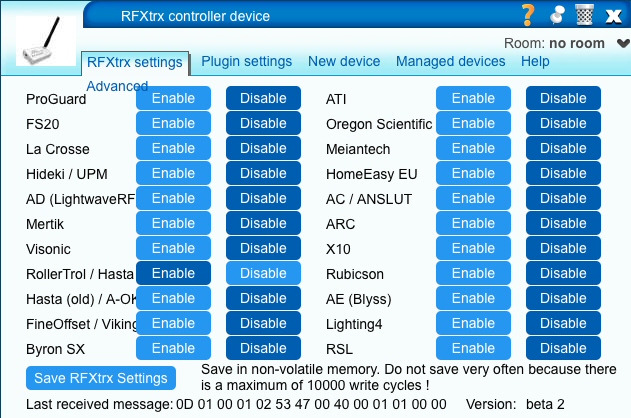
- Note that are many other devices that can be controlled by the USB transceiver, and it is possible to add more transceivers if you wish to further expand your system at a later time.
Assign a motor to the system by pressing a button on remote control
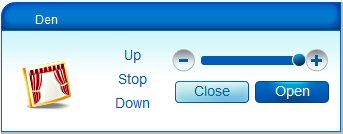
 Here's where the real magic begins. When an up/down/stop button on the RollerTrol™ hand held remote is pressed, the USB transceiver will receive the radio RF signals and cause the Vera system to automatically 'learn' the RF commands for that channel. An icon dialog screen will automatically appear in the user interface, just like the one you see here - put your mouse over it to see the settings icon appear in the title bar.
You can also continue adding channels and motors (or motor groups) by pressing additional channel buttons on the remote control. It doesn't get any easier than this!
Assign that motor to a room, create events and scenes to suit your needs
From this point, you can assign your blind motor to a room and treat it like any other device in the vera system, creating as many events and scenes as you like.
Please refere to the Vera documentation for more info about assigning devices to rooms, creating events and scenes, etc:
PLEASE NOTE:
The Vera User Interface (UI) has now advanced from UI5 to UI7, and instructions in this article series are for the older UI5 version. We will soon be updating these instructions, and in the meantime, if you have UI7 (green theme) please install the new version of the RFXCOM transceiver plugin. Here is the forum discussion area, and don't hesitate to ask questions there if you need to; these folks are very helpful:
RFXCOM USB transceiver plugin for RollerTrol shades and blind motors
Please have a look at lolodomo's instructions; he is an expert developer, and as he mentions, you have to download and install the ZIP archive here:RFXCOM USB transceiver plugin download page for RollerTrol blinds and shade motors
There are also additional instructions in this post on the Vera forum:
RollerTrol™ blind and shade motor discussion: Vera UI 7
Articles in this series:
Part 1: Vera and VeraLite introduction: web enabled controllers for blinds & shades
Part 2: How to prepare Veralite™ for use with our RollerTrol™ blind motors
Part 3: How to add Rollertrol™ shade and blind control to Veralite & using the USB transceiver
This is the end of the series "How to use Veralite & the RFXCOM™ USB transceiver with our blind & shade motors". We sincerely hope you enjoy using these advanced motor systems; if you have any questions, please feel free to contact us at any time!

 Shopping Cart Home - Start Here
 Remote Controls for Radio Equipped Motors
 DIY Starter Kits for Window Shades
 DIY Starter Kits for Window Openers
 ZWAVE Blind & Shade Controllers
 How To Choose the Right Blind & Shade Motor
 Select tubular Motor (Comparison table)
 Choose RollerTrol Battery & Solar Motors
 DIY Roller Blind Motors - FAQ
 How To Insert Blind Motors & Attach Brackets
 Calculate your Blind or Shade fabric Weight
 Select Tube Size for Blind Motor
 How to Insert Blind Motors Into Tube
 How to Insert Blind Motors Into Tube with Adapters
 Attach Mounting Brackets - Standard + Mini Series
 Attach Mounting Brackets - MAXI Blind Series
 How To Set Up Radio Equipped Blind & Shade Motors
 Series P Radio Remote Control Motors
 Series G Radio Remote Control Motors
 Series R Radio Remote Control Motors
 BroadLink RF/IR Hub System for Motors
 How To Set Up Window/Skylight Openers
 Introduction: Window & Skylight (K Series)
 BroadLink RF/IR Hub System for Motors
 Z-Wave Interfacing for Shade & Opener Motors
 Wired Wall Switch Control of Window Openers
 How To Use Alexa With Our Motors & Window Openers
 How To Use BroadLink Phone App Hub With Our Motors
 How To Set Up ShadeSlider Skylight or Bottom-Up Blind
 How To Retrofit RV, Boat and Motorhome Blinds
 How To Set Up Non-Radio Motors
 Operation & Travel Limits of Non-Radio Motors
 Make a Simple DC Motor Reversing Switch
 How To Set Up ZWAVE Control
 ZWAVE Controller for G Series Radio motors
 ZWAVE Door/Window Opening Detection
 ZWAVE Motion Detector with Temperature Sensing
 Motorized Window Blinds & Shades
 Motorized Dual Window Shade
 Make Motorized Blackout Blinds
 Phone-Tablet-PC Control for Motorized Blinds
 Mini Motor for Existing Shade Retrofit
 Roman Shade Retrofit
 Make a Motorized Window Opener
 Blind & Shade Motors for RV & Boats
 Make Your Own Projector Screen
 Curtain Closer: Ultimate Home Theater
 Wireless Battery Operated Drapery Motor Kit
 Make a Motorized Bottom-Up Shade
 Make a Motorized Skylight Opener
 BroadLink RF/IR Hub System for Motors
 Why Buy From US?
 Background & Mission Statement
 Customer DIY Testimonials
 Site Map - Search All Pages
 Why Buy From US?
 RollerTrol Users Forum
 Contact Page