Blind Motor Automation: Activating Your WiFi Environmental Sensor

This is the second article in this series about configuring the BroadLink® smart environmental sensor to control our blind motors, skylight/window openers, electronic window film, drapery motors, and many other devices, such as fans & LED lighting, with a simple phone app.
For more background information, please see the previous article for an introduction to the smart environmental sensor.
If you didn't see the previous article series about using our HA-RFIRW-5V controller hub for home theater, you may be interested to review that series as this IFTTT environmental sensor is an add-on to that system.
The sensor will control the blind motors by sending a wifi command to the automation hub, and the hub itself will broadcast the RF radio signal to activate the shade motors (or anything else you want to control).
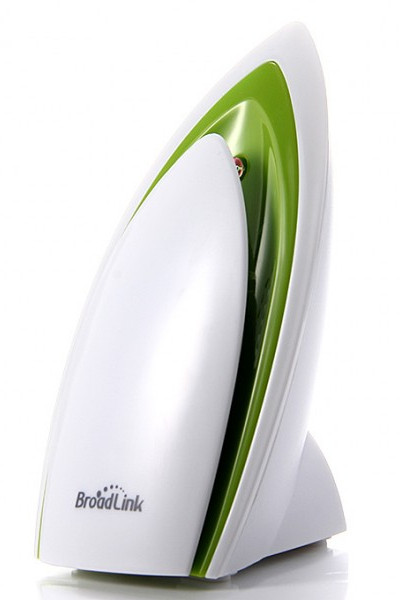
When you receive your environmental sensor, there are 3 pieces in the box; please check the following:
- The ES-WIFI-5V environmental sensor itself
- A 5v AC power adapter
- A USB cable with a micro-USB connector that powers the environmental sensor from the adapter
Please Note: It is important to follow these instructions sequentially to avoid any confusion.
The BroadLink® system has quickly become our favorite choice for a number of reasons, not the least being the ease-of-use factor, and if you follow these instructions carefully, you will find that it is quite "user friendly".
The ES-WIFI-5V wifi environmental sensor can monitor VOC (Volatile Organic Compounds) air quality, temperature, humidity, light level, and sound level. This IFTTT (if-this-then-that) example will only be concerned with 2 parameters, temperature and/or light level.
Buy These Products In Our Online Store
If you are interested, you can purchase these products in our DIY online automation store.
Powering Up The Smart Environmental Sensor
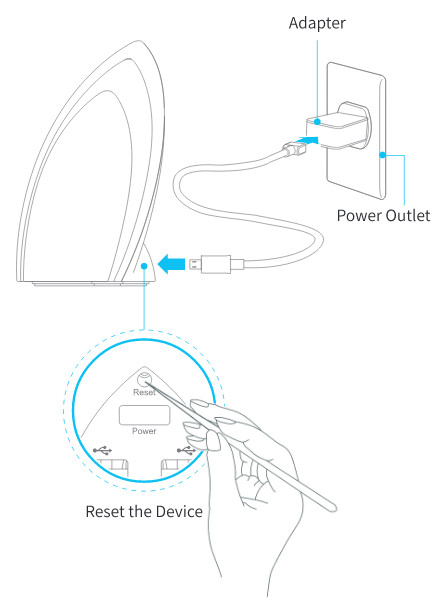
 Referring to the picture, the very first step is to remove the contents of the box and power it up by plugging the USB cable into the micro-USB port on the sensor.
The standard USB connector on the other end of the power cable is plugged into the power adapter (which plugs into an AC wall outlet).
Please take note of the re-set button that is recessed inside a small hole, just above the micro-USB DC input power connector. You will need a paper clip or something similar to re-set the sensor to the default factory state. This is not normally required on a new unit as it arrives in the factory default state, ready for the router pairing procedure.
There is an LED indicator recessed into the sensor, and you should see this flashing when you first plug it in. Once it has been successfully paired with your WiFi router, the LED will turn off.
There are 2 ways to connect this unit, depending on the type of unit you have:
- Direct SmartConfig™ mode
- AP Mode
Connecting to Your Router With SmartConfig™
SmartConfig™ is the simplest method, and it will work in almost all cases. Once you have downloaded and installed the software, as described in the next article (which you may have done already if you have set up another device), you simply enter your WiFi router ID/password credentials, and the unit will connect automatically, with appropriate screen messages.
You can try this now by advancing to this page to download the BroadLink home automation program onto your phone. There is a progress indicator you can watch, to see if it is successful.
If you get a time-out connection error, it could be caused by your router settings. Our Asus bench router was almost brand new and basically state-of-the-art, yet the SmartConfig™ would not work. I logged into our router administration screen in my browser and looked at the WiFi router connection settings, and saw that it was set to WPA-Personal with AES encryption.
I changed it to WPA-Auto-Personal, which added TKIP encryption, and the SmartConfig™ system worked. Also, it is important to note that these devices only support the standard 2.4 GHz frequency, and not 5 GHz.
If you cannot get it to connect with SmartConfig™, please see this page and use the alternative AP mode method.
Buy These Products In Our Online Store
If you are interested, you can purchase these products in our DIY online automation store.
Articles in this series:
Part 1-Temperature and light sensitive blinds: Introduction
Part 2-Smart sensor WiFi router connection: Activate Sensor (you are here)
Part 3-Environmental sensor program installation
Part 4-Environmental sensor IFTTT event handling
Also, see the follow-on series about our other devices:

 Shopping Cart Home - Start Here
 Remote Controls for Radio Equipped Motors
 DIY Starter Kits for Window Shades
 DIY Starter Kits for Window Openers
 ZWAVE Blind & Shade Controllers
 How To Choose the Right Blind & Shade Motor
 Select tubular Motor (Comparison table)
 Choose RollerTrol Battery & Solar Motors
 DIY Roller Blind Motors - FAQ
 How To Insert Blind Motors & Attach Brackets
 Calculate your Blind or Shade fabric Weight
 Select Tube Size for Blind Motor
 How to Insert Blind Motors Into Tube
 How to Insert Blind Motors Into Tube with Adapters
 Attach Mounting Brackets - Standard + Mini Series
 Attach Mounting Brackets - MAXI Blind Series
 How To Set Up Radio Equipped Blind & Shade Motors
 Series P Radio Remote Control Motors
 Series G Radio Remote Control Motors
 Series R Radio Remote Control Motors
 BroadLink RF/IR Hub System for Motors
 How To Set Up Window/Skylight Openers
 Introduction: Window & Skylight (K Series)
 BroadLink RF/IR Hub System for Motors
 Z-Wave Interfacing for Shade & Opener Motors
 Wired Wall Switch Control of Window Openers
 How To Use Alexa With Our Motors & Window Openers
 How To Use BroadLink Phone App Hub With Our Motors
 How To Set Up ShadeSlider Skylight or Bottom-Up Blind
 How To Retrofit RV, Boat and Motorhome Blinds
 How To Set Up Non-Radio Motors
 Operation & Travel Limits of Non-Radio Motors
 Make a Simple DC Motor Reversing Switch
 How To Set Up ZWAVE Control
 ZWAVE Controller for G Series Radio motors
 ZWAVE Door/Window Opening Detection
 ZWAVE Motion Detector with Temperature Sensing
 Motorized Window Blinds & Shades
 Motorized Dual Window Shade
 Make Motorized Blackout Blinds
 Phone-Tablet-PC Control for Motorized Blinds
 Mini Motor for Existing Shade Retrofit
 Roman Shade Retrofit
 Make a Motorized Window Opener
 Blind & Shade Motors for RV & Boats
 Make Your Own Projector Screen
 Curtain Closer: Ultimate Home Theater
 Wireless Battery Operated Drapery Motor Kit
 Make a Motorized Bottom-Up Shade
 Make a Motorized Skylight Opener
 BroadLink RF/IR Hub System for Motors
 Why Buy From US?
 Background & Mission Statement
 Customer DIY Testimonials
 Site Map - Search All Pages
 Why Buy From US?
 RollerTrol Users Forum
 Contact Page