Light Sensor For Shade Motors - PART 3: Adjusting Light Sensitivity

The light sensor can be used to directly activate our radio equipped blind and shade motors using a digital RF (Radio Frequency) control signal.
In part 2 we discussed the procedure for assigning motors to the MCGS-1-RF wireless window mounted light sensor by cloning channels from the master remote.
In this 3rd article, we will see how to detect the ambient light conditions, which will help select (and set) the most appropriate light sensitivity setting of the sunlight sensor. It has 4 operational sensitivity settings to choose from.
These instructions assume that you have already assigned at least one motor, as discussed in Part 2.
If you have not done that, please look at the instructions on that page before you adjust the sensitivity.
Checking Ambient Light Level
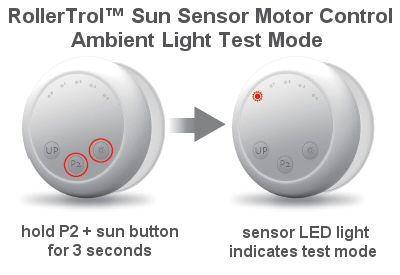
 You can check the current ambient light level by entering a special test mode: Hold down P2 and the sunlight icon button at the same time for 3 seconds - the mode 0 LED lights up, indicating you have entered the test mode.
You can now walk around with it, testing various light levels. If you hold it close to a regular light bulb (suction cup side should face the bulb), you should see it jump up to the 60k LUX level (LED #4), if the light bulb is bright enough. As you move the light sensor away from the bright light, it will jump to a lower LUX indicator.
This special ambient light test mode will timeout in 2 minutes. You can also exit the test mode by pressing any of the 3 control buttons.
Setting Light Level Sensitivity
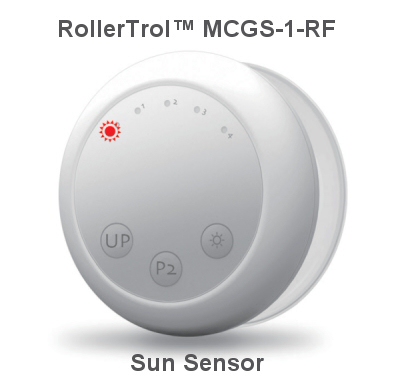
The light sensor has 4 operational sensitivity modes. You can check the current sensitivity setting by pressing and releasing the mode button (the third button to the right, with the sunlight icon). The appropriate LED mode light will turn on when you do this, for about 1 second.
| Mode | Response Threshold |
|---|---|
| 0 | Test |
| 1 | 15k LUX |
| 2 | 30k LUX |
| 3 | 45k LUX |
| 4 | 60k LUX |
If you press the mode button again, before the LED mode light times out in 1 second, it will switch the mode to the next highest setting. If it is already on the highest setting, it will recycle itself to the lowest setting and proceed sequentially in that fashion.
Note that the higher setting decreases the sensitivity of the light sensor, requiring more light to trigger the motor action. A LUX is a unit of light intensity measurement (15k LUX = 15,000 LUX).
When the light level increases beyond the current sensitivity level for more than 2 minutes, the sensor will issue a CLOSE command and the shade will deploy to the extended position.
When the light level falls below the current sensitivity level for more than 15 minutes, the sensor will issue an OPEN command and the shade will retract to its fully retracted travel limit position.
If you want to reverse the operation, please use the motor reverse programmable function: Radio Motor Reversing Instructions.
Sunlight sensors for blinds and shade motors can be purchased in our online store, click here to view in a new windowPART 1: Sunlight sensor for blinds - Battery and Controls
PART 2: Sunlight sensor for blinds - Assigning a Radio Motor
PART 3: Sunlight sensor for blinds - Adjusting Light Sensing Modes (YOU ARE HERE)
We sincerely hope you enjoy using these advanced motors; if you have any questions, please feel free to contact us at any time!

 Shopping Cart Home - Start Here
 Remote Controls for Radio Equipped Motors
 DIY Starter Kits for Window Shades
 DIY Starter Kits for Window Openers
 ZWAVE Blind & Shade Controllers
 How To Choose the Right Blind & Shade Motor
 Select tubular Motor (Comparison table)
 Choose RollerTrol Battery & Solar Motors
 DIY Roller Blind Motors - FAQ
 How To Insert Blind Motors & Attach Brackets
 Calculate your Blind or Shade fabric Weight
 Select Tube Size for Blind Motor
 How to Insert Blind Motors Into Tube
 How to Insert Blind Motors Into Tube with Adapters
 Attach Mounting Brackets - Standard + Mini Series
 Attach Mounting Brackets - MAXI Blind Series
 How To Set Up Radio Equipped Blind & Shade Motors
 Series P Radio Remote Control Motors
 Series G Radio Remote Control Motors
 Series R Radio Remote Control Motors
 BroadLink RF/IR Hub System for Motors
 How To Set Up Window/Skylight Openers
 Introduction: Window & Skylight (K Series)
 BroadLink RF/IR Hub System for Motors
 Z-Wave Interfacing for Shade & Opener Motors
 Wired Wall Switch Control of Window Openers
 How To Use Alexa With Our Motors & Window Openers
 How To Use BroadLink Phone App Hub With Our Motors
 How To Set Up ShadeSlider Skylight or Bottom-Up Blind
 How To Retrofit RV, Boat and Motorhome Blinds
 How To Set Up Non-Radio Motors
 Operation & Travel Limits of Non-Radio Motors
 Make a Simple DC Motor Reversing Switch
 How To Set Up ZWAVE Control
 ZWAVE Controller for G Series Radio motors
 ZWAVE Door/Window Opening Detection
 ZWAVE Motion Detector with Temperature Sensing
 Motorized Window Blinds & Shades
 Motorized Dual Window Shade
 Make Motorized Blackout Blinds
 Phone-Tablet-PC Control for Motorized Blinds
 Mini Motor for Existing Shade Retrofit
 Roman Shade Retrofit
 Make a Motorized Window Opener
 Blind & Shade Motors for RV & Boats
 Make Your Own Projector Screen
 Curtain Closer: Ultimate Home Theater
 Wireless Battery Operated Drapery Motor Kit
 Make a Motorized Bottom-Up Shade
 Make a Motorized Skylight Opener
 BroadLink RF/IR Hub System for Motors
 Why Buy From US?
 Background & Mission Statement
 Customer DIY Testimonials
 Site Map - Search All Pages
 Why Buy From US?
 RollerTrol Users Forum
 Contact Page