Raspberry Pi Home Automation: 3D CAD Floorplan Views
Adrian Biffen, Senior Partner
PLEASE NOTE: We found the Node-Red system with its visual design system to be another excellent way to set up a home automation system, and it is our current favourite. See OUR ALTERNATE ARTICLE SERIES on how we control blinds, lights, window openers and many other devices with Alexa™, using Node-RED and Alexa™ on the Raspberry Pi (Node-RED comes pre-installed on the Pi).
 The Raspberry Pi ® can be used as a very effective home automation system when used with Stefan Stromberg's OpenNetHome automation software, as discussed in the previous article.
This system does not require an external Internet connection to operate, so this is a good choice if you have security concerns. You can access it remotely with an Internet connection, but that functionality is optional.
This article will discuss the process of creating floor plans to show the placement of devices such as our shade and blind motors, window and skylight openers, and other items.
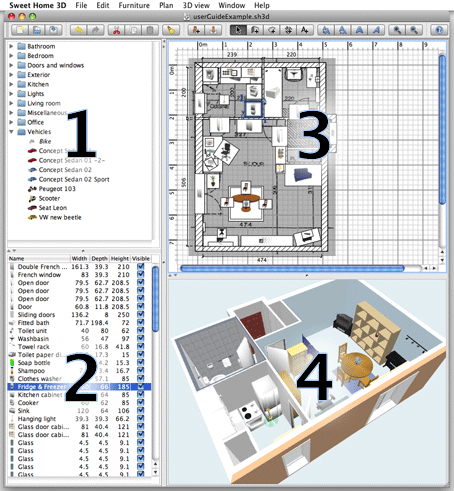
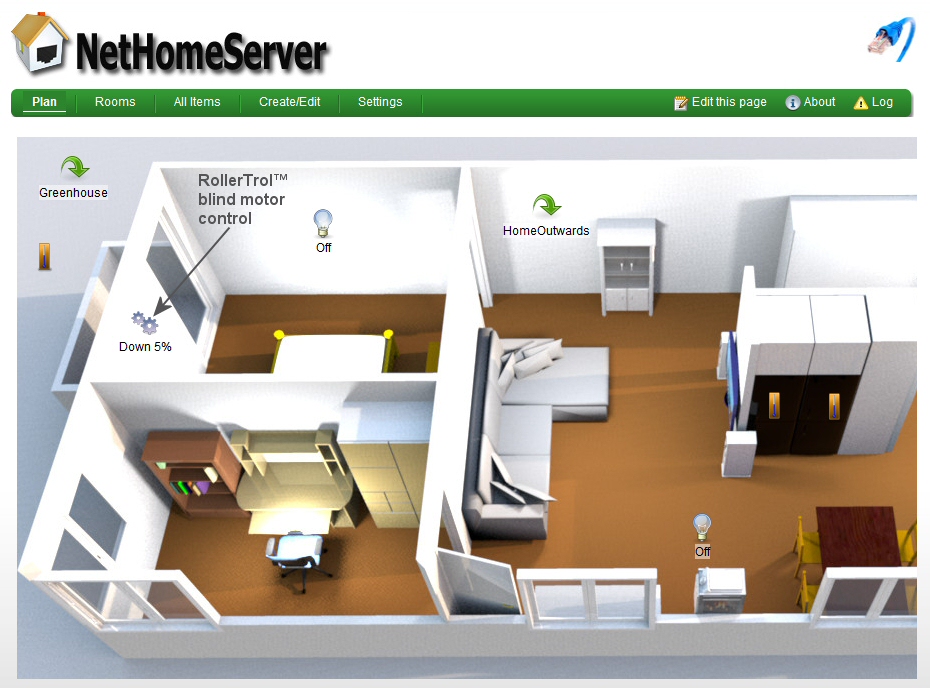
We are using Emmanuel Puybaret's excellent Sweet Home 3D CAD program. The picture below was generated by this program, but you could use any jpeg or png image.
As mentioned previously, you can also have multiple plan views if you want to focus in detail on a particular area or room in your floorplan view.
We are using it for greenhouse control in our test system for our greenhouse division, so we definitely want to show the greenhouse separately from the house.

The above picture is an actual screen capture from a Windows® laptop, while the home automation software is running on the Raspberry Pi. Note that the OpenNetHome system has the ability to display the state of the blind, whether it is fully opened or closed, or part way (Down 5% in picture).
Also note the link to the greenhouse plan in the upper left hand corner; when you click or press the link, the greenhouse plan is displayed. In this way you can create lots of different plans and link to them from any plan view. Each plan has its own URL, so you can also create a bookmark to it.
Create Your New Plan View With Sweet Home 3D
The Sweet Home 3D program is very easy to use and you can very quickly create a basic plan and save it as an image file. We won't cover that process here, but there is an extensive help system associated with the program that makes quick work of it. We found it so easy that we did not have to bother with the help files, although we have had a lot of 3D CAD experience. But even a newbie will find this program very easy to quickly create a basic 3D floor plan.
You can take it much further than that and create much more with Sweet Home 3D, including walk-throughs and fly-bys. It is a very capable program to explore, if you're interested in architectural 3D CAD rendering
Once the new layout image has been created, you should save it to the 'media' folder on the Raspberry Pi where the OpenNetHome program is installed.
Linking Multiple Plans Together
 Here are the steps for assigning it to the automation system:
- Go Create/Edit => Plan (classed as infrastructure). This will create a new plan entity for your new image.
- In the dialog box that appears, give it a name (we used Greenhouse), then select the image file you created from the drop-down list.
- Leave everything else in that dialog as is for now, you can update it later.
- Go All Items => Infrastructure => CreatedPlan (this is the default primary plan name that comes with the program).
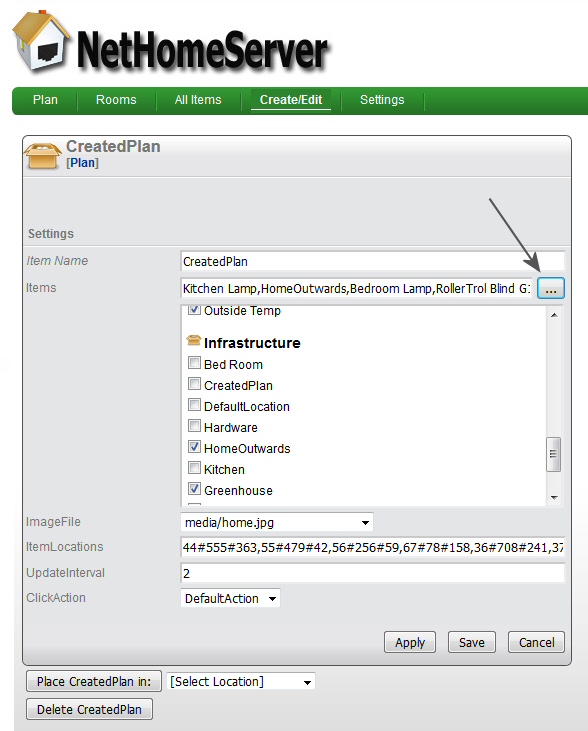
- When the dialog box for the primary plan appears, click or press the dotted button at the end of the Items line (see arrow at right). This will cause the checklist selection system to appear.
- Scroll down through the checklist until you get to the Infrastructure section, then put a checkmark in front of the name of your new image file that you created.
- Save and close the dialog. When you load the primary plan from the main menu, you should now see the link to the new plan you created.
- With the primary plan open, you can click/press Edit this page and drag the link wherever you want it.
You can create and link them all on any floorplan page, and you can also create bookmarks in your browser for each plan view. This is a powerful system that can be expanded over time as you expand your home automation system.
Please Note: Our blind motors and window openers are operated with wall mount and hand held controls, and our system is designed to allow automation to be added at any time. This means you can start with our simple remote controls and add the automation later, and take your time with it. Our remote controls will continue to function while you build your automation system and will also continue to function after the automation is activated.
You can find out where to buy the Pi 2 Model B unit by searching for this phrase: "buy a pi [country]"
Here are some examples using the DuckDuckGo search engine that doesn't track you:
We sincerely hope you enjoy using these articles; if you have any questions, please feel free to contact us at any time!
PART 1: Raspberry Pi As A Home Automation Controller: Introduction
PART 2: Raspberry Pi As A Home Automation Controller: Using NOOBS to Install Raspian
PART 3: Raspberry Pi As A Home Automation Controller: Installing OpenNetHome Software
PART 4: Raspberry Pi As A Home Automation Controller: Creating a Window Blind Device
PART 5: Raspberry Pi As A Home Automation Controller: Using 3D Software to Create your Floor Plans (YOU ARE HERE)

 Shopping Cart Home - Start Here
 Remote Controls for Radio Equipped Motors
 DIY Starter Kits for Window Shades
 DIY Starter Kits for Window Openers
 ZWAVE Blind & Shade Controllers
 How To Choose the Right Blind & Shade Motor
 Select tubular Motor (Comparison table)
 Choose RollerTrol Battery & Solar Motors
 DIY Roller Blind Motors - FAQ
 How To Insert Blind Motors & Attach Brackets
 Calculate your Blind or Shade fabric Weight
 Select Tube Size for Blind Motor
 How to Insert Blind Motors Into Tube
 How to Insert Blind Motors Into Tube with Adapters
 Attach Mounting Brackets - Standard + Mini Series
 Attach Mounting Brackets - MAXI Blind Series
 How To Set Up Radio Equipped Blind & Shade Motors
 Series P Radio Remote Control Motors
 Series G Radio Remote Control Motors
 Series R Radio Remote Control Motors
 BroadLink RF/IR Hub System for Motors
 How To Set Up Window/Skylight Openers
 Introduction: Window & Skylight (K Series)
 BroadLink RF/IR Hub System for Motors
 Z-Wave Interfacing for Shade & Opener Motors
 Wired Wall Switch Control of Window Openers
 How To Use Alexa With Our Motors & Window Openers
 How To Use BroadLink Phone App Hub With Our Motors
 How To Set Up ShadeSlider Skylight or Bottom-Up Blind
 How To Retrofit RV, Boat and Motorhome Blinds
 How To Set Up Non-Radio Motors
 Operation & Travel Limits of Non-Radio Motors
 Make a Simple DC Motor Reversing Switch
 How To Set Up ZWAVE Control
 ZWAVE Controller for G Series Radio motors
 ZWAVE Door/Window Opening Detection
 ZWAVE Motion Detector with Temperature Sensing
 Motorized Window Blinds & Shades
 Motorized Dual Window Shade
 Make Motorized Blackout Blinds
 Phone-Tablet-PC Control for Motorized Blinds
 Mini Motor for Existing Shade Retrofit
 Roman Shade Retrofit
 Make a Motorized Window Opener
 Blind & Shade Motors for RV & Boats
 Make Your Own Projector Screen
 Curtain Closer: Ultimate Home Theater
 Wireless Battery Operated Drapery Motor Kit
 Make a Motorized Bottom-Up Shade
 Make a Motorized Skylight Opener
 BroadLink RF/IR Hub System for Motors
 Why Buy From US?
 Background & Mission Statement
 Customer DIY Testimonials
 Site Map - Search All Pages
 Why Buy From US?
 RollerTrol Users Forum
 Contact Page