Raspberry Pi Low Cost Home Automation: NOOBS OS Installation
Adrian Biffen, Senior Partner
PLEASE NOTE: We found the Node-Red system with its visual design system to be another excellent way to set up a home automation system, and it is our current favourite. See OUR ALTERNATE ARTICLE SERIES on how we control blinds, lights, window openers and many other devices with Alexa™, using Node-RED and Alexa™ on the Raspberry Pi (Node-RED comes pre-installed on the Pi).
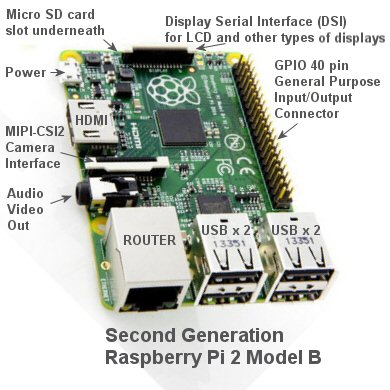 The Raspberry Pi ® is a very affordable, credit-card sized SBC (Single Board Computer). It is a very capable device designed for computer exploration, as discussed in the previous article.
This article will discuss the process of downloading and installing the officially supported Raspbian operating system from scratch onto an empty Micro SD card, using the second generation product (Raspberry Pi 2 Model B) and the NOOBS installer.
The Pi 2 Model B can function as a home automation controller just as well as other dedicated units such as Vera®, Wink®, Homeseer®, SmartThings®, etc. It also functions very nicely as a general purpose computer.
Configured as a home automation hub, it does not depend on the cloud for operation, something we feel is a very important consideration when setting up an automated system. It will control your home and greenhouse with or without an internet connection.
Please Note: Many of the Raspberry Pi kits contain a micro SD card that already has the Raspbian operating system installed and ready to go. You just insert the card into the Pi, connect an HDMI monitor or TV, mouse and keyboard, then power it up. After some minor very easy configuration steps, it will load the GUI (Graphical User Interface) and you're good to go! (and you can skip down to First Boot of Your Pi if this is what you have)
The kits also typically include a 'wall wart' type of 5v AC/DC power supply; this can be important because the Pi is powered via a micro USB connector (not a mini USB connector). If you don't have a tablet or other device with the same type of power supply, you'll want to include one of these in your purchase.
The Micro-SD Memory Card
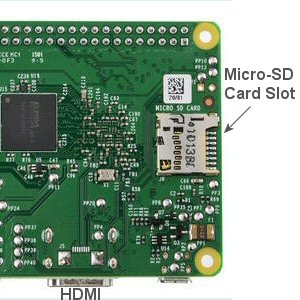
 The Pi 2 B has a slot on the underside of the board that accepts a Micro-SD card that is about the size of a thumbnail.
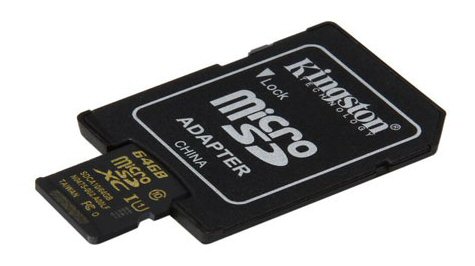
This tiny little component can actually be thought of as a replaceable solid state hard drive for the Pi that can be swapped out with other Micro-SD cards, containing different operating systems. They hold quite a lot of memory, and a 64 GB unit will give you plenty of room for the operating system, programs and data.
Here it is shown as inserted into the larger adapter that allows you to use a regular laptop to recognize it as another drive.
Micro-SD cards can be slow, so you may want to hunt for one that conforms to the UHS-II spec, which means they share the same performances figures as fully grown SD cards: currently 240MBps write speed and 260MBps read.
The NOOBS Installer Package
 NOOBS is an acronym for New Out Of Box Software, and it is essentially a compressed zip file that will automatically install the operating system that you select.
We used it to install the Raspbian operating system, which is the officially supported operating system for the Pi. There are plenty of other options for an OS, but we felt this would be the safest one to start with.
The NOOBS file is quite large and the download servers may be busy (i.e. slow), so allow yourself some time to download the file (it took around 10 minutes for us on a fast broadband connection).
We used one of our Dell laptops with Windows 7 to download and expand the NOOBS package, then we copied the unzipped files to the Micro-SD card that was seen as drive F: in our Windows 7 file manager.
Here is the download page:
 There are a few different ways to do this, as seen on the download page, but we chose the ZIP download.
Once you have finished downloading and unzipping the NOOBS installer, you can copy it to your new Micro-SD card.
The new card is probably pre-formatted, and you can test this by copying a single file to it. If it won't copy, you may have an unformatted Micro-SD card and you'll have to format it before you can proceed.
Once the NOOBS installer is copied to your Micro-SD card, you can insert it into the slot underneath the board. It will only go in one way, and you should not force it.
It has a toggle latch that will hold it in place, so just slide it in until you see it latch in place. To remove it, just push it in slightly and it will release the latch and the spring loaded mechanism will eject it.
First Boot of Your Pi
At this point you are very close to that magic moment where you can fire up this puppy.
We had previously purchased a wireless keyboard/mouse pair that uses a USB dongle, and we plugged that in (turns out it worked perfectly). You can also use wired versions; this Pi has 4 USB ports, so no problem using 2 for those components. We later found that we had to select the standard US keyboard (in preferences) to make the @ symbol appear properly when typing an email address.
We also plugged in our HDMI projector so we could see the output video on the big screen, and the final step was to insert the power cable from the wall wart into the micro USB power plug ...
And boom, it booted up, the NOOBS install process started, and the very user friendly process began. We had to select the Raspbian option with the mouse, and it launched straight into the install procedure.
This takes a while, and there are message screens with general information about the Pi capabilities that provide useful information while a progress bar is displayed.
When that process finished, we had to login (default user is raspberry, password is pi), and it went straight into the graphical front end. Here's a photo of what that looked like after we installed NetHomeServer (you can see the very nice default home automation plan view in 3D):
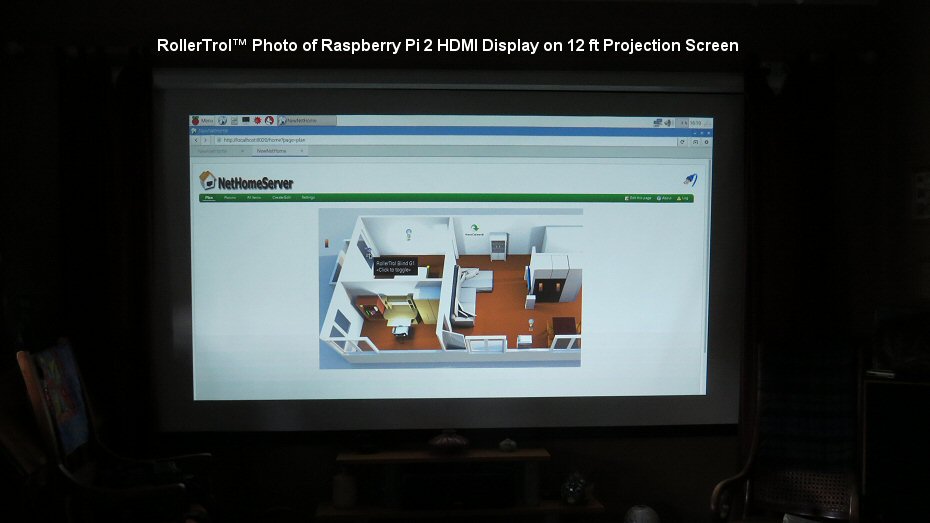
As I mentioned previously, we were very pleasantly surprised that we immediately had access to applications such as browser, email, office suite, programming tools, text editor and numerous other programs.
Pretty much everything happens along the menu bar at the top of the screen, here's an enlargement of the top left area (captured with Scrot, the built-in screen capture utility, then emailed to my laptop with the really nice Claws email client):

From left to right, here's what you see in the above image:
- Main Menu (the Raspberry Icon): Click this for sub-menu (see below)
- 'Quick Launch' Application Icons: Browser (globe icon), File Manager (filing cabinet icon), Terminal (command line access), Mathematica (splash icon), Wolfram (wolf Icon)
- 2 tabs that give quick access to programs already running - in this case Browser and Terminal
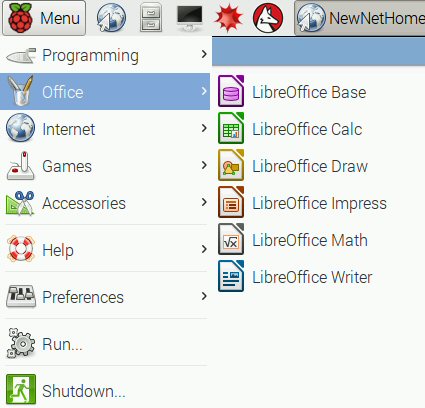 When you click the Raspberry Icon the main menu drops down, and there are subsequent flyout menus from that; in this image we're showing the Libre Office Suite (there's a lot of capability there!).
This Pi is a very suitable replacement for any laptop, just as a general purpose computer.
If you don't own a computer, the Pi would be a very effective entry point into the world of computing, and it really is amazing to see what a credit card size computer can do these days.
Our primary interest was in applying the Pi as a home automation controller, so we didn't explore for long and quickly moved on to Stefan's OpenNetHome automation software. This software sets the Pi up as a web server on your local network, and you can access it with any browser on any device in your home, or from anywhere on the Internet (if you decide you want remote capability).
Please see Part 3 for that implementation.
Installing Ice Weasel (Firefox browser) on the Raspberry Pi
Ice Weasel is the name given to Firefox browser when run on the RPi. It is easier to use than the Epiphany browser installed by Raspbian. Here are the commands:
sudo apt-get update (updates library locations)
sudo apt-get install iceweasel (downloads and installs Ice Weasel)
Once you have it installed, right-click on the top border bar to activate the bookmarks bar to make bookmarking easy, and the menu bar if you want direct access to the menu system.
Please Note: Our blind motors and window openers are operated with wall mount and hand held controls, and our system is designed to allow automation to be added at any time. This means you can start with our simple remote controls and add the automation later, and take your time with it. Our remote controls will continue to function while you build your automation system and will also continue to function after the automation is activated.
You can find out where to buy the Pi 2 Model B unit by searching for this phrase: "buy a pi [country]"
Here are some examples using the DuckDuckGo search engine that doesn't track you:
We sincerely hope you enjoy using these articles; if you have any questions, please feel free to contact us at any time!
PART 1: Raspberry Pi As A Home Automation Controller: Introduction
PART 2: Raspberry Pi As A Home Automation Controller: Using NOOBS to Install Raspian (YOU ARE HERE)
PART 3: Raspberry Pi As A Home Automation Controller: Installing OpenNetHome Software
PART 4: Raspberry Pi As A Home Automation Controller: Creating a Window Blind Device
PART 5: Raspberry Pi As A Home Automation Controller: Using 3D Software to Create your Floor Plans

 Shopping Cart Home - Start Here
 Remote Controls for Radio Equipped Motors
 DIY Starter Kits for Window Shades
 DIY Starter Kits for Window Openers
 ZWAVE Blind & Shade Controllers
 How To Choose the Right Blind & Shade Motor
 Select tubular Motor (Comparison table)
 Choose RollerTrol Battery & Solar Motors
 DIY Roller Blind Motors - FAQ
 How To Insert Blind Motors & Attach Brackets
 Calculate your Blind or Shade fabric Weight
 Select Tube Size for Blind Motor
 How to Insert Blind Motors Into Tube
 How to Insert Blind Motors Into Tube with Adapters
 Attach Mounting Brackets - Standard + Mini Series
 Attach Mounting Brackets - MAXI Blind Series
 How To Set Up Radio Equipped Blind & Shade Motors
 Series P Radio Remote Control Motors
 Series G Radio Remote Control Motors
 Series R Radio Remote Control Motors
 BroadLink RF/IR Hub System for Motors
 How To Set Up Window/Skylight Openers
 Introduction: Window & Skylight (K Series)
 BroadLink RF/IR Hub System for Motors
 Z-Wave Interfacing for Shade & Opener Motors
 Wired Wall Switch Control of Window Openers
 How To Use Alexa With Our Motors & Window Openers
 How To Use BroadLink Phone App Hub With Our Motors
 How To Set Up ShadeSlider Skylight or Bottom-Up Blind
 How To Retrofit RV, Boat and Motorhome Blinds
 How To Set Up Non-Radio Motors
 Operation & Travel Limits of Non-Radio Motors
 Make a Simple DC Motor Reversing Switch
 How To Set Up ZWAVE Control
 ZWAVE Controller for G Series Radio motors
 ZWAVE Door/Window Opening Detection
 ZWAVE Motion Detector with Temperature Sensing
 Motorized Window Blinds & Shades
 Motorized Dual Window Shade
 Make Motorized Blackout Blinds
 Phone-Tablet-PC Control for Motorized Blinds
 Mini Motor for Existing Shade Retrofit
 Roman Shade Retrofit
 Make a Motorized Window Opener
 Blind & Shade Motors for RV & Boats
 Make Your Own Projector Screen
 Curtain Closer: Ultimate Home Theater
 Wireless Battery Operated Drapery Motor Kit
 Make a Motorized Bottom-Up Shade
 Make a Motorized Skylight Opener
 BroadLink RF/IR Hub System for Motors
 Why Buy From US?
 Background & Mission Statement
 Customer DIY Testimonials
 Site Map - Search All Pages
 Why Buy From US?
 RollerTrol Users Forum
 Contact Page