IFTTT Phone App: Skylight Opener with Rain Sensor Event Handler
Overview
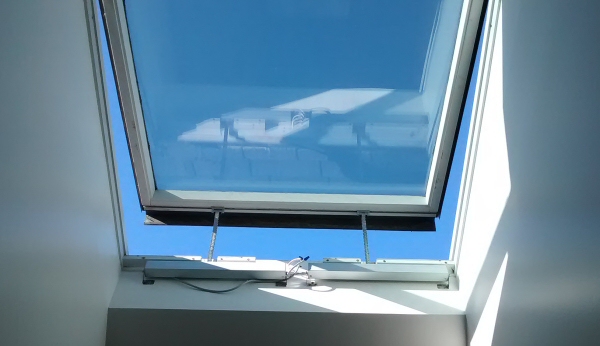
This is the third article in this series about creating an IFTTT rain sensor monitoring system for our motorized skylight openers.
It is both affordable and able to control our motors directly, because it has the ability to "learn" individual RF motor control signals, including those used to open and close our skylight/window actuators.
The BroadLink® alarm system is part of our automated hub solution, and it is being re-purposed by using a door/window open/close sensor as a digital input for the rain detector.
The hub phone app controls our skylight/window openers, blind motors, smart film, drapery motors, and many other devices, such as fans and LED lights.
If you missed the previous article about the inclusion of the rain sensor component, please consider reviewing that article first.
 In this article we will be discussing the software that generates the IFTTT (if-this-then-that) event manager for the rain sensing system applied to a typical example of a motorized skylight opener, such as the units you see in the picture above.
There are 4 key hardware components (the first 3 are part of the SK1-WIFI-AC Security Kit):
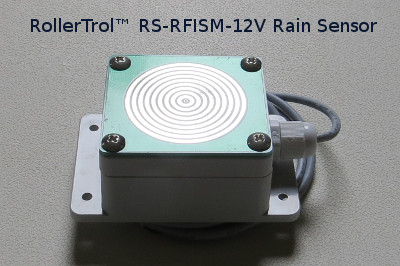
- The RS-RFISM-12V rain sensor provides a normally open relay behavior; water droplets trigger the circuit to turn on
- The DW-RFISM-3VB wireless door/window open detection transmitter (re-purposed as an input for the rain sensor)
- The TR-RFISMW-AC transceiver hub that contains the IFTTT (if-this-then-that) event reaction program
- The HA-RFIRW-5V controller hub that activates the skylight actuator motors for open and close actions
The BroadLink® Control App for Android and IOS
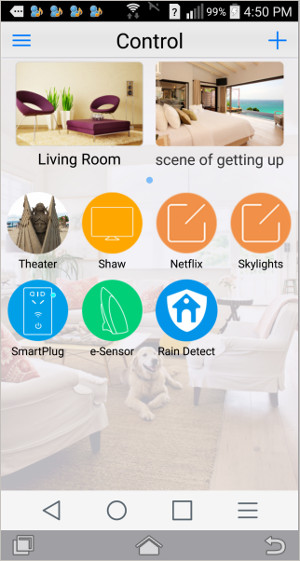 The picture to the right is a screen capture of the BroadLink® Android phone app (IOS is also available).
This is the master home screen for the entire system, where we have created control screens and installed various devices, including the last device icon that says "Rain Detect".
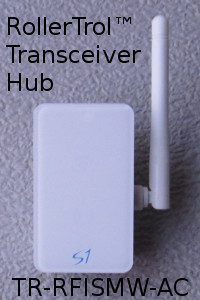 The very last item (Rain Detect) on the home screen is the icon that appears when you connect the TR-RFISMW-AC alarm transceiver hub (pictured at left) to your wifi router.
This alarm hub is the focus of this article series, managing the event logic and communications with the rest of the system via WiFi through your router. It also receives the digital trigger signals from the re-purposed door/window sensor that is connected to the rain sensor.
The hub contains the IFTTT alarm event reaction program, and it will automatically appear on any phones or tablets in your system that have had the BroadLink app installed.If you haven't already done it, please plug it into an outlet and connect to your router using the SmartConfig™ method; just enter your router SSID and password credentials.
It will connect and retain those settings in non-volatile flash memory, so even if you have a power failure, it will automatically re-start when power is restored (as do all the units in this system).
Creating IFTTT (if-this-then-that) Event Triggers and Subsequent Actions
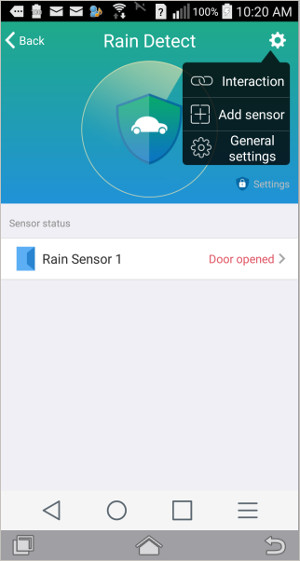
When you press the Rain Detect icon, you'll get the first screen on the left, below. This is the status monitoring screen for your alarm system, and it will show you the current status of the door/window sensor that has been re-purposed as a rain sensor.
If you press the gear icon in the top right of the status reporting screen you will get a drop-down menu with 3 choices:
- Interaction
- Add sensor
- General settings
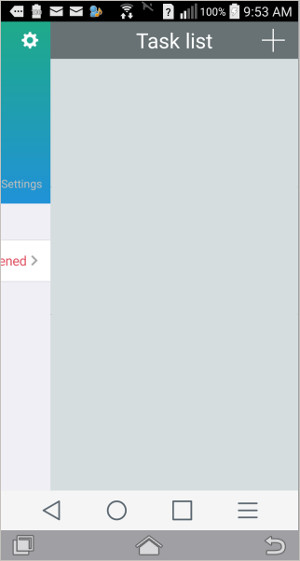
Press the Interaction menu item and you'll get the second screen below, which is where we start the process of creating an IFTTT (if-this-then-that) event handler.
Press the large + symbol to add an event trigger; you'll see the third screen below:
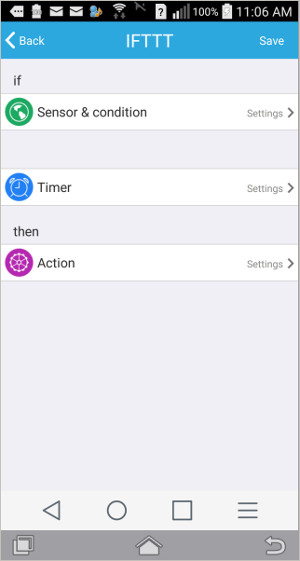
As seen in the last picture above, there are three steps involved in setting up a sensor event action:
- Sensor and Condition
- Timer (optional)
- Action
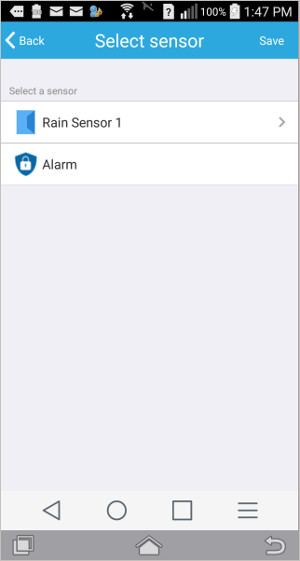
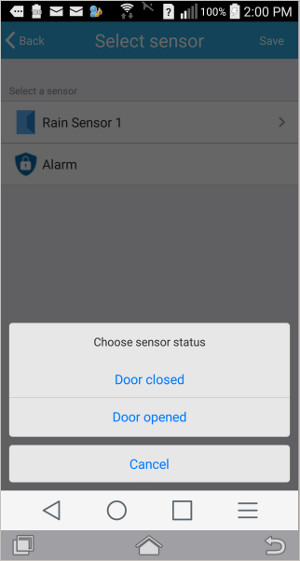
Press the Sensor and Condition option and the first screen below will appear. The name that appears will be the default name of the door/window sensor and you can change it to Rain Sensor 1 (or whatever you want) later. Do not press the 'Alarm' choice, that is for an entirely different function.
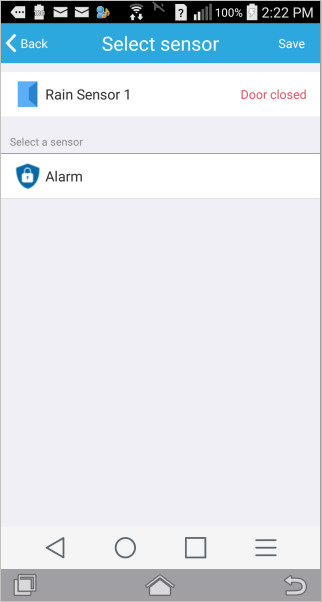
When you press the sensor selector (not the alarm) that is seen in the first screen below, the next "condition selector" screen will appear, as seen in the second picture below. Keep in mind this is the first of two events we are setting up for the re-purposed door/window sensor, one for "door closed" (rain start) and one for "door open" (rain stop). Choose "door closed" in this case.
After you choose the sensor condition, you will be returned to the third screen, with the opportunity to save these settings, so it's a good idea to do that at this point. You can always delete an event later, if required.
After saving the setup so far, pressing the "Back" button will take you to the saved list of sensors, and pressing the one we are working on will bring up the action screen again, as seen in the first picture below. We will skip the timer function, but suffice to say there is a lot of flexibility that can be introduced with that, such as delays, duration, daily repeatability, etc.
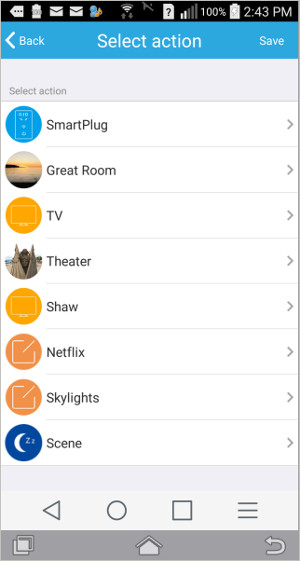
Pressing the "Action" button will set us up with a link to the various remote control capabilities that have already been set up on your system (see second picture below), one of those being the motor control system that opens and closes the skylight.
Please Note: If you didn't see the previous article series about using our HA-RFIRW-5V controller hub for home theater, you may be interested to review that series as this IFTTT rain sensor is an add-on to that system. The previous series explains how to "learn" remote control signals for your motorized blinds, shades, and skylight/window openers.
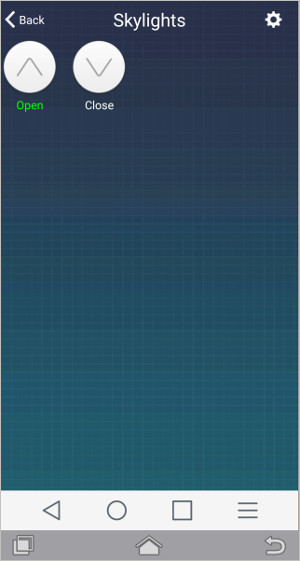
Following on, when you press the skylight remote selector (in second picture below), you'll see the actual action button that you normally press to manually close the motorized skylights (third screen below). Push that button and you'll complete the assignment of that action to the event. It is quite a simple process once you have done it a few times.

Testing the Wireless Door/window Transmitter Used as an Input Device for a Rain Sensor
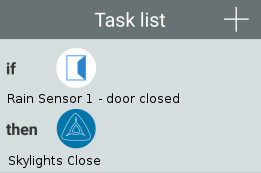 Please keep in mind that we are re-purposing the door/window opening sensor as an input device for the rain sensor. Your task list should look something like this picture.
If you missed the previous articles about the re-purposing the door/window sensor as an input, you can see the first article here.
If you followed along and reached this point with your installation, you should be able to return to the status monitoring screen and put a single drop of water on the metal detector plate of the rain sensor and see your skylight(s) close.
To finish the event programming, you would now repeat the entire event configuration to handle the rain stopped event. The only difference will be the condition selector (door open event) and the action selector (skylights open).
You may also prefer to raise a notification instead of actually opening the skylights right away; the options are many, and you can decide what works best in your particular situation.
Confirming the Action
If this is a critical application, you may want to do more to make sure things happen as intended. Here are a few examples:
- Set up a power interruptor that will prevent accidental over-ride of the skylight opening during rainfall. You could do this with our remote control relay module that can be programmed into the system. You might want to use an external "normally-closed" relay as our modules are "normally open"; this would save energy and prevent relay coil failure because neither relay would be powered on unless it is raining.
- Set up a second door/window sensor to make sure the skylight has actually closed; this would protect you in case the motor itself fails. You could also use a separate transceiver hub that would make the system completely redundant; they are not expensive..
Where To Go From Here
Articles in this Skylight Rain Sensor series:
Part 1-Motorized Skylight Rain Sensor: Introduction
Part 2-Skylight Rain Sensor Hardware Setup
Part 3-Skylight Rain Sensor Program Event Handling (you are here)
You can also see more info about our motorized skylight/window actuators here.
Also, see the follow-on series about our other companion devices:

 Shopping Cart Home - Start Here
 Remote Controls for Radio Equipped Motors
 DIY Starter Kits for Window Shades
 DIY Starter Kits for Window Openers
 ZWAVE Blind & Shade Controllers
 How To Choose the Right Blind & Shade Motor
 Select tubular Motor (Comparison table)
 Choose RollerTrol Battery & Solar Motors
 DIY Roller Blind Motors - FAQ
 How To Insert Blind Motors & Attach Brackets
 Calculate your Blind or Shade fabric Weight
 Select Tube Size for Blind Motor
 How to Insert Blind Motors Into Tube
 How to Insert Blind Motors Into Tube with Adapters
 Attach Mounting Brackets - Standard + Mini Series
 Attach Mounting Brackets - MAXI Blind Series
 How To Set Up Radio Equipped Blind & Shade Motors
 Series P Radio Remote Control Motors
 Series G Radio Remote Control Motors
 Series R Radio Remote Control Motors
 BroadLink RF/IR Hub System for Motors
 How To Set Up Window/Skylight Openers
 Introduction: Window & Skylight (K Series)
 BroadLink RF/IR Hub System for Motors
 Z-Wave Interfacing for Shade & Opener Motors
 Wired Wall Switch Control of Window Openers
 How To Use Alexa With Our Motors & Window Openers
 How To Use BroadLink Phone App Hub With Our Motors
 How To Set Up ShadeSlider Skylight or Bottom-Up Blind
 How To Retrofit RV, Boat and Motorhome Blinds
 How To Set Up Non-Radio Motors
 Operation & Travel Limits of Non-Radio Motors
 Make a Simple DC Motor Reversing Switch
 How To Set Up ZWAVE Control
 ZWAVE Controller for G Series Radio motors
 ZWAVE Door/Window Opening Detection
 ZWAVE Motion Detector with Temperature Sensing
 Motorized Window Blinds & Shades
 Motorized Dual Window Shade
 Make Motorized Blackout Blinds
 Phone-Tablet-PC Control for Motorized Blinds
 Mini Motor for Existing Shade Retrofit
 Roman Shade Retrofit
 Make a Motorized Window Opener
 Blind & Shade Motors for RV & Boats
 Make Your Own Projector Screen
 Curtain Closer: Ultimate Home Theater
 Wireless Battery Operated Drapery Motor Kit
 Make a Motorized Bottom-Up Shade
 Make a Motorized Skylight Opener
 BroadLink RF/IR Hub System for Motors
 Why Buy From US?
 Background & Mission Statement
 Customer DIY Testimonials
 Site Map - Search All Pages
 Why Buy From US?
 RollerTrol Users Forum
 Contact Page