FAQ: Can a timer be used with electric blinds?
PLEASE NOTE: If you received your timer after to April 1, 2015 please refer the series G blind and shade timer instructions. The instructions on this page are for series R timers, which have been superseded with series G. This page is here for legacy purposes.
A timer can be used to activate our radio equipped blind and shade motors using RF (Radio Frequency) for transmission of a remote control signal. This is a four part article series on how to set up the timers.
Please Note: The Vera home automation system gives much better control over times, and can also track the change in dawn/dusk times over the course of a year. It costs more, but not that much, and represents great value. It is also very user friendly, whereas our stand-alone timer is not.
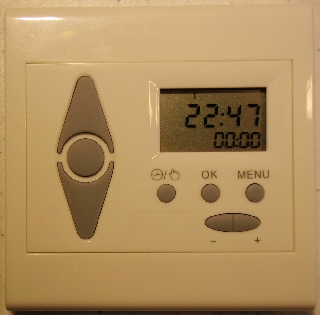
The MCT-1-RF wireless wall mounted timer transmits the radio signal to a small antenna in the motor; a microprocessor then decodes the signals to activate the motor. The timer is able to memorize a total 18 different timing event triggers, organized in a sequential fashion from Monday to Sunday. It can also be used in conjunction with our sunlight sensor.
The RF signal is also capable of passing through walls and in many cases can reach anywhere inside a typical home.
Our multi-channel hand held remotes have up to 14 channels that can be programmed to control blind motors in various different rooms and hallways throughout the house. These remotes transmit the same signal as the timers and can be used in conjunction with them.
 The first step in setting these timers is to remove the cover, exposing the battery compartment and several concealed setting switches.
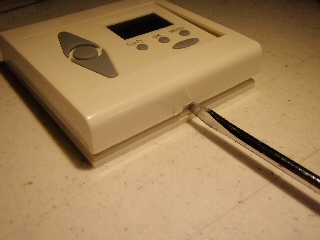
There are two slots on the top and bottom of the timer that accept a flat screwdriver blade, as in the picture on the left.
When you rotate the screwdriver blade in each slot, it will pop the clamps inside the unit, releasing the top cover.
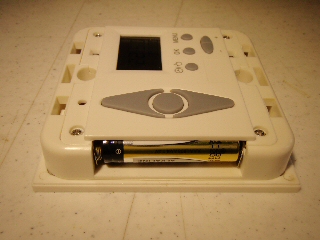
You can then lift off the cover, exposing the battery compartment and the setting switches.
The battery compartment is on the left side of the unit. The battery itself (supplied) is a standard 1.5 volt AAA unit and will be marked with a positive (+) (top) and negative (-) (bottom) terminal.
 The battery should be inserted with the bottom (negative) terminal against the spring inside the battery compartment.
When the battery is inserted, the LCD display will switch on and there will be various timer parameters displayed, but please observe the self-test period, as per the note below:
NOTE: Please wait 5 minutes for the self-check to complete and for the circuitry to stabilize, before entering any settings. The unit will be ready for programming when the clock display changes to 00:01 if it has not been previously pre-programmed.
Also, when you remove the battery to change it, there is a built-in temporary battery to allow you enough time to make the change without losing all the settings. If you want to reset the unit and erase all settings, leave the battery out for 5 minutes or longer, until the standby battery has fully discharged.
PART 1: Timer for blinds - Removing the Cover
PART 2: Timer for blinds - Controls and Layout
PART 3: Timer for blinds - Linking to a Radio Motor
PART 4: Timer for blinds - Creating Timer Events
We sincerely hope you enjoy using these advanced motors; if you have any questions, please feel free to contact us at any time!

 Shopping Cart Home - Start Here
 Remote Controls for Radio Equipped Motors
 DIY Starter Kits for Window Shades
 DIY Starter Kits for Window Openers
 ZWAVE Blind & Shade Controllers
 How To Choose the Right Blind & Shade Motor
 Select tubular Motor (Comparison table)
 Choose RollerTrol Battery & Solar Motors
 DIY Roller Blind Motors - FAQ
 How To Insert Blind Motors & Attach Brackets
 Calculate your Blind or Shade fabric Weight
 Select Tube Size for Blind Motor
 How to Insert Blind Motors Into Tube
 How to Insert Blind Motors Into Tube with Adapters
 Attach Mounting Brackets - Standard + Mini Series
 Attach Mounting Brackets - MAXI Blind Series
 How To Set Up Radio Equipped Blind & Shade Motors
 Series P Radio Remote Control Motors
 Series G Radio Remote Control Motors
 Series R Radio Remote Control Motors
 BroadLink RF/IR Hub System for Motors
 How To Set Up Window/Skylight Openers
 Introduction: Window & Skylight (K Series)
 BroadLink RF/IR Hub System for Motors
 Z-Wave Interfacing for Shade & Opener Motors
 Wired Wall Switch Control of Window Openers
 How To Use Alexa With Our Motors & Window Openers
 How To Use BroadLink Phone App Hub With Our Motors
 How To Set Up ShadeSlider Skylight or Bottom-Up Blind
 How To Retrofit RV, Boat and Motorhome Blinds
 How To Set Up Non-Radio Motors
 Operation & Travel Limits of Non-Radio Motors
 Make a Simple DC Motor Reversing Switch
 How To Set Up ZWAVE Control
 ZWAVE Controller for G Series Radio motors
 ZWAVE Door/Window Opening Detection
 ZWAVE Motion Detector with Temperature Sensing
 Motorized Window Blinds & Shades
 Motorized Dual Window Shade
 Make Motorized Blackout Blinds
 Phone-Tablet-PC Control for Motorized Blinds
 Mini Motor for Existing Shade Retrofit
 Roman Shade Retrofit
 Make a Motorized Window Opener
 Blind & Shade Motors for RV & Boats
 Make Your Own Projector Screen
 Curtain Closer: Ultimate Home Theater
 Wireless Battery Operated Drapery Motor Kit
 Make a Motorized Bottom-Up Shade
 Make a Motorized Skylight Opener
 BroadLink RF/IR Hub System for Motors
 Why Buy From US?
 Background & Mission Statement
 Customer DIY Testimonials
 Site Map - Search All Pages
 Why Buy From US?
 RollerTrol Users Forum
 Contact Page