RPi + BroadLink Hub + Home Assistant: Low Cost Home Automation
Adrian Biffen, Senior Partner
Please Note: This article series is NOT about the Google Assistant system.
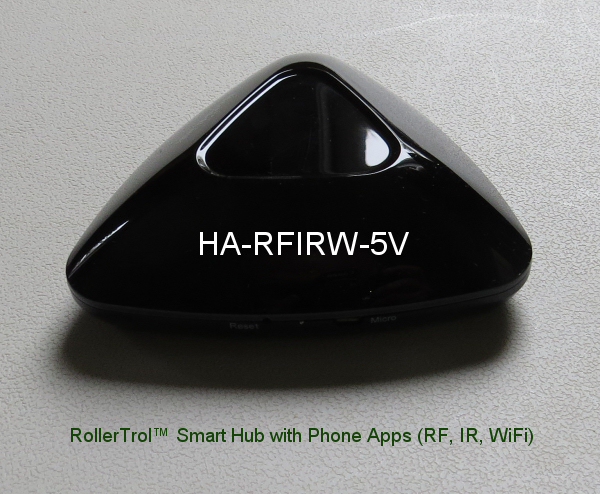 The BroadLink® RF-IR Blaster can directly control our roller shade motors and window openers with the excellent BroadLink® phone app, and this may well be all you need.
But if you want to take things further, you can couple it to the Raspberry Pi® (a low cost, credit-card sized computer) via wifi using the excellent open source Home Assistant program.
If you install the powerful Home Assistant home automation system (HASS) on the Pi, you will turn it into a very effective, low cost home automation system that will integrate over 600 different devices.
This is the second article in this series and if you missed the previous introduction to the RaspBerry Pi, you might want to have a look at that first.
In this article we will discuss the configuration and setup of Home Assistant, as it pertains to making the BroadLink® RF-IR blaster function with our 433 MHz blind motors, TV remote, and disabling/enabling Alexa®.
This is an example of three typical things you may need to control in your media room or home theater: Alexa, blackout blinds and TV remote control.
This article series will not cover installation of the Home Assistant system on the Pi as this is well covered at the Home Assistant website.
However, we think the All-in-one installer for Raspberry Pi is the best way to install the HASS program on the Pi because it automatically installs extra components such as MQTT and Z-Wave. It also sets up a virtual environment that prevents other programs from interfering if they are updated with new libraries that could possibly break the HASS system.
The HASS software can also be installed on any OS platform; for instance, we used our lab machines running Ubuntu® to host the HASS system and to capture screens from HASS and write this article series. We later moved it to an RPi 3.
We won't cover the setup of Alexa® here, but I would point out we have an Echo Dot that is plugged into one of our BroadLink® smart plugs, so that we can turn it off when we don't want it listening from the Amazon® cloud.
Configuring the Home Assistant (HASS) Software
 The HASS program is controlled by a text file (configuration.yaml) that follows a specific type of data protocol called YAML, which is essentially a superset of JSON data files, both of which use a data structure known as key/value pairs.
For example, here are the three key/value pairs that define our location and time zone in the configuration.yaml file:
- latitude: 19.5846
- longitude: -155.0242
- time_zone: Pacific/Honolulu
It is a relatively simple file, but keep in mind that, like the Python language, indentation is an important and critical feature. If you get it wrong, the HASS system will let you know with error messages.
Also, please note that lines with a '#' character in front are not executable, they are just comments that make the key/value pairs and headings more understandable.
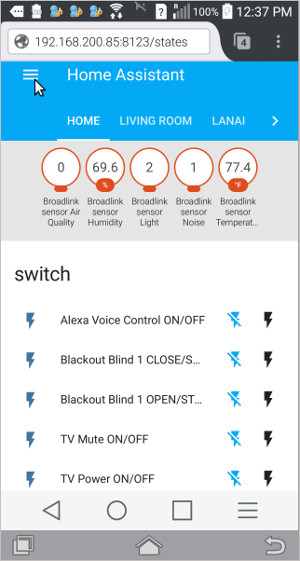
If you download and install the example configuration file below, you'll be able to set your HASS system up in the same way we did. You should get a home screen that looks like the picture at right, where we have placed a few example sensors and controls.
You will have to edit this file and enter the IP and MAC address of each device you have on your system; the sensor and switch controls will not appear until you do this. You can get that information by logging into your router admin, or by using software to scan your network. We used arp-scan on Ubuntu to get that information.
At the top, we have the BroadLink® e-Air sensor reporting on room environmental conditions. It is capable of IFTTT (if-this-then-that) automation, either with the separate BroadLink® phone app, or with the HASS system.
Then we have the Alexa® power control, blackout blind controls, and the TV power and mute functions.
We won't be covering the sensor aspect of things here, but we have another article series that covers the environmental sensor automation topic using the very capable BroadLink® phone app (which can still be used, even if you are running HASS):
IFTTT example: temperature and light sensitive blinds and shades
The Home Assistant Example Configuration File
Here is the download link: (opens in a new tab in your browser, click to view)
Download Home Assistant Example File
After you replace the default configuration.yaml file for HASS with this file, you can start the remote control code captures, as described below, and copy/paste them into the command_on and command_off sections of the yaml config file. Please note the cursor arrow pointing to the menu selector in the above picture; you'll be using this menu system to capture and display IR and RF code strings.
HASS Runs as a Local Web Server (with optional remote access)
If you have already installed HASS, you'll know that it turns your Pi (or whatever you installed it on) into a web server, with an interface that can be viewed in a browser like Firefox® on any device connected by wifi (or cable) to your router.
The screen captures you see in this article were taken from my Android phone (running Firefox) to demonstrate that it is a completely responsive design, and it looks good whether it is on a small phone, a larger tablet, or a regular computer monitor (regardless of browser).
We also noted that any changes were immediately reflected on all the browser screens we had looking at the interface, including other Ubuntu laptops, an iPad, and another Android phone. This is very nice.
If you have successfully loaded the home screen above, please click on the menu selector (see the cursor arrow above) to reveal the HASS system sub-menu shown in the first picture below ...
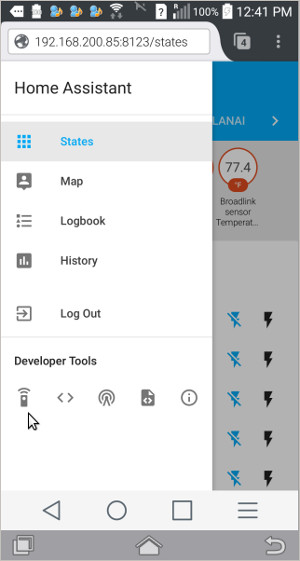
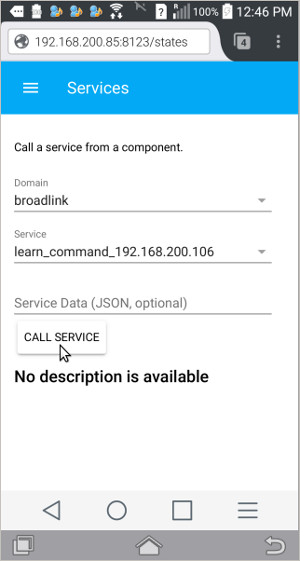
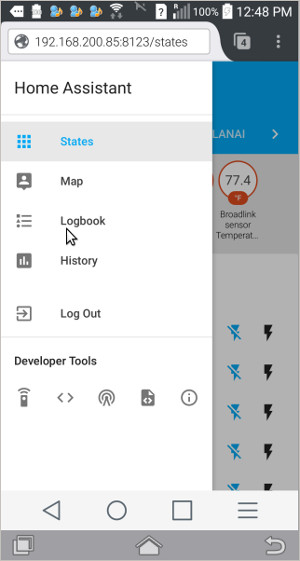
In the Developer Tools area of the sub-menu, you'll see an icon that resembles a remote control; clicking on that brings up the second screen you see above. This is the actual interface that allows you to capture the codes from your remote control to store in the HASS system.
 When you press the Call Service button (see arrow on picture), you should see the yellow LED on the BroadLink hub turn on to indicate that it has been set to learning mode. You then have 20 seconds to press the button on your remote for the function you want to store; when you release the button, you should see the yellow learning LED turn off.
Some key points:
- The system will automatically detect whether you are using an RF or IR remote
- If recording an RF signal, hold the remote right up to the BroadLink hub when you press the remote
- IR distance is not so critical, but you should be within a few feet
- Press the button you want to capture firmly, then release it. We found that a half second duration works well
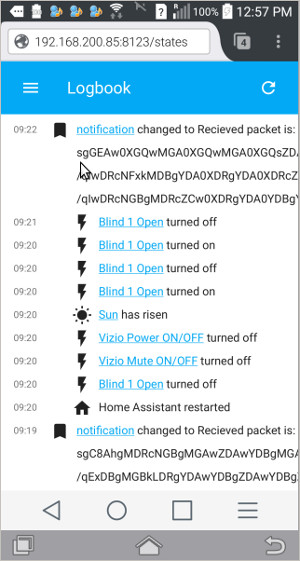
The captured code will be stored automatically in the logfile, which is accessed via the Logbook menu item shown in the third picture above (see arrow cursor). This produces the logfile report shown in the picture to the right.
https://community.home-assistant.io/t/rf-remotes-with-broadlink/6291/84
There are many events captured in the logfile, so we scrolled it so the captured code is at the top. You can see the captured code event in the picture where the cursor arrow is.
*UPDATE - PLEASE NOTE: In the newest version the captured code is not put into the logfile; instead it appears in the front end when you click on 'States' and can be copied from there. This is a permanent change. Here is the relevant HASS forum discussion:
It is important to understand that the captured codes are much longer than what you see on the screen, and the copy/paste function is much easier to handle on a laptop or desktop system, rather than a phone.
Here is a screen capture of the actual command_on of the RF digital radio code that makes our blackout blind open (note that it must be enclosed in single quotes):

Once you have captured all the control codes you need (and configured the IP/MAC addresses), you should be able to re-start HASS and be able to control everything you want to. It worked perfectly for us, but if you have problems please check IP addresses and MAC addresses in the yaml configuration file.
Buy These Products Online
If you are interested, you can purchase these products in our DIY online store.
Articles in this series:
Part 1: RPi + BroadLink Hub + Home Assistant: Introduction
Part 2: RPi + BroadLink Hub + Home Assistant: Using the RaspBerry Pi with Home Assistant (you are here)
Part 3: RPi + BroadLink Hub + Home Assistant: Multi-Position Slider Control for Blind Motors
Where To Go From Here
You can also see more info about our motorized skylight/window actuators here.
Also, see the follow-on series about our other companion devices:

 Shopping Cart Home - Start Here
 Remote Controls for Radio Equipped Motors
 DIY Starter Kits for Window Shades
 DIY Starter Kits for Window Openers
 ZWAVE Blind & Shade Controllers
 How To Choose the Right Blind & Shade Motor
 Select tubular Motor (Comparison table)
 Choose RollerTrol Battery & Solar Motors
 DIY Roller Blind Motors - FAQ
 How To Insert Blind Motors & Attach Brackets
 Calculate your Blind or Shade fabric Weight
 Select Tube Size for Blind Motor
 How to Insert Blind Motors Into Tube
 How to Insert Blind Motors Into Tube with Adapters
 Attach Mounting Brackets - Standard + Mini Series
 Attach Mounting Brackets - MAXI Blind Series
 How To Set Up Radio Equipped Blind & Shade Motors
 Series P Radio Remote Control Motors
 Series G Radio Remote Control Motors
 Series R Radio Remote Control Motors
 BroadLink RF/IR Hub System for Motors
 How To Set Up Window/Skylight Openers
 Introduction: Window & Skylight (K Series)
 BroadLink RF/IR Hub System for Motors
 Z-Wave Interfacing for Shade & Opener Motors
 Wired Wall Switch Control of Window Openers
 How To Use Alexa With Our Motors & Window Openers
 How To Use BroadLink Phone App Hub With Our Motors
 How To Set Up ShadeSlider Skylight or Bottom-Up Blind
 How To Retrofit RV, Boat and Motorhome Blinds
 How To Set Up Non-Radio Motors
 Operation & Travel Limits of Non-Radio Motors
 Make a Simple DC Motor Reversing Switch
 How To Set Up ZWAVE Control
 ZWAVE Controller for G Series Radio motors
 ZWAVE Door/Window Opening Detection
 ZWAVE Motion Detector with Temperature Sensing
 Motorized Window Blinds & Shades
 Motorized Dual Window Shade
 Make Motorized Blackout Blinds
 Phone-Tablet-PC Control for Motorized Blinds
 Mini Motor for Existing Shade Retrofit
 Roman Shade Retrofit
 Make a Motorized Window Opener
 Blind & Shade Motors for RV & Boats
 Make Your Own Projector Screen
 Curtain Closer: Ultimate Home Theater
 Wireless Battery Operated Drapery Motor Kit
 Make a Motorized Bottom-Up Shade
 Make a Motorized Skylight Opener
 BroadLink RF/IR Hub System for Motors
 Why Buy From US?
 Background & Mission Statement
 Customer DIY Testimonials
 Site Map - Search All Pages
 Why Buy From US?
 RollerTrol Users Forum
 Contact Page