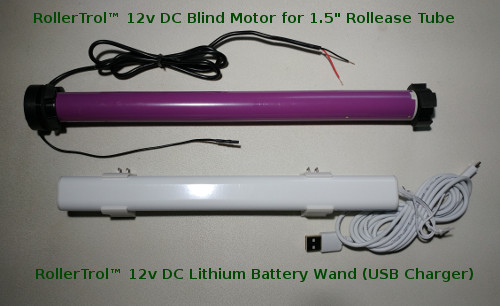
The instructions starting at step 1 apply to this motor:
TMDP-12-25-15-32-R (12 lb lift capacity)
The instructions starting at step 1 apply to this remote:
DCGQ-5-RF (5 ch hand held, with holster)
These Are Special Motors With Very Low Standby Current
We specialize in very low power motors. These RF radio motors are "always on", listening for radio commands, so it is important that these motors have a very low current consumption (especially for battery operation). They are rated at 60 microamps (0.00006 amp), an industry leading specification.
You can power these motors with our AC/DC power supplies, plugged into grid power, or you can use a 12v battery (the KIT version comes with power supply).
 We have a slimline external battery wand for 12v DC motors, if you need battery power for your blinds (tested continuously for 340 open/close cycles).
Also, the battery wand does not have to be near the motor if you use 16 guage lamp cord to position them somewhere else, other than in the blind header.
These battery wands use any micro USB adapter to re-charge the internal batteries after many months of use.
Our very flexible radio control motors have some notable features:
- P Series and G Series motors use the same radio RF protocol, only the setup is slightly different.
- Alexa and Google voice control, timers, temperature and light sensing are also available with the BroadLink RM4 Pro IR/RF hub (see article here; opens new browser tab).
- Our 5 channel remote control has 5 separate channels + an ALL channel (wall mount are also available).
- Assign individual channel control to each motor AND group them on a different channel
- Assign (clone) each motor to different remotes for multiple control points
- These motors also have a 3rd travel limit setting that falls between the upper and lower limit, so that you can command your shade to go to an intermediate partial open setting.
- Operate these motors in 'jog mode' for applications requiring small movements (example: adjusting slat angle on Venetian or vertical blinds)
1. Locating the Setting Button

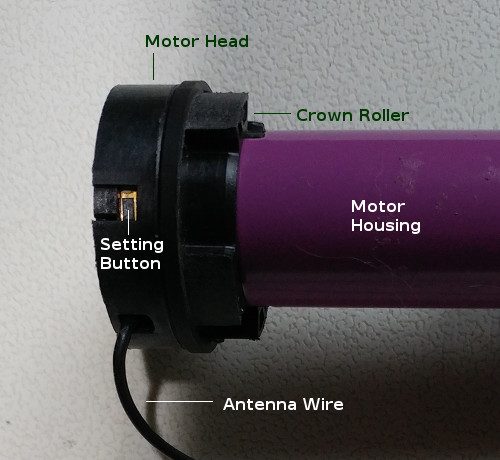
Picture 1: Setting switch & location
Each RollerTrol™ wired radio motor has a small hole on the outside edge of the motor head which exposes the setting button.
This activates the 'programming' mode of the motor. You will feel a slight tactile 'click' when the button is pressed. It is also possible to miss the switch entirely, if you are using something small, like a paper clip.
PLEASE NOTE: When you press the setting button on the motor head and follow through with the channel assignment procedure, the motor memory is completely erased, so you can think of this as 'starting over'. The travel limit settings are also erased (the motor will run continuously as there are no travel limits settings established yet).
There is also a short wire exiting the motor head a little further around. This wire is the receiving antenna for the RF radio receiver built into the motor (it 'listens' continuosly for radio commands). For maximum reception, this wire should be kept away from any contact with a metal part.
There is also a wire in the motor head for supplying the motor with 12v DC power, and polarity needs to be observed as it will not work if the wiring is reversed (although no damage will occur). RED is positive.
The picture at right is a generic representation, and motor head design will vary slightly from model to model.
2. Connecting the Wire to a Power Supply:
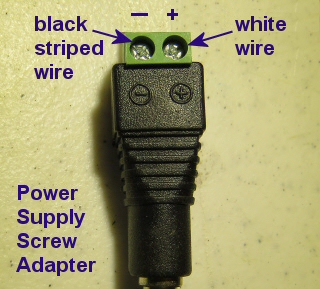
 We provide small screw terminal adapters with every power supply.
If you look carefully, you will see that they are marked with positive and negative terminals. The BLACK wire from the motor should connect to the negative screw terminal, and the other RED wire in the pair should connect to the positive terminal.
You will need a small Philips (star head) screwdriver to tighten the terminal screws; we recommend that you use a small jeweler's screwdriver.
3. Preparing the Multi-Channel Radio Remote Control:
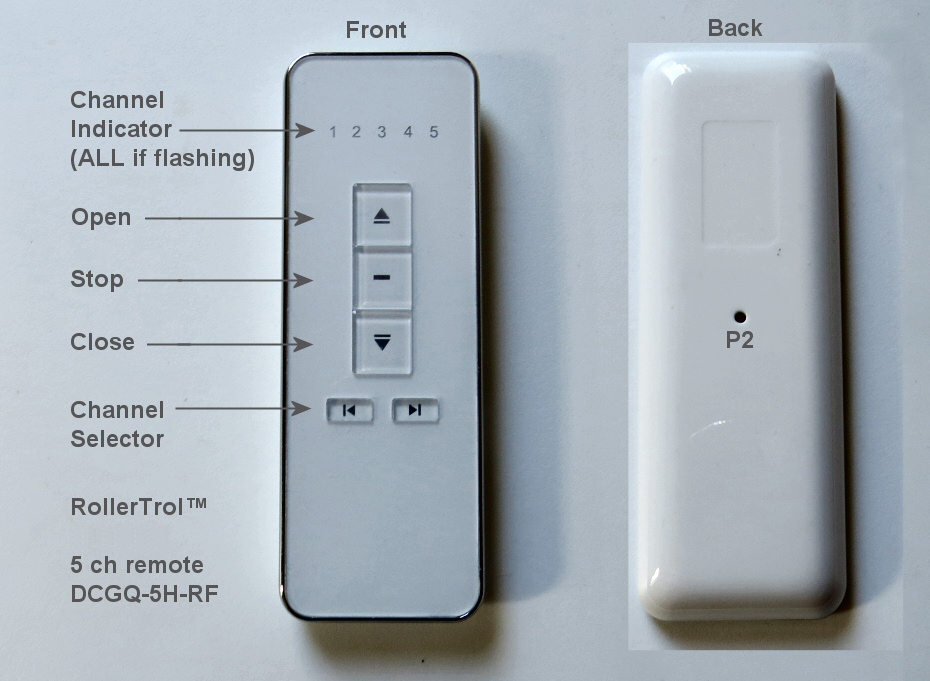
There is a hole in the back of the remote with a button inside it (the cover does not need to be removed; please familiarize yourself with the location of this switch, it is used to confirm channel assignments and other programming actions. It is referred as P2 in the instructions.
This switch also has tactile feedback, and you do not need to press very hard. Try to use something that is rounded and slightly smaller than the hole as it is possible to miss the switch entirely if you use a pointed object.

There are up / stop / down buttons and channel selector buttons as per the above picture.
You can slide the back cover off the remote control to replace the battery, but these units come with batteries installed and last for years. A slight downward pressure with your thumbs at the top while you slide it off is all that is required.
After removing this cover, you will see the battery compartment at the bottom of the remote. If the button battery is not installed, insert it now. Please pay attention to the battery polarity. The battery has a large plus + sign on one side - this should be facing up, towards you.
4. Setting Up The Master Remote
You may have noticed that your can easily CLONE a channel from one remote to another, but first you will need to create a MASTER REMOTE. This Master Remote can then be used to clone motors to other remotes, if you want multiple control points.
For example, living rooms often have more than one entrance, so you may want to install wireless wall mount remotes at both entrances (you can have up to 20 control points per motor).
PLEASE NOTE: You have a maximum of 6 seconds between button presses to complete the task at hand; if you do not complete a button press within 6 seconds, the motor will "time out" and you will have to start the procedure again.
Here are the steps to create the MASTER REMOTE:
- A. Use the CHANNEL SELECTOR button to set the remote on the channel you want to control this motor.
- B. Press the setting button on the MOTOR HEAD for 1 second, then release it (motor beeps once).
- C. Press and release the P2 button on the back of REMOTE CONTROL (motor beeps once).
- D. Press and release the P2 button (again) on the back of REMOTE CONTROL (motor beeps once).
- E. Press the UP or DOWN button on the REMOTE CONTROL, then release it (motor beeps 3 times).
At this point the motor has been successfully programmed, and you can test it by pressing the remote UP/DOWN buttons. There are a couple of points at this stage that are worth noting:
- When you press the setting button on the MOTOR HEAD, you will ERASE the motor memory (starting over).
- When you pressed the UP or DOWN button in the above procedure, you automatically selected the direction of rotation.
- If the rotation is opposite to the way you want, you can repeat the above process to change the direction (but press the opposite UP/DOWN button).
- Alternatively, you can also permanently reverse the motor direction by following the instructions in the next step (#5).
- You have not set the TRAVEL LIMITS yet; this is covered in the section further down this page (#7).
5. Reversing The Motor Direction
Long press the setting button on the MOTOR HEAD for 5 seconds, then release it (motor beeps 3 times). The motor direction has now been successfully reversed.
6. Setting JOG Mode of Operation
When setting the travel limits the motor runs at normal speed, but it may be difficult to set the travel limits precisely. You can re-program the motor to JOG in very small increments, which can be very helpful when setting travel limits. This is also how you can re-program the motor if it is to be used for adjusting the slats of a Venetian blind.
PLEASE NOTE: You have a maximum of 6 seconds between button presses to complete the task at hand; if you do not complete a button press within 6 seconds, the motor will "time out" and you will have to start the procedure again.
- A. Change the channel on the REMOTE CONTROL to the motor you wish to adjust.
- B. Press and release the P2 button on the back of REMOTE CONTROL (motor beeps once).
- C. Press and release the UP button on the REMOTE CONTROL (motor beeps once).
- D. Press and release the DOWN button on the REMOTE CONTROL (motor beeps 3 times).
You have now successfully re-programmed the motor into JOG mode. There are a couple of points about this mode of operation that are worth noting:
- You can cancel the JOG mode of operation by repeating the steps above.
- When you press and release the UP or DOWN button QUICKLY on the remote, the motor will JOG.
- If you press the UP or DOWN button on the remote for longer than 2 seconds, the motor will run at normal speed.
7. Setting the UP Travel Limit
PLEASE NOTE: You have a maximum of 6 seconds between button presses to complete the task at hand; if you do not complete a button press within 6 seconds, the motor will "time out" and you will have to start the procedure again.
As previously mentioned, when setting the travel limits the motor runs at normal speed, but it may be difficult to set the travel limits precisely. You can re-program the motor to JOG in very small increments, which can be very helpful when setting travel limits. This is also how you can re-program the motor if it is to be used for adjusting the slats of a Venetian blind. Please see the procedure in the previous step 6, if you need to do this.
When in JOG mode, you can also run at normal speed by long pressing the UP or DOWN buttons for longer than 2 seconds.
- A. Change the channel on the REMOTE CONTROL to the motor you wish to adjust.
- B. Operate the motor with the remote until it reaches the UP position you desire.
- C. Press and release the P2 button on the back of REMOTE CONTROL (motor beeps once).
- D. Press and release the UP button on the REMOTE CONTROL (motor beeps once).
- E. Press and release the UP button (again) on the REMOTE CONTROL (motor beeps 3 times).
You have now successfully set the UPPER limit.
8. Setting the DOWN Travel Limit
PLEASE NOTE: You have a maximum of 6 seconds between button presses to complete the task at hand; if you do not complete a button press within 6 seconds, the motor will "time out" and you will have to start the procedure again.
As previously mentioned, when setting the travel limits the motor runs at normal speed, but it may be difficult to set the travel limits precisely. You can re-program the motor to JOG in very small increments, which can be very helpful when setting travel limits. This is also how you can re-program the motor if it is to be used for adjusting the slats of a Venetian blind. Please see the procedure in the previous step 6, if you need to do this.
When in JOG mode, you can also run at normal speed by long pressing the UP or DOWN buttons for longer than 2 seconds.
- A. Change the channel on the REMOTE CONTROL to the motor you wish to adjust.
- B. Operate the motor with the remote until it reaches the DOWN position you desire.
- C. Press and release the P2 button on the back of REMOTE CONTROL (motor beeps once).
- D. Press and release the DOWN button on the REMOTE CONTROL (motor beeps once).
- E. Press and release the DOWN button (again) on the REMOTE CONTROL (motor beeps 3 times).
You have now successfully set the LOWER limit.
9. Setting the MIDDLE Travel Limit
There is also a third memory position, if you want to open the blind or shade to a partially open position. PLEASE NOTE: You must set the DOWN travel limit setting BEFORE you follow this procedure for the 3rd memory position.
PLEASE NOTE: You have a maximum of 6 seconds between button presses to complete the task at hand; if you do not complete a button press within 6 seconds, the motor will "time out" and you will have to start the procedure again.
- A. Change the channel on the REMOTE CONTROL to the motor you wish to adjust.
- B. Operate the motor with the remote until it reaches the MIDDLE position you desire.
- C. Press and release the P2 button on the back of REMOTE CONTROL (motor beeps once).
- D. Press and release the STOP button on the REMOTE CONTROL (motor beeps once).
- E. Press and release the STOP button (again) on the REMOTE CONTROL (motor beeps 3 times).
You have now successfully set the MIDDLE limit.
10. Deleting the UP, DOWN and MIDDLE Travel Limit Settings (No Change to Channel Assignments)
PLEASE NOTE: You have a maximum of 6 seconds between button presses to complete the task at hand; if you do not complete a button press within 6 seconds, the motor will "time out" and you will have to start the procedure again.
- A. Change the channel on the REMOTE CONTROL to the motor you wish to adjust.
- B. Press and release the P2 button on the back of REMOTE CONTROL (motor beeps once).
- C. Press and release the DOWN button on the REMOTE CONTROL (motor beeps once).
- D. Press and release the P2 button (again) on the back of REMOTE CONTROL (motor beeps 3 times).
You have now successfully deleted all travel limit settings.
11. Cloning a Channel From REMOTE "A" to REMOTE "B"
You can easily create another remote control simply by CLONING a channel (up to 20 times per motor). You can also clone channels onto the same remote, if it is a multi-channel type. Please note that cloning does NOT change travel limit settings of the motor.
PLEASE NOTE: You have a maximum of 6 seconds between button presses to complete the task at hand; if you do not complete a button press within 6 seconds, the motor will "time out" and you will have to start the procedure again.
- A. Change the channel on the REMOTE CONTROL "A" to the motor you wish to CLONE.
- B. Change the channel on the REMOTE CONTROL "B" to the motor you wish to CLONE.
- C. Press and release the P2 button on the back of REMOTE CONTROL "A" (motor beeps once).
- D. Press and release the P2 button (again) on the back of REMOTE CONTROL "A" (motor beeps once).
- E. Press and release the P2 button on the back of REMOTE CONTROL "B" (motor beeps 3 times).
You have now successfully cloned a channel from REMOTE CONTROL "A" to REMOTE CONTROL "B".
12. Clearing Channel Assignment Memory (No Change to Travel Limits)
You can easily clear the channel assignment memory; please note that this does NOT change travel limit settings of the motor.
PLEASE NOTE: You have a maximum of 6 seconds between button presses to complete the task at hand; if you do not complete a button press within 6 seconds, the motor will "time out" and you will have to start the procedure again.
- A. Press and release the P2 button on the back of REMOTE CONTROL "A" (motor beeps once).
- B. Press and release the STOP button on the REMOTE CONTROL "A" (motor beeps once).
- C. Press and release the P2 button (again) on the back of REMOTE CONTROL "A" (motor beeps 3 times).
You have now successfully erased the channel assignment memory (including any cloned channels).
Mounting bracket instructions for Standard P Series Motors
We sincerely hope you enjoy using these advanced motors; if you have any questions, please feel free to contact us at any time!

 Shopping Cart Home - Start Here
 Remote Controls for Radio Equipped Motors
 DIY Starter Kits for Window Shades
 DIY Starter Kits for Window Openers
 ZWAVE Blind & Shade Controllers
 How To Choose the Right Blind & Shade Motor
 Select tubular Motor (Comparison table)
 Choose RollerTrol Battery & Solar Motors
 DIY Roller Blind Motors - FAQ
 How To Insert Blind Motors & Attach Brackets
 Calculate your Blind or Shade fabric Weight
 Select Tube Size for Blind Motor
 How to Insert Blind Motors Into Tube
 How to Insert Blind Motors Into Tube with Adapters
 Attach Mounting Brackets - Standard + Mini Series
 Attach Mounting Brackets - MAXI Blind Series
 How To Set Up Radio Equipped Blind & Shade Motors
 Series P Radio Remote Control Motors
 Series G Radio Remote Control Motors
 Series R Radio Remote Control Motors
 BroadLink RF/IR Hub System for Motors
 How To Set Up Window/Skylight Openers
 Introduction: Window & Skylight (K Series)
 BroadLink RF/IR Hub System for Motors
 Z-Wave Interfacing for Shade & Opener Motors
 Wired Wall Switch Control of Window Openers
 How To Use Alexa With Our Motors & Window Openers
 How To Use BroadLink Phone App Hub With Our Motors
 How To Set Up ShadeSlider Skylight or Bottom-Up Blind
 How To Retrofit RV, Boat and Motorhome Blinds
 How To Set Up Non-Radio Motors
 Operation & Travel Limits of Non-Radio Motors
 Make a Simple DC Motor Reversing Switch
 How To Set Up ZWAVE Control
 ZWAVE Controller for G Series Radio motors
 ZWAVE Door/Window Opening Detection
 ZWAVE Motion Detector with Temperature Sensing
 Motorized Window Blinds & Shades
 Motorized Dual Window Shade
 Make Motorized Blackout Blinds
 Phone-Tablet-PC Control for Motorized Blinds
 Mini Motor for Existing Shade Retrofit
 Roman Shade Retrofit
 Make a Motorized Window Opener
 Blind & Shade Motors for RV & Boats
 Make Your Own Projector Screen
 Curtain Closer: Ultimate Home Theater
 Wireless Battery Operated Drapery Motor Kit
 Make a Motorized Bottom-Up Shade
 Make a Motorized Skylight Opener
 BroadLink RF/IR Hub System for Motors
 Why Buy From US?
 Background & Mission Statement
 Customer DIY Testimonials
 Site Map - Search All Pages
 Why Buy From US?
 RollerTrol Users Forum
 Contact Page