Alexa™ + Node-RED + BroadLink™: A Dashboard for Controlling Blinds
Adrian Biffen, Senior Partner
Please Note: This article series assumes you have set up your BroadLink™ hub with the phone app (see home theater article series), and you are running Node-RED IoT visual design on the Raspberry Pi (and you have an Alexa™ voice control device, like the Tap or Echo).
The previous Part 6 of this series discussed how the Node-RED system has a dashboard design system for operating lights with a "virtual switch".
In this article (Part 7), we'll examine how to enable dashboard buttons that will control blinds in your home automation system. The dashboard will be visible on any wifi enabled device on your local router system by using the characters "UI" tagged onto your local Node-RED design screen link (eg. http://192.168.1.179:1880/UI).
Insert Dashboard Display BUTTON Nodes Into the Visual Design Workspace
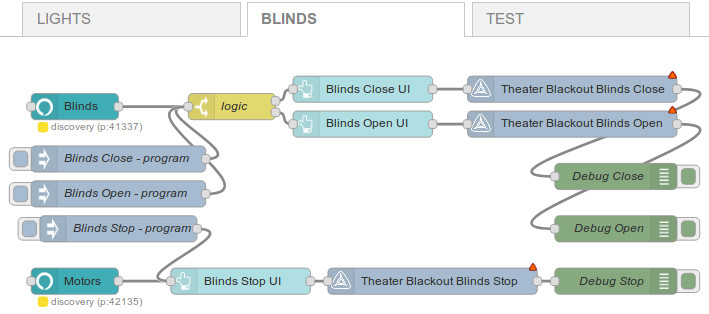
The picture below adds 3 UI BUTTONS to the setup in part 5 where we were able to control blinds. Now the DASHBOARD USER INTERFACE will be able to control the blackout blinds too. The three DASHBOARD BUTTONS are labeled Blinds Close UI, Blinds Open UI, and Blinds Stop UI.

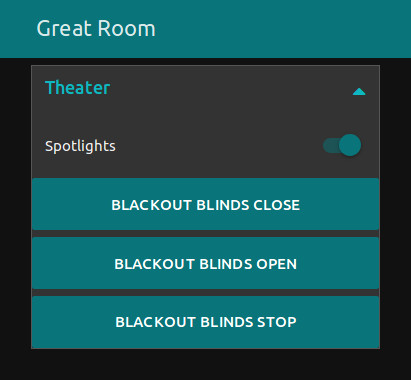
The dashboard buttons automatically create 3 virtual buttons on the UI (User Interface), as shown below. This can be seen in your browser at the same address as the design screen, except that you add a "/UI" designation to the link:

The buttons don't move like the light switch does, so there isn't a synchronization issue like the light switch in the previous article. Nevertheless, we treated them the same way with the 3 button nodes placed INLINE with the PASS-THROUGH setting enabled. This insures that if we decide to make them change color or do something to indicate the state of the blinds, we will already have that capability in place.
At this point we have created the button controls for the blackout blinds in the Node-RED dashboard interface. If you have followed along and built a similar system, you should be able to click or tap the buttons in the user interface (UI) to make the blinds retract and deploy, and stop anywhere in between. You could also build timers into the program for part-way stops too.
Is This A Real Project?
 Indeed it is! In our great room, we have a projector that displays a 1080P picture on a 12 foot screen. We will soon be upgrading to a new 4K DLP projector, but there's no hurry as the picture quality from our BenQ projector is already superb.
The 8.1 Dolby sound system puts out great sound too, with a sub-woofer that will shake the room if there's an earthquake or explosion on the screen.
We have used this system for many thousands of hours of great entertainment, and we also use it for staff workshops (there's nothing much better than having a 12 ft. monitor for training purposes).
However, when we are not using it, we want the room back! The screen retracts and the blackout blinds open, giving us nice views of our moss covered rock gardens and trees on 3 sides of the room.
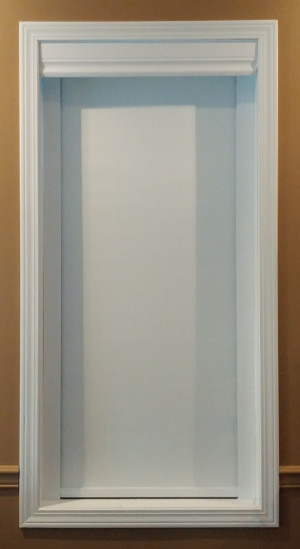
This is an actual picture of the installation, and it works very well, with commands from Alexa, or by using the dashboard. You can clearly see the side guides and bottom hem bar (with brush) that help give it a very good light seal. The fabric is the excellent Flocke™ blackout material from Mermet™.
The motorized blackout blinds (with side guides) are an essential component of this system, and can be purchased on our custom shade website. Our expert custom shade specialists will be happy to help you with your own set of specifications.
We had just installed our blackout blinds (that we manufacture) in our great room, replacing our DIY home built units. The DIY shades worked quite well, but the near 100% light seal of our manufactured shades is most definitely better.
The room was already automated with Home Assistant running on a Pi, but we never much liked the HASS configuration files that use the YAML syntax. We liked how easy the Node-RED system is with its drag 'n drop visual design screen, so we decided to set up a second Pi running Node-RED to see how well it works. This article series is the product of that effort.
----------------------------------------------------
Buy The BroadLink™ Hub and Accessory Modules In Our Online Store
In the meantime, we have the excellent BroadLink phone apps that are very capable, and they may very well be all you need (they work stand-alone, the RPi is not needed). This will give you direct control over our blind motors and window openers. Please note that you will need to set up the phone app if you want to implement the system described in this series.
If you are interested, you can purchase these products in our DIY online automation store.
Articles in this series:
Part 1: Alexa™ + RPi + BroadLink™ Hub + Node-RED: Blind Control Introduction
Part 2: Alexa™ + RPi + BroadLink™ Hub + Node-RED: Installing Node Components into Node-RED
Part 3: Alexa™ + RPi + BroadLink™ Hub + Node-RED: Configuring Nodes in Node-RED
Part 4: Alexa™ + RPi + BroadLink Hub + Node-RED: A Simple Flow Example: Light Control
Part 5: Alexa™ + RPi + BroadLink Hub + Node-RED: Control Blind & Shade Motors
Part 6: Alexa™ + RPi + BroadLink Hub + Node-RED: Configuring the Node-RED Dashboard Light Switch
Part 7: Creating the Node-RED User Interface Dashboard for Blackout Blinds (you are here)

 Shopping Cart Home - Start Here
 Remote Controls for Radio Equipped Motors
 DIY Starter Kits for Window Shades
 DIY Starter Kits for Window Openers
 ZWAVE Blind & Shade Controllers
 How To Choose the Right Blind & Shade Motor
 Select tubular Motor (Comparison table)
 Choose RollerTrol Battery & Solar Motors
 DIY Roller Blind Motors - FAQ
 How To Insert Blind Motors & Attach Brackets
 Calculate your Blind or Shade fabric Weight
 Select Tube Size for Blind Motor
 How to Insert Blind Motors Into Tube
 How to Insert Blind Motors Into Tube with Adapters
 Attach Mounting Brackets - Standard + Mini Series
 Attach Mounting Brackets - MAXI Blind Series
 How To Set Up Radio Equipped Blind & Shade Motors
 Series P Radio Remote Control Motors
 Series G Radio Remote Control Motors
 Series R Radio Remote Control Motors
 BroadLink RF/IR Hub System for Motors
 How To Set Up Window/Skylight Openers
 Introduction: Window & Skylight (K Series)
 BroadLink RF/IR Hub System for Motors
 Z-Wave Interfacing for Shade & Opener Motors
 Wired Wall Switch Control of Window Openers
 How To Use Alexa With Our Motors & Window Openers
 How To Use BroadLink Phone App Hub With Our Motors
 How To Set Up ShadeSlider Skylight or Bottom-Up Blind
 How To Retrofit RV, Boat and Motorhome Blinds
 How To Set Up Non-Radio Motors
 Operation & Travel Limits of Non-Radio Motors
 Make a Simple DC Motor Reversing Switch
 How To Set Up ZWAVE Control
 ZWAVE Controller for G Series Radio motors
 ZWAVE Door/Window Opening Detection
 ZWAVE Motion Detector with Temperature Sensing
 Motorized Window Blinds & Shades
 Motorized Dual Window Shade
 Make Motorized Blackout Blinds
 Phone-Tablet-PC Control for Motorized Blinds
 Mini Motor for Existing Shade Retrofit
 Roman Shade Retrofit
 Make a Motorized Window Opener
 Blind & Shade Motors for RV & Boats
 Make Your Own Projector Screen
 Curtain Closer: Ultimate Home Theater
 Wireless Battery Operated Drapery Motor Kit
 Make a Motorized Bottom-Up Shade
 Make a Motorized Skylight Opener
 BroadLink RF/IR Hub System for Motors
 Why Buy From US?
 Background & Mission Statement
 Customer DIY Testimonials
 Site Map - Search All Pages
 Why Buy From US?
 RollerTrol Users Forum
 Contact Page