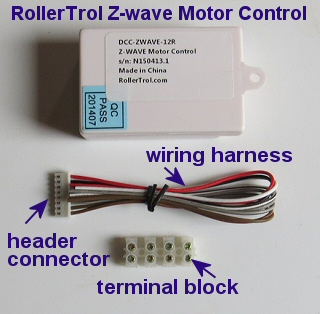
Our ZWAVE® blind and shade motor control (DCC-ZWAVE-12R) trigger modules can be used to activate our radio equipped blind and shade motors using an RF (Radio Frequency) digital remote control radio transmission.
These units can also function as Z-wave repeaters, passing signals on to other local z-wave devices.
It can be used with any certified Z WAVE hub, such as Wink, SmartThings, Razberry Pi, Vera, Homeseer, Syslink, Zipr, Xuan, Staples Connect, Fibaro, Xuan, Homelive, Isis, Nexia, etc.
This versatile device, part of our NodeSwitch™ automation control series, can also be used to control other 12v DC motors and devices using the accessories shown below.
This is the first in a series of articles about how to set up our Z-WAVE® control systems.
Z-Wave Control: DC Motors and Other Devices
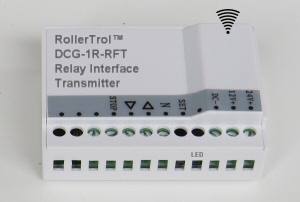 When using the DCC-ZWAVE-12R Z-WAVE® controller with our blind and shade radio motors, it is used to trigger our DCG-1R-RFT radio motor relay interface transmitter (pictured at left).
The relay interface transmitter module then sends a radio signal to the radio receiver built into our motors; a microprocessor inside the motors then decodes the signals to activate the motor with open/close/stop functions.
This unit could be thought of as a single channel hand held remote control, without buttons.
It is important to note that all our other hand held remotes, wall mount remotes, timers and sun sensors will continue to function; our motors can be controlled from multiple remote locations. Each motor has enough memory to hold the digital signatures of 20 different channels, from any number of remotes.
The default 'relay on' trigger period of the DCC-ZWAVE-12R Z-WAVE module is 1 second, but it can be programmed to hold the trigger condition for up to 255 seconds.
The RF radio control signal is also capable of passing through walls and in most cases can reach anywhere inside a typical home.
You can also use the relay interface transmitter module to control our wired window openers and other 12v DC motors, such as fans, drapery motors, etc. The advantage of this is that you can also use our hand held (or other) remotes to operate blinds and shades, as well as window and skylight openers.
Z-WAVE® controller for blinds and shade motors can be purchased in our online store (view in a new window)
Preparing the Controller Out of the Box
Installation of the DCC-ZWAVE-12R Z-WAVE trigger module is relatively straightforward; the 3 electrically isolated relays (NO - normally open) each have a pair of wires, and the unit is powered by a pair, so there is a total of 8 wires. Here are the steps to follow for preparing the Zwave module so that it is ready to connect to the motor controller:
- Strip the insulation from the individual wires in the wiring harness, about 1/4 inch is good.
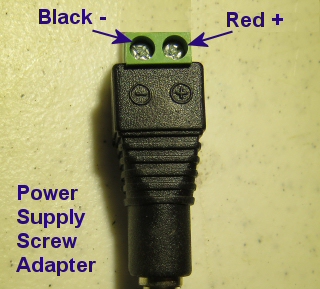
- Connect the power supply screw adapter that we supply to the red and black wires, but be sure to observe polarity. If you look closely at the screw adapter, you'll see the symbols for plus (+) and minus (-) (picture at right). Don't power it up yet.
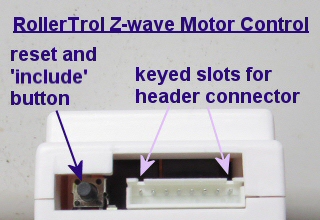
- Insert the header connector into the unit; note that it is 'keyed' and only fits one way - it should not be forced. There are 2 small slots on the header receptacle connector (in the unit itself, see picture below), and the header connector has 2 corresponding ridges that slide into those slots.
We supply terminal blocks with screw terminals to connect the 6 relay wires to the device you want to trigger, either the wired wall switch for our non-radio motors (and window openers), or the radio wall switch for our radio blind and shade motors.
 At this point you can connect the six relay wires to one side of the terminal blocks, but make sure you don't trap any insulation inside the screw terminals as it can actually prevent the wire from contacting the conductive metal parts.
Here is the color coding of the 6 relay wires:
- Relay 1 (Open function): White and White/Black
- Relay 2 (Close function): Gray and Gray/Black
- Relay 3 (Stop function): Brown and Brown/Red
Z-Wave Motor Control Trigger Module: Operational Summary
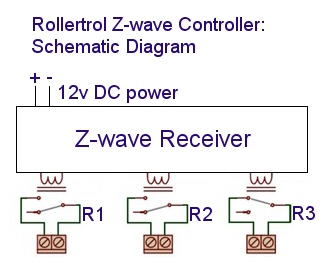
The schematic diagram of the actual relay configuration is very straightforward, as seen in the simplified schematic below. The relays are just switches that are normally open when the device is first powered up. When the Z-WAVE receiver gets a radio control signal, it activates the designated relay just the same as if you had flipped a light switch.
In the schematic, we show relay 1 and relay 2 in the normally open circuit position, but relay 3 is shown in the activated position, which simply completes the circuit, triggering whatever is connected to the screw terminals. Relays 1 and 2 do exactly the same thing when they are triggered by a remote radio signal from a Z-WAVE hub.
 In the next instalment, we'll show you how to connect the Z-WAVE module to the DCG-1R-RFT transmitter, which will then be able to control any of our radio motors and receivers.
Z-WAVE® controller for blinds and shade motors can be purchased in our online store (view in a new window)
PART 1: Z-WAVE control of blind and shade motors - Introduction (YOU ARE HERE)
PART 2: Z-WAVE motor control - Connecting the Z-WAVE trigger module to the radio transmitter
PART 3: Z-WAVE controller for blind motors- Creating Z-WAVE controller events (Vera example)
We sincerely hope you enjoy using these advanced motors; if you have any questions, please feel free to contact us at any time!

 Shopping Cart Home - Start Here
 Remote Controls for Radio Equipped Motors
 DIY Starter Kits for Window Shades
 DIY Starter Kits for Window Openers
 ZWAVE Blind & Shade Controllers
 How To Choose the Right Blind & Shade Motor
 Select tubular Motor (Comparison table)
 Choose RollerTrol Battery & Solar Motors
 DIY Roller Blind Motors - FAQ
 How To Insert Blind Motors & Attach Brackets
 Calculate your Blind or Shade fabric Weight
 Select Tube Size for Blind Motor
 How to Insert Blind Motors Into Tube
 How to Insert Blind Motors Into Tube with Adapters
 Attach Mounting Brackets - Standard + Mini Series
 Attach Mounting Brackets - MAXI Blind Series
 How To Set Up Radio Equipped Blind & Shade Motors
 Series P Radio Remote Control Motors
 Series G Radio Remote Control Motors
 Series R Radio Remote Control Motors
 BroadLink RF/IR Hub System for Motors
 How To Set Up Window/Skylight Openers
 Introduction: Window & Skylight (K Series)
 BroadLink RF/IR Hub System for Motors
 Z-Wave Interfacing for Shade & Opener Motors
 Wired Wall Switch Control of Window Openers
 How To Use Alexa With Our Motors & Window Openers
 How To Use BroadLink Phone App Hub With Our Motors
 How To Set Up ShadeSlider Skylight or Bottom-Up Blind
 How To Retrofit RV, Boat and Motorhome Blinds
 How To Set Up Non-Radio Motors
 Operation & Travel Limits of Non-Radio Motors
 Make a Simple DC Motor Reversing Switch
 How To Set Up ZWAVE Control
 ZWAVE Controller for G Series Radio motors
 ZWAVE Door/Window Opening Detection
 ZWAVE Motion Detector with Temperature Sensing
 Motorized Window Blinds & Shades
 Motorized Dual Window Shade
 Make Motorized Blackout Blinds
 Phone-Tablet-PC Control for Motorized Blinds
 Mini Motor for Existing Shade Retrofit
 Roman Shade Retrofit
 Make a Motorized Window Opener
 Blind & Shade Motors for RV & Boats
 Make Your Own Projector Screen
 Curtain Closer: Ultimate Home Theater
 Wireless Battery Operated Drapery Motor Kit
 Make a Motorized Bottom-Up Shade
 Make a Motorized Skylight Opener
 BroadLink RF/IR Hub System for Motors
 Why Buy From US?
 Background & Mission Statement
 Customer DIY Testimonials
 Site Map - Search All Pages
 Why Buy From US?
 RollerTrol Users Forum
 Contact Page