FAQ: How do I use ZWAVE and Vera to control blind motors?
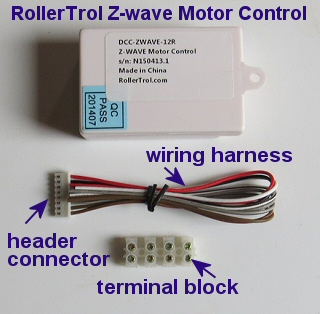
Our ZWAVE® motor control trigger module (DCC-ZWAVE-12R) can be used to operate our shade and blind motors, window and skylight openers, using our surface mount radio wall switches, and other interfaces.
In the previous articles we examined the basic operation of the Z-WAVE trigger module, used to control our motors. The final step in the configuration of this system is to assign the ZWAVE module to a home automation control hub, and we'll use the Vera product in this example.
ZWAVE setup on the Vera home automation is a relatively simple process, and it is a relatively standard procedure on any Z-wave hub.
Z-Wave Module Inclusion With Vera
The procedure for assigning a ZWAVE device to a Vera control system is known as 'inclusion', and it can be summarized in a few simple steps:
- 1. Power up your ZWAVE device to be 'included'
- 2. Place it within 3 ft. of the Vera hub
- 3. Put Vera into 'inclusion' mode: Add Device > Other Devices > Z Wave Device
That's it, you're done! Vera will automatically detect the presence of the ZWAVE device waiting to be included, and it will be automatically registered - and the device-specific controls will appear in the 'Devices' area of the browser based user interface, ready to use.
Other ZWAVE hubs from other manufacturers may not 'auto-include' the device, and you may have to take the extra step of pressing the 'include' button on the ZWAVE module (beside the header connector).
If you are using our ZWAVE module to trigger our radio motor wall switch, no further adjustment is required, as the default 'relay on' time of about 1 second will work quite adequately.
Factory Re-set: If you need to re-set the ZWAVE trigger module, hold the setting button down for at least 5 seconds, then release it.
Z-Wave Control Module - Adjusting the Timing With Vera
If you are using our ZWAVE trigger module with our wired wall switch, there will be one further adjustment to make, in order to use the 'momentary' mode of wall switch. The relays in the ZWAVE module will have to be held on for the duration of the desired motor travel time.
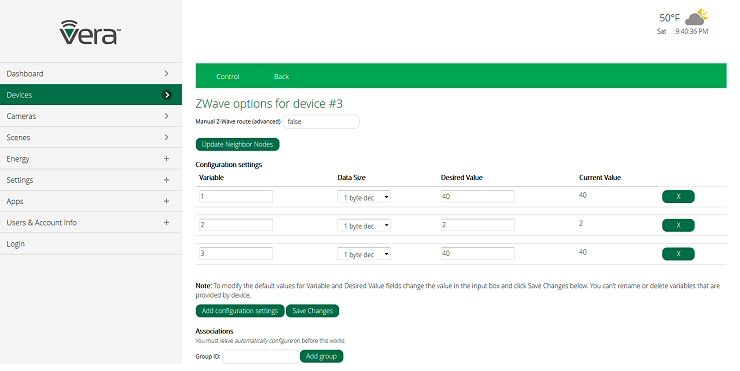
In the Vera system this consists of adding 3 variables with the associated timing for each of the 3 control relays, and other hubs will have similar capabilities.
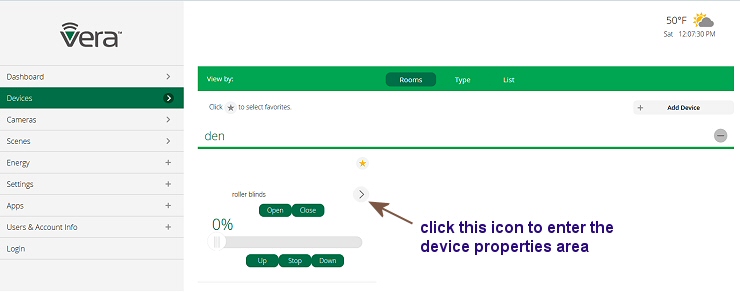
You add these variables by going to the 'properties' section of your ZWAVE relay module, in the picture below you can see the icon where you select the properties:

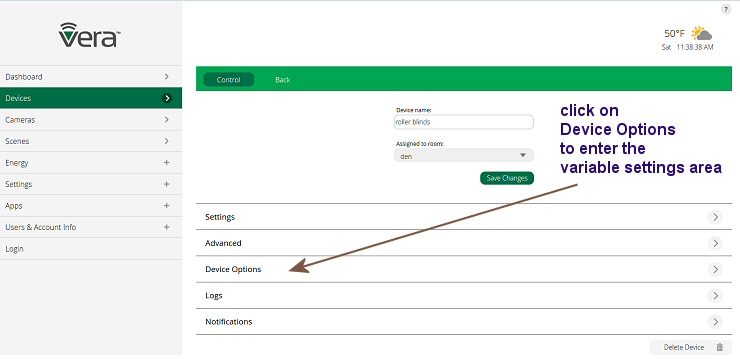
The next step is to move to the Device Options area:

This brings up the screen where you actually enter the settings; we used an on-duration of 40 seconds, which is plenty of time for the window opener to travel full stroke. Choose the '1-byte-decimal' option:

PART 1: ZWAVE control of shade and blind motors - Introduction
PART 2: ZWAVE motor controller for blinds and window openers - Connecting to the wired wall switch
PART 3: ZWAVE controller for blinds - Linking to a Radio Motor with our Input/Output radio wall switch
PART 4: ZWAVE controller for blind motors- Creating ZWAVE controller events (Vera example) (YOU ARE HERE)
We sincerely hope you enjoy using these advanced motors; if you have any questions, please feel free to contact us at any time!

 Shopping Cart Home - Start Here
 Remote Controls for Radio Equipped Motors
 DIY Starter Kits for Window Shades
 DIY Starter Kits for Window Openers
 ZWAVE Blind & Shade Controllers
 How To Choose the Right Blind & Shade Motor
 Select tubular Motor (Comparison table)
 Choose RollerTrol Battery & Solar Motors
 DIY Roller Blind Motors - FAQ
 How To Insert Blind Motors & Attach Brackets
 Calculate your Blind or Shade fabric Weight
 Select Tube Size for Blind Motor
 How to Insert Blind Motors Into Tube
 How to Insert Blind Motors Into Tube with Adapters
 Attach Mounting Brackets - Standard + Mini Series
 Attach Mounting Brackets - MAXI Blind Series
 How To Set Up Radio Equipped Blind & Shade Motors
 Series P Radio Remote Control Motors
 Series G Radio Remote Control Motors
 Series R Radio Remote Control Motors
 BroadLink RF/IR Hub System for Motors
 How To Set Up Window/Skylight Openers
 Introduction: Window & Skylight (K Series)
 BroadLink RF/IR Hub System for Motors
 Z-Wave Interfacing for Shade & Opener Motors
 Wired Wall Switch Control of Window Openers
 How To Use Alexa With Our Motors & Window Openers
 How To Use BroadLink Phone App Hub With Our Motors
 How To Set Up ShadeSlider Skylight or Bottom-Up Blind
 How To Retrofit RV, Boat and Motorhome Blinds
 How To Set Up Non-Radio Motors
 Operation & Travel Limits of Non-Radio Motors
 Make a Simple DC Motor Reversing Switch
 How To Set Up ZWAVE Control
 ZWAVE Controller for G Series Radio motors
 ZWAVE Door/Window Opening Detection
 ZWAVE Motion Detector with Temperature Sensing
 Motorized Window Blinds & Shades
 Motorized Dual Window Shade
 Make Motorized Blackout Blinds
 Phone-Tablet-PC Control for Motorized Blinds
 Mini Motor for Existing Shade Retrofit
 Roman Shade Retrofit
 Make a Motorized Window Opener
 Blind & Shade Motors for RV & Boats
 Make Your Own Projector Screen
 Curtain Closer: Ultimate Home Theater
 Wireless Battery Operated Drapery Motor Kit
 Make a Motorized Bottom-Up Shade
 Make a Motorized Skylight Opener
 BroadLink RF/IR Hub System for Motors
 Why Buy From US?
 Background & Mission Statement
 Customer DIY Testimonials
 Site Map - Search All Pages
 Why Buy From US?
 RollerTrol Users Forum
 Contact Page