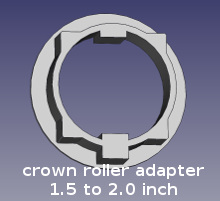
3D Printing for Blind and Shade Motor Adapters
We have been active in the 3D CAD industry for over 30 years, with powerful CAD class computers that can handle the task of building 3D virtual models for items associated with blind motors, such as tube adapters. We also have 3D printers that are well suited for printing tube adapters for blinds and shades, using the layer deposition method.
Our stock adapters are made for industry-standard Rollease® tubing, which is the most common aluminum tube size in North America (see TUBE sizes pictured below). It is important to understand that TUBE sizes are measure by OD (Outer Diameter), as opposed to PIPE sizes, measured by ID (Inner Diameter).
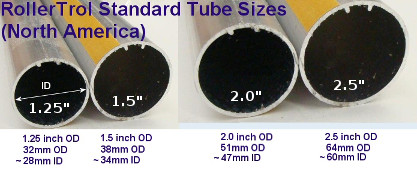 At our Custom Shade Division we often manufacture blinds and shades for very large windows that require a wider tube roller. This also means we have to increase the tube diameter to 2" to combat sag (known also as 'smiley face'), and sometimes 2.5" for extreme sizes.
We also manufacture heavy duty motors that can handle the larger sizes with ease, and we have 'in house' capabilities for producing the required adapters for these larger blinds and shades. This allows us to optimize the design of these adapters so that they fit perfectly, without any slop that can affect motor performance.
Three Adapters Required for Each Motorized Blind or Shade
There are 3 adapters that need to have the diameter increased for each blind, regardless of the size we are stepping up to, whether the tube diameter is 2 inch or 2 1/2 inch. This schematic picture shows where the 3 important adapters are located; these are the standard 1.5" adapters, before any step-up adapters are added:
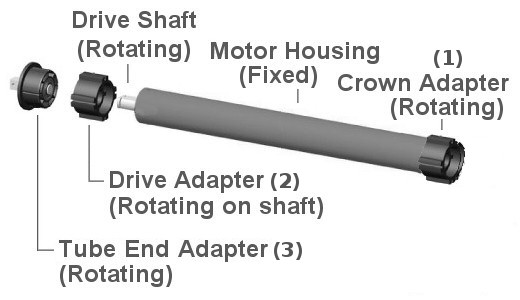
- (1) CROWN ROLLER (positioned at fixed motor head, rotates with tube on lubricated slip ring, providing support for tube end)
- (2) MOTOR DRIVE ADAPTER (positioned inside tube on motor axle, drives tube rotation. This critical drive adapter should be locked to the tube with a setscrew if you are using a tube with a smooth inner wall)
- (3) END CAP IDLER (positioned at opposite end from motor, rotates with tube on axle, providing support for tube end)
Upsizing Drive Adapters for Blind & Shade Motors
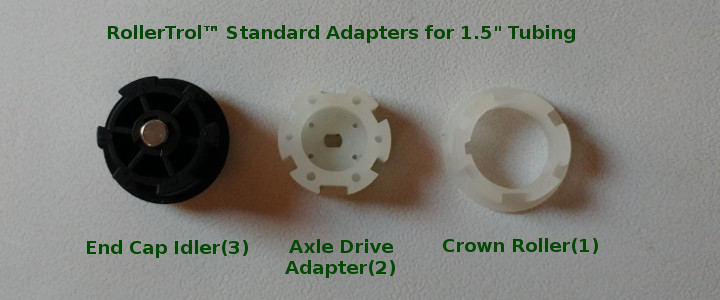
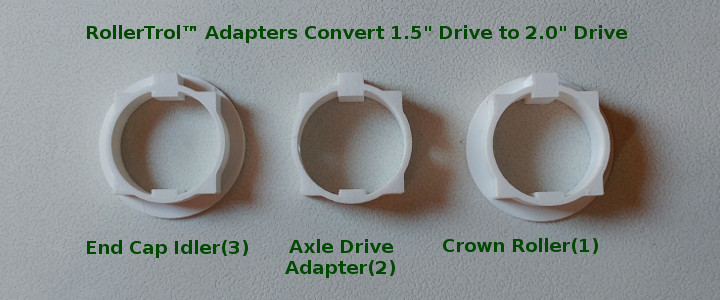
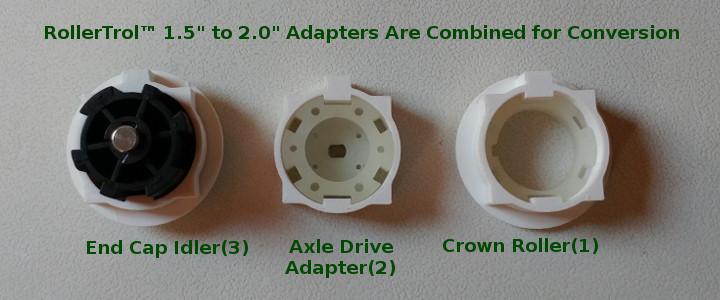
The next sequence of pictures reveal how our manufactured adapters allow a motor to drive a 2.0 inch tube, instead of 1.5 inch. Please note that we have used the same identification protocol as above: crown roller (1), axle drive adapter (2), tube end cap idler (3).
The first picture below shows what the standard 1.5" adapters actually look like (but please note they sometimes come in different colors (eg. black or gray instead of white, and vice-versa):
Here are the upsizing adapters we produce with our CAD system and 3D printers:
This picture below shows how the new adapters are combined with the original standard adapters to "upsize" and drive a 2" tube. Please note that that the upsizing adapter needs to be attached to the drive adapter so that it cannot slip off (you could use some glue):
Special Attention: Drive Shaft Adapter
The drive shaft adapter (center in above picture) that is driven by the motor axle requires some special attention.
If you are using a tube with a smooth inside wall that might allow the drive system to slip, you can use a setscrew to lock the adapter to the tube. Please keep in mind that there is a steel reinforcing plate embedded inside the 1.5" drive adapter that is faintly visible, so please make sure your screw is short enough to avoid this plate.
The Rollease tubing we use has proper tines (internal extruded ridges) that lock the adapter to the tube, so a setscrew is not necessary.
If you need to use a setscrew to lock the tube to the drive adapter, here is an article that shows how to install a setscrew to lock your drive adapter to the blind tube.
Mounting Bracket Pictures
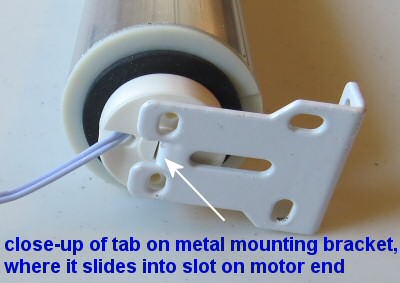
Tube end view showing mounting bracket tab locked into motor head slot, with 2" plastic adapter for crown roller installed. Please note that we may occasionally supply different mounting brackets, but they all function in a similar fashion:
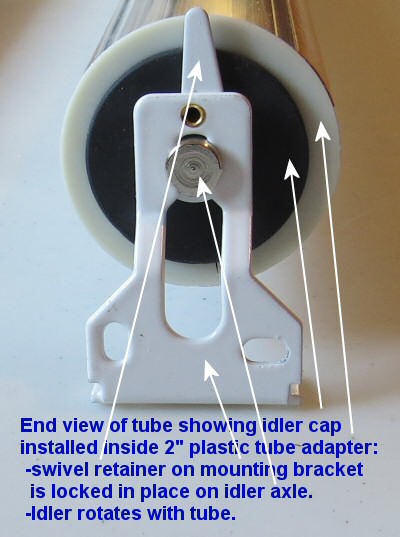
Tube end view showing end cap idler locked into mounting bracket (with 2" plastic adapter installed):

 Shopping Cart Home - Start Here
 Remote Controls for Radio Equipped Motors
 DIY Starter Kits for Window Shades
 DIY Starter Kits for Window Openers
 ZWAVE Blind & Shade Controllers
 How To Choose the Right Blind & Shade Motor
 Select tubular Motor (Comparison table)
 Choose RollerTrol Battery & Solar Motors
 DIY Roller Blind Motors - FAQ
 How To Insert Blind Motors & Attach Brackets
 Calculate your Blind or Shade fabric Weight
 Select Tube Size for Blind Motor
 How to Insert Blind Motors Into Tube
 How to Insert Blind Motors Into Tube with Adapters
 Attach Mounting Brackets - Standard + Mini Series
 Attach Mounting Brackets - MAXI Blind Series
 How To Set Up Radio Equipped Blind & Shade Motors
 Series P Radio Remote Control Motors
 Series G Radio Remote Control Motors
 Series R Radio Remote Control Motors
 BroadLink RF/IR Hub System for Motors
 How To Set Up Window/Skylight Openers
 Introduction: Window & Skylight (K Series)
 BroadLink RF/IR Hub System for Motors
 Z-Wave Interfacing for Shade & Opener Motors
 Wired Wall Switch Control of Window Openers
 How To Use Alexa With Our Motors & Window Openers
 How To Use BroadLink Phone App Hub With Our Motors
 How To Set Up ShadeSlider Skylight or Bottom-Up Blind
 How To Retrofit RV, Boat and Motorhome Blinds
 How To Set Up Non-Radio Motors
 Operation & Travel Limits of Non-Radio Motors
 Make a Simple DC Motor Reversing Switch
 How To Set Up ZWAVE Control
 ZWAVE Controller for G Series Radio motors
 ZWAVE Door/Window Opening Detection
 ZWAVE Motion Detector with Temperature Sensing
 Motorized Window Blinds & Shades
 Motorized Dual Window Shade
 Make Motorized Blackout Blinds
 Phone-Tablet-PC Control for Motorized Blinds
 Mini Motor for Existing Shade Retrofit
 Roman Shade Retrofit
 Make a Motorized Window Opener
 Blind & Shade Motors for RV & Boats
 Make Your Own Projector Screen
 Curtain Closer: Ultimate Home Theater
 Wireless Battery Operated Drapery Motor Kit
 Make a Motorized Bottom-Up Shade
 Make a Motorized Skylight Opener
 BroadLink RF/IR Hub System for Motors
 Why Buy From US?
 Background & Mission Statement
 Customer DIY Testimonials
 Site Map - Search All Pages
 Why Buy From US?
 RollerTrol Users Forum
 Contact Page