Raspberry Pi Home Automation: Shade/Blind Motor Configuration
Adrian Biffen, Senior Partner
PLEASE NOTE: We found the Node-Red system with its visual design system to be another excellent way to set up a home automation system, and it is our current favourite. See OUR ALTERNATE ARTICLE SERIES on how we control blinds, lights, window openers and many other devices with Alexa™, using Node-RED and Alexa™ on the Raspberry Pi (Node-RED comes pre-installed on the Pi).
The Raspberry Pi ® is a very affordable, credit-card sized SBC (Single Board Computer) that makes a very effective home automation system when used with Stefan Stromberg's OpenNetHome automation software, as discussed in the previous article.
 Please note that this system does not require an external Internet connection to operate, so if you are concerned about security, this is a good choice. You can access it remotely with an Internet connection, but that functionality is optional.
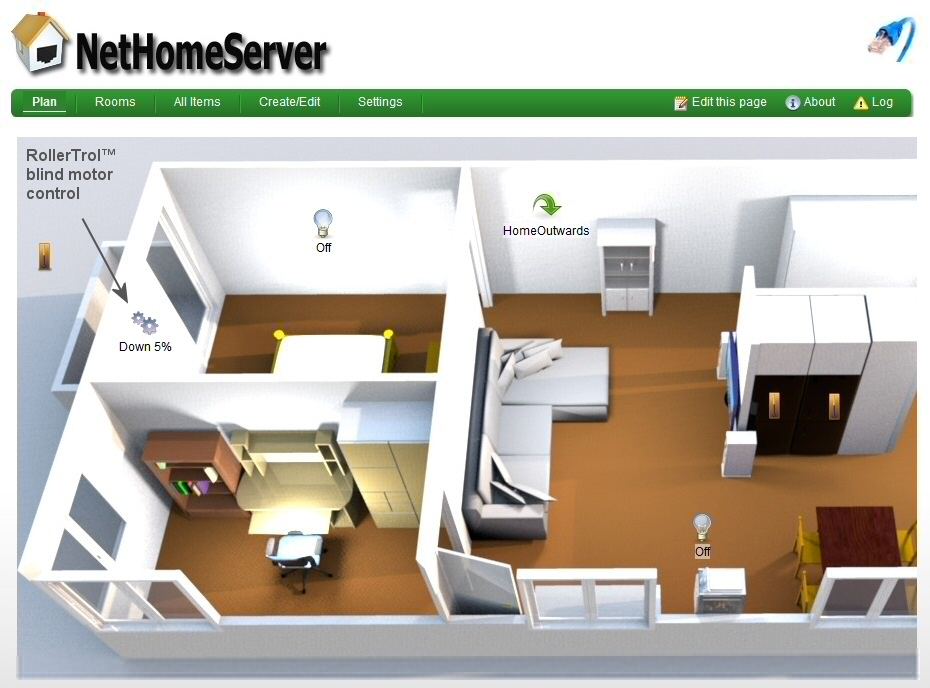
This article will discuss the process of creating devices for remote control of our shade and blind motors, window and skylight openers, and other items. The devices can be subsequently placed on the plan view, as seen in the picture below.
You can also have multiple plan views if you want to focus in detail on a particular area or room in your floorplan view; the next article (part 5) will explain this capability in depth.
The above picture is an actual screen capture of the home plan view (running on the Raspberry Pi). Note that the OpenNetHome system has the ability to display the state of the blind, whether it is fully opened or closed, or part way (Down 5% in picture).
This is accomplished by entering the actual measured excursion time, so that the system can calculate the position. It is re-set whenever it reaches an upper or lower travel limit.
Configuring the USB Transceiver
The first step is to implement device creation for the 433 MHz USB transmitter dongle that sends the radio signals to the addressable receivers used for our motors.
We are using the Jeelink product from Jean-Claude Wippler's excellent Jeelabs product line, sold in the US by Modern Devices. There are 2 versions, please choose the Jeelink Classic Version (433 MHz, RFM12B chip).
You simply plug it in, select the USB port and create the RF transmitter device. For those of you interested in more information about this USB transceiver, we'll cover it later in more detail in another article. Once the Jeelink is installed, you have to select it and activate the RollerTrol motors:
All Items => Hardware => Jeelink => Receiver/Transmitter Protocols (click the button with 3 dots ... to select)
Please note that the screen captures below may be slightly out of date as Stefan's software evolves.
Configuring a Blind Motor
 The process of creating a blind or shade entity is quite straight forward, here are the steps:
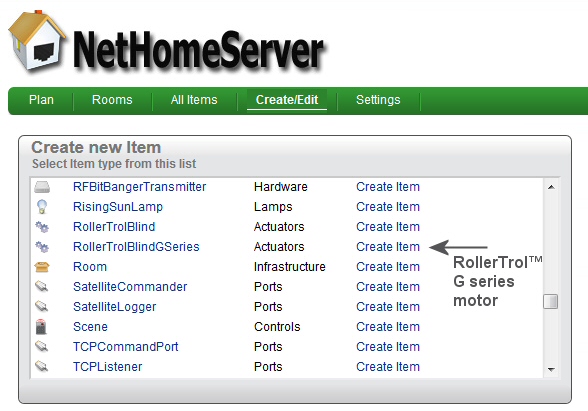
- Click or select Create/Edit from the main menu. This will display a list of available devices that can be created, as shown in the picture at right.
- Scroll down until you reach the RollerTrol Blind Motor selections.
- You can select our original R series protocol type, or the newer G series. For the purposes of this article we will use the G series.
- Please note: G series selection will also work with our window and skylight openers - they use the same remotes.
- Click or select Create Item, this opens the next screen.
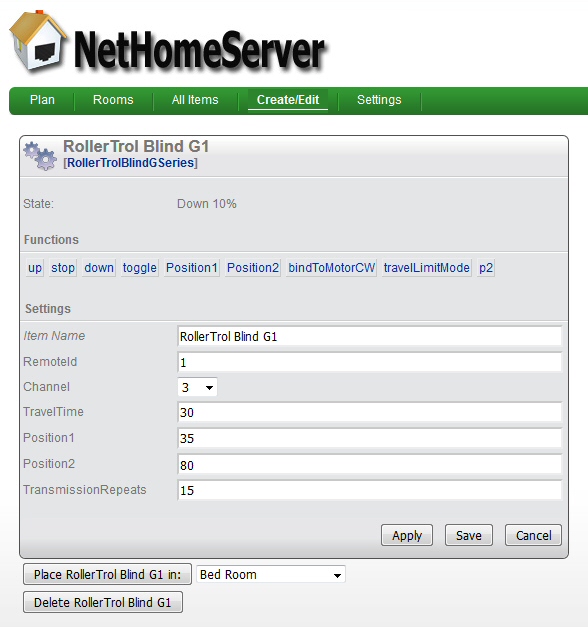
You can think of this configuration as just another remote control; it behaves in a very similar manner as our hand held and wall mount remote controls. For the purposes of this article we are going to assume that you have already created a master channel with a regular hand held or wall mount remote control.
This will allow us to simply clone the master channel to the automation system. Note that only the master remote can set travel limits. You could do it the other way around - configure this as a master channel, and clone it to a hand held or wall mount remote. This article explains how to create a master channel.You can fill in the properties in a similar way to what you see below:
- Item Name: This will be your identifier, call it whatever you like
- Remote ID: This is a virtual ID, you can assign any number
- Channel: Each Remote ID can have up to 15 channels
- Travel Time: Set this (in seconds) to be slightly longer than a full excursion
- Position 1: Set your percentage for an intermediate stop position (based on travel time)
- Position 2: Set your percentage for another intermediate stop position (based on travel time)
- Transmission Repeats: default 15 is typical
- Room: select the room where the device will be located
 When you have entered all the properties, you can press the SAVE button and proceed with the cloning process.
The cloning process is very simple, here are the steps:
- Make sure the REMOTE is set to the master channel you want to clone; the next actions must be completed within 6 seconds of each other.
- Press and release the P2 button TWICE on the REMOTE that holds the master channel, the motor will beep once and jog each time.
- Press and release the P2 button ONCE on the OpenNetHome screen, the motor will beep 7 times and jog.
- At this point, you are finished - the UP/STOP/DOWN/TOGGLE buttons will work, and the travel limits will not be changed.
When you have confirmed the operation, you can press the SAVE button to complete the process.
If you prefer that the automation system is the master channel, this article explains the process of creating a master channel.
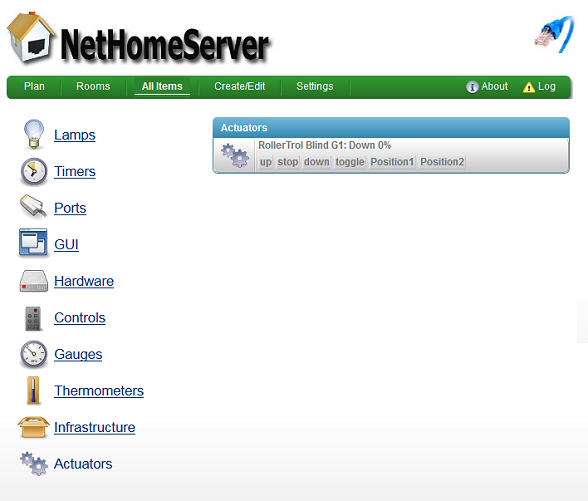
 You can access the settings for a particular device at any time, simply by selecting
All Items => Actuators
The control panel for the motorized item (blind, shade, window/skylight opener, etc) will appear on the right hand side of the screen. You can operate it manually with any of the control buttons. Click or press the name of the device and the settings dialog will appear.
Please Note: Our blind motors and window openers are operated with wall mount and hand held controls, and our system is designed to allow automation to be added at any time. This means you can start with our simple remote controls and add the automation later, and take your time with it. Our remote controls will continue to function while you build your automation system and will also continue to function after the automation is activated.
You can find out where to buy the Pi 2 Model B unit by searching for this phrase: "buy a pi [country]"
Here are some examples using the DuckDuckGo search engine that doesn't track you:
We sincerely hope you enjoy using these articles; if you have any questions, please feel free to contact us at any time!
PART 1: Raspberry Pi As A Home Automation Controller: Introduction
PART 2: Raspberry Pi As A Home Automation Controller: Using NOOBS to Install Raspian
PART 3: Raspberry Pi As A Home Automation Controller: Installing OpenNetHome Software
PART 4: Raspberry Pi As A Home Automation Controller: Creating a Window Blind Device (YOU ARE HERE)
PART 5: Raspberry Pi As A Home Automation Controller: Using 3D Software to Create your Floor Plans

 Shopping Cart Home - Start Here
 Remote Controls for Radio Equipped Motors
 DIY Starter Kits for Window Shades
 DIY Starter Kits for Window Openers
 ZWAVE Blind & Shade Controllers
 How To Choose the Right Blind & Shade Motor
 Select tubular Motor (Comparison table)
 Choose RollerTrol Battery & Solar Motors
 DIY Roller Blind Motors - FAQ
 How To Insert Blind Motors & Attach Brackets
 Calculate your Blind or Shade fabric Weight
 Select Tube Size for Blind Motor
 How to Insert Blind Motors Into Tube
 How to Insert Blind Motors Into Tube with Adapters
 Attach Mounting Brackets - Standard + Mini Series
 Attach Mounting Brackets - MAXI Blind Series
 How To Set Up Radio Equipped Blind & Shade Motors
 Series P Radio Remote Control Motors
 Series G Radio Remote Control Motors
 Series R Radio Remote Control Motors
 BroadLink RF/IR Hub System for Motors
 How To Set Up Window/Skylight Openers
 Introduction: Window & Skylight (K Series)
 BroadLink RF/IR Hub System for Motors
 Z-Wave Interfacing for Shade & Opener Motors
 Wired Wall Switch Control of Window Openers
 How To Use Alexa With Our Motors & Window Openers
 How To Use BroadLink Phone App Hub With Our Motors
 How To Set Up ShadeSlider Skylight or Bottom-Up Blind
 How To Retrofit RV, Boat and Motorhome Blinds
 How To Set Up Non-Radio Motors
 Operation & Travel Limits of Non-Radio Motors
 Make a Simple DC Motor Reversing Switch
 How To Set Up ZWAVE Control
 ZWAVE Controller for G Series Radio motors
 ZWAVE Door/Window Opening Detection
 ZWAVE Motion Detector with Temperature Sensing
 Motorized Window Blinds & Shades
 Motorized Dual Window Shade
 Make Motorized Blackout Blinds
 Phone-Tablet-PC Control for Motorized Blinds
 Mini Motor for Existing Shade Retrofit
 Roman Shade Retrofit
 Make a Motorized Window Opener
 Blind & Shade Motors for RV & Boats
 Make Your Own Projector Screen
 Curtain Closer: Ultimate Home Theater
 Wireless Battery Operated Drapery Motor Kit
 Make a Motorized Bottom-Up Shade
 Make a Motorized Skylight Opener
 BroadLink RF/IR Hub System for Motors
 Why Buy From US?
 Background & Mission Statement
 Customer DIY Testimonials
 Site Map - Search All Pages
 Why Buy From US?
 RollerTrol Users Forum
 Contact Page