FAQ: Do you have 12v replacement motors for RV blinds & shades?
Our aftermarket motors run on 12 volts DC (safe for kids and adults) and can be used as replacement motors for motorized blinds, shades and flagpoles in any RV: motorhomes, travel trailers, etc.
Here's what a recent customer had to say:
"Hi Adrian, I wanted to let you know that I received the motor this morning. The adaptation required to replace my original motor took about an hour. It was actually pretty easy. I reinstalled the shade in the motor home, connected the power and it worked 'good as new' and a lot quieter too. The best part is, I saved more than $169.00. Just printed the instructions for setting the limits, I don’t expect to have any problems there.
Thanks for your help, Stan"
Also, one of our customers has figured out perhaps a better way to do it, instead of the detailed description further down:
"Adrian, I found a much easier way to adapt your motor to automotion tubes ..."
Take the plastic drive gear off of their tube and fill with 2 part epoxy putty. Then Dremel tool ID down to about 3/8 inch. Drill a 25/64 hole in putty and attach E ring. I then drilled a 1/8 hole and secured drive gear to your motor shaft with a 1/8 roll pin from Lowes. Then reassemble. Works great and saves $500!
- Lance
If you're into 3D printing, another customer has very kindly provided the .stl 3D printer file for the drive adapter he has designed for the RV shade replacement motor:
download 3D printer file for RV blind motor drive adapter here.
The following detailed description was provided by one of our clients when he used one of our standard motors to replace a dead motor in a shade made by AutoMotion.
AutoMotion Windshield Shade Motor Replacement
Since AutoMotion won’t sell a replacement motor a different source is needed. I found such a source for replacement motors: RollerTrol Automation System (www.rollertrol.com) up in British Columbia, Canada.
They have a motor that will work: one with twice the torque (part # TMDB-12-25-7-28-NR).
They also have some motors that include a radio control if you want to upgrade to a remote control system but I decided to not add that bit of complexity at this time. For comparison, here are the specs for the OEM motor and the higher capacity replacement:
| SPEC | OEM MOTOR | NEW MOTOR |
|---|---|---|
| Input Voltage | 12VDC | 12VDC |
| Input Power | 8W | 18 W |
| Input Current | 0.66 A | .7 A |
| Speed | 30 rpm | 28 rpm |
| Torque | 0.7 Nm | 0.7 Nm |
| Lift capacity | 6 lbs | 7 lb |
| Diameter | 24 mm | 25 mm |
| Length | 12” | 12” |
I felt that the added torque would only be an asset, and since the wiring, switch, and fuse can support the added current I decided to go with the stronger motor. Ordering online was simple, and the motor arrived promptly – about 4 days in transit. The rep I dealt with (Andrew) was very helpful and prompt with answers to my questions.
With the motor ordered you can begin the project. I removed the shade and worked on it at home, using a blanket held in place with the sun visors to provide privacy while the project was underway. The entire project can be completed in a day but I stretched it out, working on it whenever I had a few free moments, and I wanted to document the project for future reference. The longest step would be letting some epoxy set up completely – I let that step sit for a couple of days to make sure it was fully cured.
Anyway, here’s what I did:
-
You first have to remove the shade assembly from the windshield area of the Motorhome. The wiring is run down the driver’s A pillar so that needs to be removed. The wires were connected with crimp connectors so you need to cut the wires wherever you feel is convenient. The replacement motor comes with a reusable junction block – you can either use that to reconnect the wires, or use your own connections as you see fit. My shade was attached to the overhead Cabinetry with 8 screws. It helps to have someone to hold one end of the shade while you remove the last screws on the other end. Once you have the shade down you can start removing the motor.
- Remove the driver’s side end plate from the shade assembly. It is held on with 3 screws that use a small square drive.
- With the end plate removed the motor can be pulled out of the roller – it might take some serious tugging to get it out because it’s a pretty snug fit, but it will come out. On the outer end of the motor, where the wiring is, there is a round metal plate – this will need to be removed and attached to the new motor, after some modifications. This plate secures the motor to the end plate that was removed above.
- The original motor has a drive gear on the end that is different from the replacement motor drive gear:
-
Another option would be to use a coupler that is slightly less than 1” in outside diameter so that it fits into the roller tube, inside the internal ridges, and then place a 1/8” X 1 ¼” pin in one end, that will slide into opposing ridges in the tube, and an appropriate sized washer on the other end similar to the washer I used above to allow the motor shaft to turn the assembly. I could not find the appropriately sized coupler or washer at my local Home Depot so I went with what I could find, resulting in the method described above.
-
At the other end of the motor you need to remove the round plate from the original motor and attach it to the new motor. There is a tab on each side of this plate – one side slips into the motor end and the other side slips into the end plate, removed above. This offers the motor some stability and attaches it solidly to the shade body. The new motor does not exactly match the old one so I simply removed the tab that slides into the motor, and then drilled new holes in the motor end so that the plate can be secured to the motor end.
-
With this plate in place and the drive gear in place on the other end of the motor you can slide the motor into the roller tube and replace the end cap that was removed way back in step 2. I noticed that the end cap does not fit flush with the rest of the housing – there is about ¼” gap between the pieces, so you can use some standoffs to fill the void, or stack some small washers to fill the void.
-
The shade should now be ready to be reinstalled in your windshield and connected up to the control wires. Again, it helps to have an assistant for this step – they can hold one end of the shade in position while you replace the screws to secure the other end to the cabinetry. Once it’s reattached, run the wires down the driver’s A-pillar and connect them to the wires coming from the switch. You’ll have to test it to make sure the shade direction corresponds to the switch direction – pushing “UP” on the switch actually makes the shade go UP, etc. before buttoning everything up. Then replace the A-pillar and enjoy your operational shade!
-
The total expense for the project:
a. Motor ordered from RollerTrol Automation Systems (www.rollertrol.com) – part number TMDB-12-25-7-28-NR
b. ¾” conduit coupler: $0.24
c. 1/8” X 1” fender washer: $0.15
d. TOTAL: $93.39
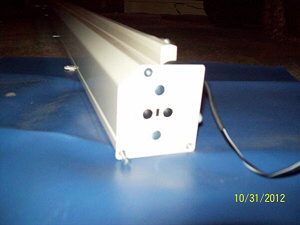
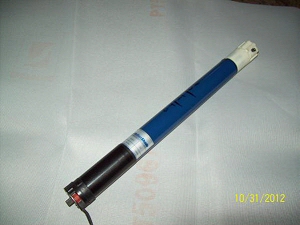
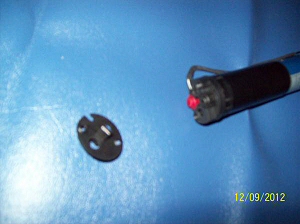
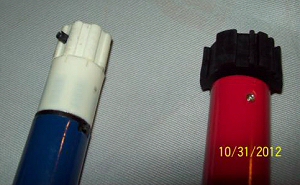
Original drive on left; new drive on right
The original drive gear is a plastic assembly that is held onto the motor shaft with a screw going into the end of the shaft. There is a 1/8” rolled pin placed through the plastic piece, as seen in the photo above, which fits into the ridges in the roller tube, providing the drive coupling. The new motor has a drive gear attached to the motor shaft with an “E” ring. I investigated whether to use the original drive gear or the replacement. The replacement gear has an outside diameter of 1 3/8” while the roller has an inside diameter of 1 ¼” – it’s a bit too big. It could be made smaller by grinding it down but that is a lot of work. Another option is to adapt the original drive gear to the new motor. I chose a third option: duplicate the new drive using common off-the-shelf parts with the correct dimensions to fit into the roller tube and mesh with the protrusions inside the tube:
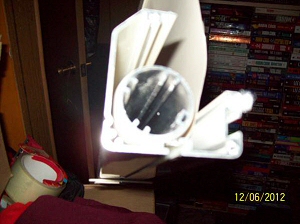
The drive gear needs to have a shape that will fit into the roller – it will look something like this:
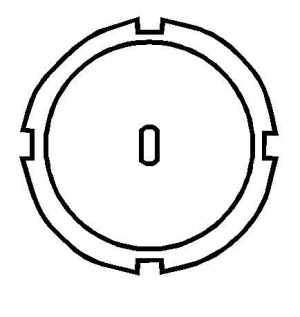
The internal dimensions of the roller tube are 1 ¼” diameter, with the protrusions having a 1” diameter so the four notches in the drive must accommodate those dimensions. The notches need to be 3/8” wide. The bottom plate of the drive has a slot that fits onto the motor shaft – this slot is ¼” long and 3/16” wide. The whole drive should be around ½” tall but the actual height is probably not important so long as it slides into the roller tube. Someone with the right facilities could manufacture a nice professional-looking part, but I don’t have a CNC machine or any other machine shop tools so I decided to build it out of commonly available parts from a local hardware shop. So I went to Home Depot and bought a plastic ¾” electrical conduit coupler, and a 1” fender washer with a 1/8” hole in it. The fender washer will be epoxied onto the end of the coupler, to provide a means of attaching to the motor shaft. This shaft is about ¼” in diameter, with flats on opposing sides making it about 5/32” across the flats:
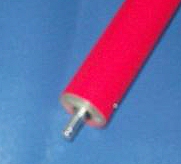
So, that means the parts need to be modified slightly: the coupler needs to have some grooves in it to accommodate the ridges in the roller tube, and the washer needs to have its center hole elongated to fit onto the motor shaft. This is what the coupler looks like after the grooves have been added:
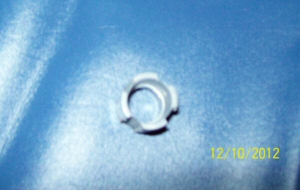
Once the coupler has been modified to fit inside the roller tube, and the washer modified to fit on the motor shaft, the two pieces can be epoxied together. When the epoxy is dry you can make final adjustments with a Dremel tool to make sure the whole thing fits inside the roller tube. When it is complete it can be installed on the end of the motor shaft using the E-ring that was holding the original drive gear in place. Since the coupler is 1 ½” long it might be a good idea to shorten it to make it easier to fit the “E” ring in place but you can leave it the full length if you want. I left it the full length of 1 ½” and used some long needle-nosed pliers to install the E-ring.
This is a link to the Automotion™ replacement motor:
motorhome shade replacement motor
This is a link to a list of all blind motor starter kits:
Here's a dual shade example for an RV, kindly provided by one of our customers:
We sincerely hope you enjoy using these advanced motors; if you have any questions, please feel free to contact us at any time!

 Shopping Cart Home - Start Here
 Remote Controls for Radio Equipped Motors
 DIY Starter Kits for Window Shades
 DIY Starter Kits for Window Openers
 ZWAVE Blind & Shade Controllers
 How To Choose the Right Blind & Shade Motor
 Select tubular Motor (Comparison table)
 Choose RollerTrol Battery & Solar Motors
 DIY Roller Blind Motors - FAQ
 How To Insert Blind Motors & Attach Brackets
 Calculate your Blind or Shade fabric Weight
 Select Tube Size for Blind Motor
 How to Insert Blind Motors Into Tube
 How to Insert Blind Motors Into Tube with Adapters
 Attach Mounting Brackets - Standard + Mini Series
 Attach Mounting Brackets - MAXI Blind Series
 How To Set Up Radio Equipped Blind & Shade Motors
 Series P Radio Remote Control Motors
 Series G Radio Remote Control Motors
 Series R Radio Remote Control Motors
 BroadLink RF/IR Hub System for Motors
 How To Set Up Window/Skylight Openers
 Introduction: Window & Skylight (K Series)
 BroadLink RF/IR Hub System for Motors
 Z-Wave Interfacing for Shade & Opener Motors
 Wired Wall Switch Control of Window Openers
 How To Use Alexa With Our Motors & Window Openers
 How To Use BroadLink Phone App Hub With Our Motors
 How To Set Up ShadeSlider Skylight or Bottom-Up Blind
 How To Retrofit RV, Boat and Motorhome Blinds
 How To Set Up Non-Radio Motors
 Operation & Travel Limits of Non-Radio Motors
 Make a Simple DC Motor Reversing Switch
 How To Set Up ZWAVE Control
 ZWAVE Controller for G Series Radio motors
 ZWAVE Door/Window Opening Detection
 ZWAVE Motion Detector with Temperature Sensing
 Motorized Window Blinds & Shades
 Motorized Dual Window Shade
 Make Motorized Blackout Blinds
 Phone-Tablet-PC Control for Motorized Blinds
 Mini Motor for Existing Shade Retrofit
 Roman Shade Retrofit
 Make a Motorized Window Opener
 Blind & Shade Motors for RV & Boats
 Make Your Own Projector Screen
 Curtain Closer: Ultimate Home Theater
 Wireless Battery Operated Drapery Motor Kit
 Make a Motorized Bottom-Up Shade
 Make a Motorized Skylight Opener
 BroadLink RF/IR Hub System for Motors
 Why Buy From US?
 Background & Mission Statement
 Customer DIY Testimonials
 Site Map - Search All Pages
 Why Buy From US?
 RollerTrol Users Forum
 Contact Page