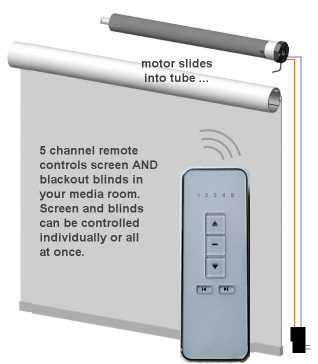
FAQ: Can you show me how to motorize my existing roller blinds? The tube is 2" Rollease with Mermet material and a continuous cord loop lift system
Our standard motors are designed to fit Rollease 1.5" tubing, but larger blinds and shades sometimes require a larger size, such as 2".
We have 1.5" -> 2" adapters that allow the use of our standard size motors with two inch tubing. In this article, we'll show you how to install the motors into larger tubes with the special adapters.
If you are doing a motorization retrofit of an existing manual shade, you would remove the clutch mechanism from one end, where you are going to insert the motor. Further to the retrofit situation, you may also be able to use the existing idler mounting at the other end of the tube, or you may prefer to use the one supplied with the motor, as discussed below.
Note that the motors can be permanently programmed (with the remote) to operate normally in either direction, so you can choose whichever end you prefer. Please see the instructions link that came with your shipping notice for the blind and shade motor programming instructions.
1. Overview of the parts:
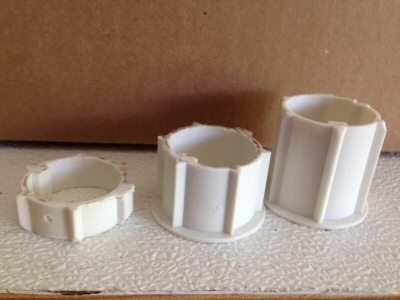 Each roller uses 1 adapter set to increase the drive diameter from 1.5 inch to 2.0 inch tubing, and the adapter set has 3 pieces to fit the 3 rotating parts (as shown in the picture below):
- the drive adapter that is on the motor output axle - note the drilled hole that you can use for a small setscrew to lock the
- the crown roller at the plastic power and setting button end of the motor
- the tube end cap idler that fits in the tube end opposite to the motor end
The cylindrical motor housing of the tubular motor remains stationary and is locked to the mounting bracket with a tab, while the drive adapter rotates the tube.
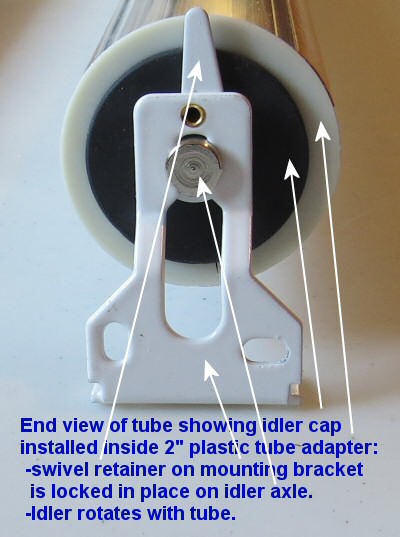
At the other end of the tube, a rubber idler wheel cap is inserted into another plastic up-sizing adapter (not shown in layout below) and then the 2 assembled pieces are inserted into the tube; the idler rotates freely with the tube.
The idler shaft has a cut-out channel machined into it that allows the idler wheel to slide into place on the bracket, and the mounting bracket for that end has a swivel clip that locks the axle for the idler into a slot on the bracket.
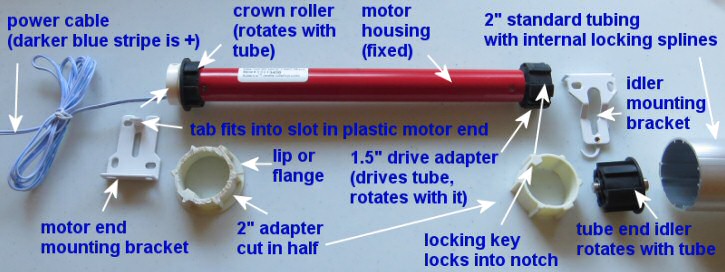
2. How to slide on the drive adapters for 2" tubing:
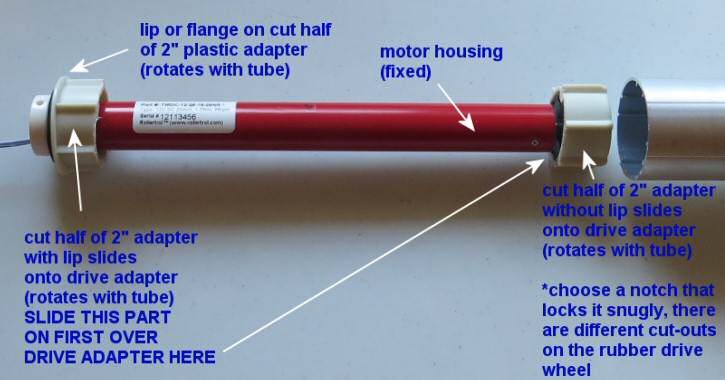
After cutting one of the 2" adapters in half (hacksaw and vise works well), you end up with 2 different pieces - one with a lip (aka flange), and one without. The flanged piece slides on first, over the drive adapter and along the motor body, until it reaches the crown roller.
Note that the flange needs to be on the outside of the motor (this prevents the motor from sliding past the outer end of the tube). The adapter also has a 'key' molded into the plastic that is designed to lock into the notches cut into crown roller. There are different sizes of cut-outs on the crown roller to accommodate different adapter profiles, so you should try and use one that fits the adapter snugly, to minimize any slack.
Once the crown roller is set up in this way, the other 'flangeless' adapter half is inserted onto the rubber drive adapter. The same principal applies here - use a cut-out notch in the drive adapter that fits the key snugly, as per the end view in the picture further down.
3. Motor end view of drive adapter on motor axle, with 2" adapter installed, note key locked inside cut-out:
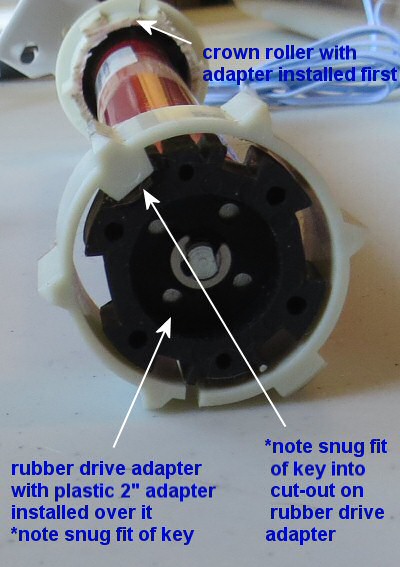 Here we see the adpater key locked snugly into place on the drive adapter. If you were using 1 1/2" tubing, you would not need the plastic upsizing adapters, but the procedure for inserting the motors into the tube would be the same.
The standard Rollease® style tubing has internal splines that are formed when the aluminum is extruded during the manufacturing process.
The drive adapters have ridges molded into them so that when you slide the motor into the tube, it locks the two together so that there is no slippage as the roller shade is deployed and retracted.
This eliminates the need to drill a hole to insert a setscrew or locking pin, as you would normally have to do if you used a piece of pipe or tubing with a smooth inside surface.
Note the 'C clip' on the motor drive shaft that holds the drive adapter in place on the axle.
You can remove the drive adapter and use these motors to drive many other things, other than roller shades.
For example, we have customers that motorize sliding cupboard doors, disappearing TV stands, aquarium lids, etc.
You are only limited by your imagination in the different ways that these motors can be used!
4. Tube end view showing tab detail where it locks into motor slot:
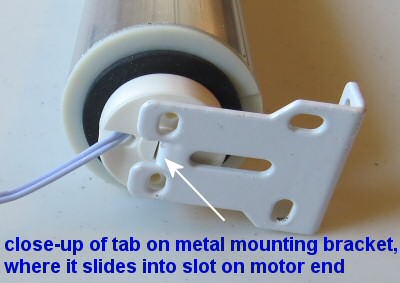
5. Tube end view showing idler locked into mounting bracket (with 2" plastic adapter installed):
more information about DIY tubing and pipe for roller shades
Our "Mini" series fits existing retail blinds that have an inside roller diameter of 3/4" (18mm) or more. Here is an article about rerofitting roller blinds from Home Depot with our Mini motors:
retrofit existing roller shades from Home Depot
We sincerely hope you enjoy using these advanced motors; if you have any questions, please feel free to contact us at any time!

 Shopping Cart Home - Start Here
 Remote Controls for Radio Equipped Motors
 DIY Starter Kits for Window Shades
 DIY Starter Kits for Window Openers
 ZWAVE Blind & Shade Controllers
 How To Choose the Right Blind & Shade Motor
 Select tubular Motor (Comparison table)
 Choose RollerTrol Battery & Solar Motors
 DIY Roller Blind Motors - FAQ
 How To Insert Blind Motors & Attach Brackets
 Calculate your Blind or Shade fabric Weight
 Select Tube Size for Blind Motor
 How to Insert Blind Motors Into Tube
 How to Insert Blind Motors Into Tube with Adapters
 Attach Mounting Brackets - Standard + Mini Series
 Attach Mounting Brackets - MAXI Blind Series
 How To Set Up Radio Equipped Blind & Shade Motors
 Series P Radio Remote Control Motors
 Series G Radio Remote Control Motors
 Series R Radio Remote Control Motors
 BroadLink RF/IR Hub System for Motors
 How To Set Up Window/Skylight Openers
 Introduction: Window & Skylight (K Series)
 BroadLink RF/IR Hub System for Motors
 Z-Wave Interfacing for Shade & Opener Motors
 Wired Wall Switch Control of Window Openers
 How To Use Alexa With Our Motors & Window Openers
 How To Use BroadLink Phone App Hub With Our Motors
 How To Set Up ShadeSlider Skylight or Bottom-Up Blind
 How To Retrofit RV, Boat and Motorhome Blinds
 How To Set Up Non-Radio Motors
 Operation & Travel Limits of Non-Radio Motors
 Make a Simple DC Motor Reversing Switch
 How To Set Up ZWAVE Control
 ZWAVE Controller for G Series Radio motors
 ZWAVE Door/Window Opening Detection
 ZWAVE Motion Detector with Temperature Sensing
 Motorized Window Blinds & Shades
 Motorized Dual Window Shade
 Make Motorized Blackout Blinds
 Phone-Tablet-PC Control for Motorized Blinds
 Mini Motor for Existing Shade Retrofit
 Roman Shade Retrofit
 Make a Motorized Window Opener
 Blind & Shade Motors for RV & Boats
 Make Your Own Projector Screen
 Curtain Closer: Ultimate Home Theater
 Wireless Battery Operated Drapery Motor Kit
 Make a Motorized Bottom-Up Shade
 Make a Motorized Skylight Opener
 BroadLink RF/IR Hub System for Motors
 Why Buy From US?
 Background & Mission Statement
 Customer DIY Testimonials
 Site Map - Search All Pages
 Why Buy From US?
 RollerTrol Users Forum
 Contact Page