
 Shopping Cart Home - Start Here
 Remote Controls for Radio Equipped Motors
 DIY Starter Kits for Window Shades
 DIY Starter Kits for Window Openers
 ZWAVE Blind & Shade Controllers
 How To Choose the Right Blind & Shade Motor
 Select tubular Motor (Comparison table)
 Choose RollerTrol Battery & Solar Motors
 DIY Roller Blind Motors - FAQ
 How To Insert Blind Motors & Attach Brackets
 Calculate your Blind or Shade fabric Weight
 Select Tube Size for Blind Motor
 How to Insert Blind Motors Into Tube
 How to Insert Blind Motors Into Tube with Adapters
 Attach Mounting Brackets - Standard + Mini Series
 Attach Mounting Brackets - MAXI Blind Series
 How To Set Up Radio Equipped Blind & Shade Motors
 Series P Radio Remote Control Motors
 Series G Radio Remote Control Motors
 Series R Radio Remote Control Motors
 BroadLink RF/IR Hub System for Motors
 How To Set Up Window/Skylight Openers
 Introduction: Window & Skylight (K Series)
 BroadLink RF/IR Hub System for Motors
 Z-Wave Interfacing for Shade & Opener Motors
 Wired Wall Switch Control of Window Openers
 How To Use Alexa With Our Motors & Window Openers
 How To Use BroadLink Phone App Hub With Our Motors
 How To Set Up ShadeSlider Skylight or Bottom-Up Blind
 How To Retrofit RV, Boat and Motorhome Blinds
 How To Set Up Non-Radio Motors
 Operation & Travel Limits of Non-Radio Motors
 Make a Simple DC Motor Reversing Switch
 How To Set Up ZWAVE Control
 ZWAVE Controller for G Series Radio motors
 ZWAVE Door/Window Opening Detection
 ZWAVE Motion Detector with Temperature Sensing
 Motorized Window Blinds & Shades
 Motorized Dual Window Shade
 Make Motorized Blackout Blinds
 Phone-Tablet-PC Control for Motorized Blinds
 Mini Motor for Existing Shade Retrofit
 Roman Shade Retrofit
 Make a Motorized Window Opener
 Blind & Shade Motors for RV & Boats
 Make Your Own Projector Screen
 Curtain Closer: Ultimate Home Theater
 Wireless Battery Operated Drapery Motor Kit
 Make a Motorized Bottom-Up Shade
 Make a Motorized Skylight Opener
 BroadLink RF/IR Hub System for Motors
 Why Buy From US?
 Background & Mission Statement
 Customer DIY Testimonials
 Site Map - Search All Pages
 Why Buy From US?
 RollerTrol Users Forum
 Contact Page
Install Thermostat Regulator - 12 Volt Power for Awning Windows and Louvre Motors
Adrian Biffen, Senior Partner
October 2023
---
Thank you very much for selecting our thermostat control and air conditioning (AC) of 12 volt window motors, including single hung window motors, louvres, and awning window openers with stainless steel chain. Note that you can also use these in RV applications.
Please read this manual prior to installation and before use for correct application and maintenance.
Please Note: The temperature sensor probe MUST BE CONNECTED to terminal 3 and 4, otherwise you will get an "Error" (Er) message on the display.
We have separated the instructions to provide for a A. Quick Start Guide - please see B. Detailed Notes at the end of this page.
A. Quick Start Guide for Powered Motors:
Thermostat showing measured Temp in Fahrenheit:

Quick Check of Settings: (we pre-configure kits for you)
- Temperature setting for upper limit of range:
Press and release UP button, controller will display upper limit of temperature range for 2 seconds. - Temperature set for lower limit of range:
Press and release DOWN button, controller will display DIFFERENCE value for 2 seconds. - Compressor start delay:
This setting is OPTIONAL, and will FLASH (if set) during delay period. The delay can be set for 0 to 10 minutes.
Wiring Diagram:

Main Features:
- Fahrenheit or Celsius can be displayed.
- Automatic switching between heating and cooling modes.
- Control the temperature by setting the upper limit and difference.
- Using an accurate thermometer, the thermostat can be calibrated.
- Compressor output delay protection for refrigeration.
- Alarm sounds when temperature exceeds the limit or temperature sensor fails.
Operation:
If the measured temperature is greater than the temperature set value, the thermostat commences COOLING - the COOL LED is turned on, and the relay is activated.
If the measured temperature is less than the temperature set value, the COOL LED is turned off, and the relay turns off.
If the measured temperature is less than the temperature set value - DIFFERENCE set value, the thermostat commences HEATING - the HEAT LED is turned on, and the relay turns on.
If the measured temperature is greater than the temperature set value - DIFFERENCE set value, the HEAT LED is turned off, and the relay turns off.
4 Push Button Controls:

Clockwise from left:
- Power (and SAVE)
- UP button
- DOWN button
- Setting button (S)
5 Setting Screens (after holding "S" button for 3 seconds):
Note: the SET LED is active in all cases, as indicated in first picture. Please cycle through the screens by pressing the UP or DOWN buttons:
1. Setting Upper Limit (tS-temperature set value):

2. Setting Lower Limit DIFFERENCE (dS-difference set value):

3. Setting Compressor Delay (Pt-compressor 0 to 10 minutes delay):

4. Setting Calibration (CA-temperature calibration value):

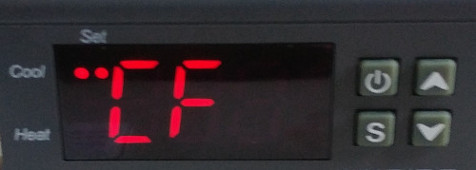
5. Setting Fahrenheit or Celsius (CF-Fahrenheit or Celsius setting):
To Set Upper Limit of Range:
- Hold down the S button for a minimum of 3 seconds.
- You should see a tS displayed (SET LED is lit).
- Press and release the S button.
- Adjust the UP or DOWN keys until the desired temperature is displayed.
- Press and release the POWER button to SAVE the setting (temperature set value will be saved).
- After SAVE, the system will change to the measured temperature.
Please Note: After SAVE (Power button), the controller will display "Er" for 3 seconds (if there is an error), and the alarm will sound. Press any button to disable alarm.
To set lower limit of range (DIFFERENCE temperature):
- Hold down the S button for a minimum of 3 seconds
- You should see a tS displayed (SET LED is lit)
- Press and release the UP button once to display the DIFFERENCE parameter (dS)
- Press and release the S button
- Adjust the UP or DOWN keys until the desired temperature DIFFERENCE is displayed
- Press and release the POWER button to SAVE the setting (desired temperature DIFFERENCE will be set)
- The system will change to the measured temperature
Please Note: After SAVE (Power button), the controller will display "Er" for 3 seconds (if there is an error), and the alarm will sound. Press any button to disable alarm.
To Set Compressor Delay (Pt-compressor 0 to 10 minutes delay):
For window motors, this is disabled (0 minutes), but can be set to a maximum of 10 minutes. Please see instructions above if you need to change this, but the display will change to "Pt".
To Set Calibration of Measured Temperature:
This is normally done with an accurate thermometer. If you take a reading from the thermometer, you can set the thermostat to the same setting. Here are the steps:
- Hold down the S button for a minimum of 3 seconds
- You should see a tS displayed (SET LED is lit)
- Press and release the UP button until you see CA displayed
- Press and release the S button
- Adjust the UP or DOWN keys until the desired temperature is displayed
- Press and release the POWER button to SAVE the setting (measured temperature will be set)
- The system will change to the measured temperature
Please Note: After SAVE (Power button), the controller will display "Er" for 3 seconds (if there is an error), and the alarm will sound. Press any button to disable alarm.
To Set Fahrenheit or Celsius:
We have not included this in the Quick Start guide because we normally pre-program this setting. Please see the "B. Detailed Instructions" below, if you need to change this.
END of QUICK START GUIDE
B. Detailed Instructions for Automating Thermostats:
Error Messages on LED Display:
Please Note: The temperature sensor probe MUST BE CONNECTED to terminal 3 and 4, otherwise you will get an "Error" (Er) message on the display.
If the temperature sensor is disconnected, or short circuit, or open circuit (temperature sensor probe is possibly defective), the thermostat controller starts sensor error mode and disables the system. The buzzer alarm sounds and the screen displays Er - you can press any key to silence the alarm.
The system will return to normal working status and the measured temperature will be displayed.
Over-Temperature Alarm:
When the measured temperature exceeds the measured temperature range, the system starts the over-temperature error alarm mode and disables the thermostat controller. The buzzer alarm sounds and the screen displays HR - you can press any key to silence the alarm.
The system will return to normal working status when normal temperature range is detected (the measured temperature will be displayed).
Safety Precautions:
The thermostat and motors are powered by 12 volts DC, so there is no shock hazard.
Ensure that the product is used within specifications, especially especially the relays. Our single/double hung motors and awning window motors use a maximum of 2 amps, and our heavy duty actuators use a maximum of 4 amps. The relays are rated at a maximum of 10 amps of current.
Do not allow metal fragments, wire clippings, fine metal shavings or file residues to enter the thermostat during installation - otherwise it could fail.
Do not allow the thermostat to be used in the presence of flammable and explosive gases.
If the output relays are used past their life expectancy, contact fusing or burning may occasionally occur. Always consider the application conditions and use the output relays within their rated load and electrical life expectancy.
To Restore Default Settings:
If the thermostat controller is changed from Celsius to Fahrenheit (or system is changed from Fahrenheit to Celsius), all the settings are changed to the default values:
When the set temperature is degrees Fahrenheit:
tS - temperature set value: 50.00 °F
dS - difference value: 3.00 °F
Pt - compressor delay: 3 minutes
CA - calibration: 0 degrees

When the set temperature is degrees Celsius:
tS - temperature set value: 10.00 °C
dS - difference value: 1.00 °C
Pt - compressor delay: 3 minutes
CA - calibration: 0 degrees

Mounting Dimensions:
Front Panel Size (inch): 2.95(L) x 1.35(H)
Front Panel Size (mm): 75 (L) x 34.5 (H)
Body Size (inch): 2.79(L) x 1.14(H)
Body Size (mm): 71(L) x 29(W)
Product Size (inch): 2.95(L) x 1.35(H) x 3.34(D)
Product Size (mm): 75(L) x 34.5(H) x 85(D)
Technical Parameters:
Temperature measuring range: -50 to 210 °F or -50 to 99 °C
Electronic Resolution: 0.1 °F or 0.1 °C
Electronic Accuracy: ±1 °F (-50 °F to 160 °F) or ±1 °C (-50 °C - 70 °C)
Power supply: 12 volts DC
Power consumption: less than 3 watts
Temperature sensor: NTC (Negative Temperature Coefficient) mechanical thermistor
Relay contact capacity: 10 ampere (both heating and cooling)
Ambient temperature: 0 °C to 60 °C
Relative humidity: 20% - 85% (no condensate)
To Change from Celsius to Fahrenheit:
Please Note: If the display shows ℉ it means we have pre-programmed it for you; please see Quick Check of Settings above.
- Hold down Power button for 1 second to power the unit ON (if it is turned OFF).
- Press and hold the S (Setting) button for a minimum of 3 seconds, then release it (the SET indicator LED will switch on).
- If no further action is taken, the ITC-1000F unit will revert to the saved settings AFTER 10 SECONDS.
- Press the DOWN or UP buttons until you see CF on the display screen.
- Press the S button and release it; the C character will be flashing on the screen display.
- If you want to display the temperature as Fahrenheit (F), press and release the UP or DOWN key to display F (flashing).
- Press and release the POWER button to SAVE.
- The display screen will revert to the correct temperature (in Fahrenheit).
- If you want to change it back to Celsius, please follow the same procedure.
END of DETAILED INSTRUCTIONS
Examples of Thermostat Control of Window Motors (including RV, Motorhome, & Trailer)
Please note that all thermostat kits come with 5 channel remote control and DC power supplies. If you are looking for DC power supplies, it is found under the "Accesories" category.
Thermostat Control of Single and Double Hung Window Motors
RollerTrol™ is a leading manufacturer of high-quality window motors for single-hung and double-hung windows. Single-hung windows have a fixed top sash and a lower sash that can be raised and lowered. Double hung windows have 2 moveable panes, but work in a similar way.
RollerTrol's SLIDER window motors are designed to work with both types of windows, providing smooth operation that are easy to control with thermostats.
Please note that these SLIDERS are always custom manufactured in our factory, set to the opening distance that you need.

Thermostat Control of Awning Window Motors with Chain Actuators:

Thermostat Control of Motorized Louvres:
Here is a short video of motorized louvres:
Contact Us 24/7 About Slides for Single Hung Window Motors (or anthing else)
We sincerely hope you enjoyed this article about using these advanced 12v motorized windows, shade blinds, and louvers; if you have any questions, please feel free to contact us at any time!